
















RV carbon monoxide alarm check: test, replace and place the generator safely
Test an RV carbon monoxide alarm by its exact manual, make a model-specific replacement decision, and place a campsite generator beyond nearby openings.

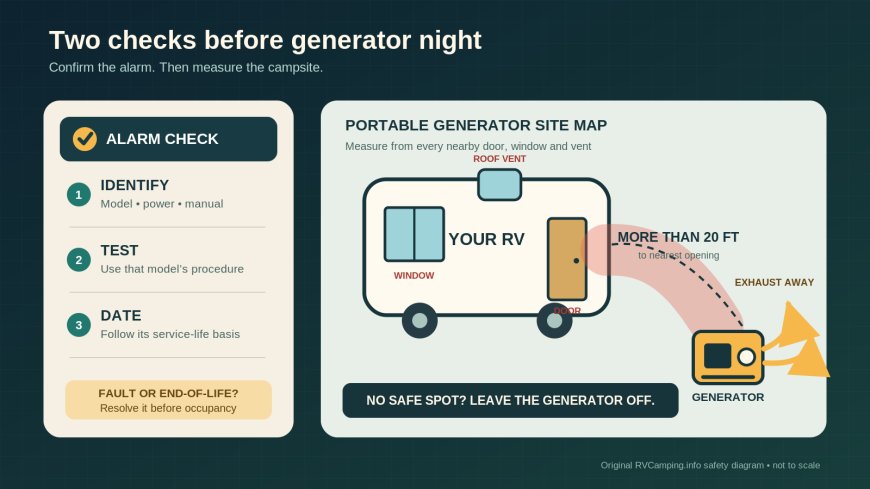
A safe campsite setup needs two separate defenses. The RV carbon monoxide alarm must be powered, within its service life and able to pass the test specified for that exact model. A portable generator belongs outdoors, beyond the required clearance from doors, windows and vents, with its exhaust aimed away from every occupied space.[1][2][3]
Do both checks before anyone settles in for the night.[1][3] An alarm does not make poor generator placement safe, and a well-placed generator does not excuse a dead alarm.[1][2]
If the alarm sounds, leave first
Carbon monoxide has no color or smell. Headache, dizziness, weakness, stomach upset, vomiting, chest pain and confusion are common poisoning symptoms; someone who is asleep or impaired may not notice symptoms in time.[2]
Treat an RV alarm as an evacuation signal, not a troubleshooting invitation.[1][3] Get everyone and every pet into fresh air, account for the group, call 911 from outside and follow the alarm manual.[1][3] CPSC tells consumers not to dismiss a CO alarm and to go outside immediately before calling 911.[1]
Do not silence the unit and go back to bed.[1] Do not enter to open more windows, shut down an appliance or collect gear unless emergency personnel say the space is safe.[1][3] A generator can be turned off only if its control is reachable from fresh air without moving through exhaust.[1]
Identify the alarm before pressing anything
Start with a phone photo of the alarm face and another of its side or back label.[3] Record:
- manufacturer and complete model number;
- whether it detects CO only or combines CO with propane or smoke detection;
- manufacture, installation and replace-by dates shown on the device;
- power source, including a hardwired 12-volt circuit, replaceable battery or sealed battery;
- normal indicator pattern, low-power warning, fault signal and end-of-life signal;
- the test schedule and procedure in the matching manual.
The distinction between manufacture date, installation date and time in service matters.[3] Use the date basis printed on the alarm or stated in its manual.[3] If you cannot identify the model, obtain the RV build sheet or ask the RV maker, dealer or alarm manufacturer for help. Do not guess from a similar-looking unit.[3]
Confirm that the installed model is approved for RV use and for its present location.[3] A household alarm may have different environmental limits, mounting instructions or listing.[3] A combination propane/CO unit can also have a low mounting location chosen for propane detection; moving it higher based on household CO advice could defeat its intended installation.[3] Follow the RV maker and exact alarm instructions.[3]
Run the test the installed model calls for
Testing frequency is not universal. CPSC's portable-generator guide gives monthly alarm testing as broad household advice.[1] The SAFE-T-ALERT 25-741 RV combination alarm manual is stricter for that device: test after storage, before a trip and at least weekly while the RV is in use.[3] Follow whichever instructions govern your installed alarm; a monthly calendar must not replace a model's pre-trip or weekly requirement.
For a routine button test, use this workflow only where it agrees with the installed alarm's manual:[3]
- Put the RV battery and disconnect system in the normal occupied-camping configuration. Restore the alarm's required power.[3]
- Check that vents on the alarm face are open. Remove dust with only the method permitted by its manual.[3]
- Tell everyone a test will sound. Keep children and pets away from the horn.
- Press and hold the test control for exactly the duration in the manual.[3]
- Compare the light pattern, horn sequence and display with the manual, not with another alarm in the RV.[3]
- Release the control, wait for the stated return to normal and confirm the normal power indication.[3]
- Log the date, model, result and any warning pattern.
On the cited SAFE-T-ALERT 25-741, the button checks electrical functions rather than sensor response.[3] Its manual gives a separate, product-specific method for checking the CO sensor with the manufacturer's CO test gas. It explicitly warns owners not to create carbon monoxide for a test.[3] Never use generator exhaust, a vehicle tailpipe, a stove, a candle or a smoldering object to challenge an alarm.
A successful button test proves only what that alarm's instructions say it proves.[3] It does not certify the furnace, water heater, generator exhaust, seals or ventilation.[3] Keep those systems on their own inspection and maintenance schedules.[3]
Know what counts as a failed check
Stop and resolve the problem before sleeping in the RV if:[3]
- the required power or normal-status light is absent;
- the horn, display or indicator sequence differs from the manual;
- a fault or end-of-life signal appears;
- the case, wiring, connector or mounting plate is damaged;
- paint, dirt, insect debris, furniture, bedding or storage blocks the openings;
- the model, age or replacement basis cannot be confirmed.
Check supply voltage and fuses only as the RV and alarm manuals direct.[3] A hardwired unit may be silent because the house-battery disconnect is off, the battery is depleted or a circuit has failed.[3] Do not make quietness the goal by unplugging the device or pulling its fuse.[3] If the prescribed reset and power checks do not restore the documented normal state, replace the alarm or obtain qualified service before occupancy.[3]
Replace by the exact device instructions
There is no defensible retirement age for every RV CO alarm. The sensor, power design and product instructions vary. Replace the unit when its label or manual says its service life has ended, when it gives an end-of-life signal, when it cannot pass its required test, or when damage or contamination makes operation uncertain.[2][3]
The five-year language in the SAFE-T-ALERT 25-741 manual applies to that 25 Series model. The manual recommends replacement after five years of service and describes its own end-of-life pattern and limited reset period.[3] That is not permission to assign five years to a different alarm. CDC's general page also tells readers to follow the detector manufacturer's replacement instructions.[2]
For an unknown-age alarm, search the model manual and decode its markings with the manufacturer.[3] If the relevant date still cannot be established, replacement is the safer practical choice. Match the replacement to the RV manufacturer's requirements, the alarm listing, voltage, detector type and mounting location.[3] Combination units are not automatically interchangeable with CO-only units.[3]
After installation, write the date and calculated replacement deadline where the product instructions specify, save the manual offline and test the new unit.[3] Do not discard the old alarm as proof that the new one works; complete the new-device test first, then dispose of the retired product under its battery and local waste instructions.[3]
Map a portable-generator site before starting it
This alarm-centered check complements our full portable-generator campsite placement guide, which covers shared-site boundaries, enclosures and equipment-manual clearances in more detail.
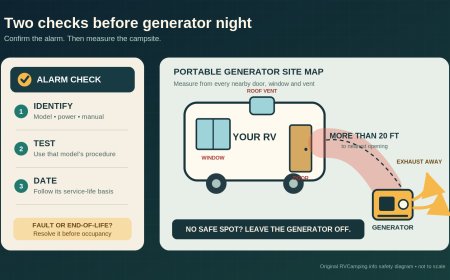
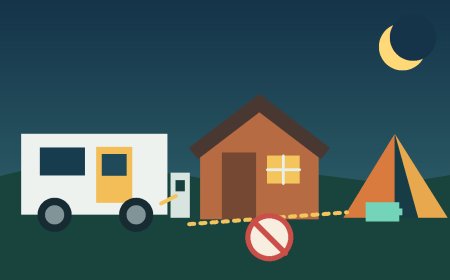
CPSC says a portable generator should operate outdoors, at least 20 feet from a house, with exhaust directed away from the home and other buildings.[1] CDC advises more than 20 feet between a generator and windows, doors or vents.[2]
At a campground, apply those distances to the nearest opening of any occupied RV, tent, cabin or building, not only your own rig. This is a conservative campsite application of the federal household guidance. Measure the shortest route from the generator to each door, openable window, roof vent, furnace or water-heater opening, and any neighboring intake. More than 20 feet from your window is not enough if the generator sits beside the next trailer's door.[1][2]
Use this placement order, together with the generator manual and campground rules:[1][2]
- Mark every occupied space and air opening around the site, including the neighbor's setup.[1][2]
- Find ground outdoors that meets the generator manual, campground rules and the federal separation guidance.[1][2]
- Point the exhaust away from RVs, tents, cabins and shared facilities. Do not aim it under another rig.[1][2]
- Keep the unit out of awnings, screen rooms, porches, storage bays, truck beds with covers, cargo trailers and other partly enclosed areas.[1][2]
- Route the cord without moving the generator closer, creating a trip hazard or inviting water into a connection.
- Recheck after slides, windows, roof vents or neighboring tents change position.[1][2]
Wind can shift, stall or curl around vehicles. Treat exhaust direction as an added safeguard, not a substitute for separation.[1][2] If the campsite cannot provide a compliant location, do not run the portable generator there.[1][2] Ask campground staff about a different site, use shore power, reduce loads or rely on a properly configured battery system.
A built-in RV generator is a different installation. Do not try to move it 20 feet away. Follow the motorhome or trailer manual for exhaust inspection, operation, window and vent restrictions, and any extension system approved for that exact generator and RV. Have damaged or leaking exhaust components repaired before use.
Account for the neighbor's exhaust
Your alarm may react to someone else's generator. The cited SAFE-T-ALERT manual lists nearby RVs, engines and portable generators among possible CO sources around a rig.[3]
Walk the boundary before bedtime.[1][2][3] If a neighbor's exhaust points toward your windows, door, vents or tent, closing those openings is not a substitute for correcting the source.[1][2] Speak with the camper or campground host and request a safer location or shutdown. Move sites if the exposure cannot be corrected. An alarm inside the RV remains necessary, but it is the last warning after prevention has failed.[1][3]
A two-minute arrival and bedtime card
Before starting a portable generator:
- alarm model and replacement status confirmed;
- required test passed and normal power indication visible;
- generator outdoors and measured beyond the federal clearance from all nearby openings;
- exhaust pointed away from occupied areas;
- campground rules and generator quiet hours checked;
- emergency gathering point and 911 plan understood.
Repeat the opening-and-exhaust check whenever the campsite changes.[1][2] Test the alarm on its own schedule, not every time the generator starts unless the manual calls for that.[3] If any item fails, leave the generator off and do not sleep in the RV until the alarm problem is resolved.[1][3]
Sources
- What to Know About Generators and Carbon Monoxide (CO) — Portable-generator separation, exhaust direction, monthly household alarm testing and emergency response guidance; accessed September 15, 2026.
- Carbon Monoxide Poisoning Basics — CO symptoms, portable-generator clearance and manufacturer-directed detector replacement; updated January 12, 2026, accessed September 15, 2026.
- SAFE-T-ALERT Model 25-741 RV Combination CO and Gas Alarm User’s Manual — Model-specific RV test method, schedule, installation limits and five-year service-life instructions; accessed September 15, 2026.
Safety note: This article cannot replace the manuals for your RV, alarm or generator, campground rules, applicable codes or emergency responders. If an alarm sounds or CO exposure is suspected, move everyone to fresh air and call 911 from outside.
What's Your Reaction?