








One box or two? Map your RV's CO and propane alarms before they age out
Identify every RV carbon-monoxide and propane alarm, distinguish dedicated and combination units, and derive each replacement date from the exact model manual.

One box or two? Map your RV's CO and propane alarms before they age out
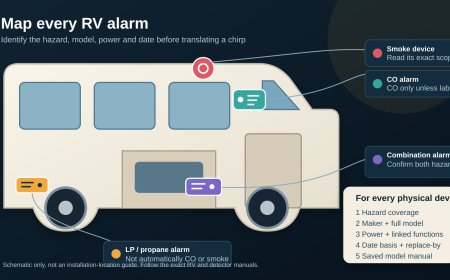
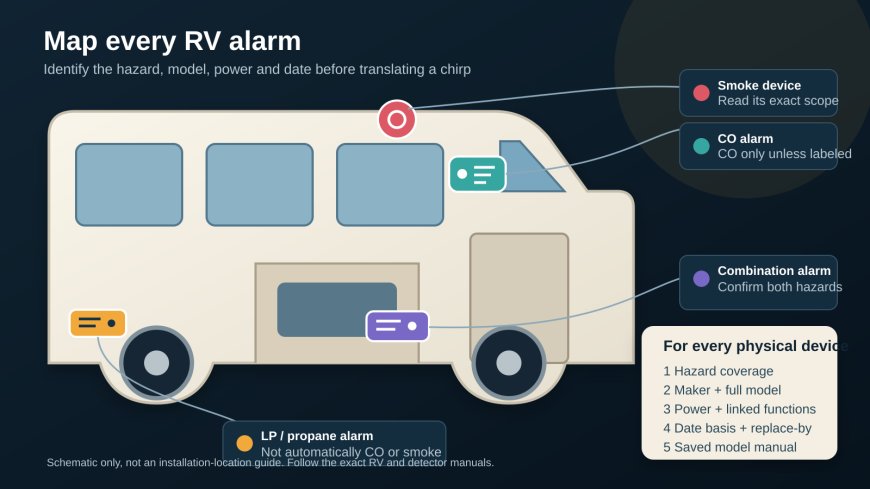
A low alarm on the galley wall might watch for propane only. A similar-looking unit might monitor propane and carbon monoxide. A separate CO alarm may sit near the sleeping area, while the smoke alarm is another device again. The faceplate is not enough to tell you which protection you have.
That matters when an alarm starts chirping. A sporadic chirp can indicate low power, a fault, or an expired sensor, but there is no trustworthy universal translation. The correct answer starts with the manufacturer, complete model number, date code, power source, and exact model manual for the device actually installed.
This is an inventory guide, not a substitute for either of our detector-specific procedures. RVCamping.info previously covered propane-alarm testing and replacement and a CO-alarm test-versus-replace decision. Here, the job is to map every alarm in one RV, identify what each box can and cannot detect, and put a model-specific replacement deadline on the service calendar.
An alarm now is not a research project
If a CO alarm pattern sounds, move everyone to fresh air, account for people and pets, call 911 from outside, and stay out until emergency responders say it is safe to return. CPSC says never to ignore an alarm and to get outside before calling 911.[1] Do not delay evacuation to diagnose a chirp chart, silence the horn, open an appliance panel, or search for the source.
If a propane alarm sounds or anyone smells gas, treat it as a possible leak. Avoid flames and electrical switches, leave the RV, and follow the emergency sequence in the exact alarm and RV manuals from a safe location. The Safe-T-Alert combination-alarm manual, for example, tells users to evacuate, account for everyone, leave openings open, close the propane tank valve, and stay out until the problem is corrected.[5] That model's sequence is evidence for that model, not permission to improvise around another system.
After everyone is safe, document which indicator flashed and the timing of the sounds. Do not disconnect a device merely to make the cabin quiet.
First identify the detector type
Use the model label and manual, not the mounting height or case shape, to fill in this map:
| Device found in the RV | What its label and manual must confirm | What not to assume |
|---|---|---|
| Dedicated LP/propane alarm | Propane or LP-gas detection, RV approval, power supply, signal chart, installation-date basis | It does not necessarily detect CO or smoke. |
| Dedicated CO alarm | Carbon-monoxide detection, RV approval, power supply, signal chart, service-life basis | It does not necessarily detect propane, smoke, or flame. |
| Combination CO/propane alarm | Both hazards named for the complete model, separate indicators or alarm patterns, shared replacement rule | One sensor or one alarm pattern does not stand in for both hazards. |
| Smoke alarm or smoke/CO alarm | Every hazard named in its listing and manual | A household-looking smoke/CO unit does not automatically replace an RV LP alarm. |
The distinction is explicit in the manuals. Safe-T-Alert's 30 Series manual says its propane unit is neither a smoke/fire alarm nor a CO alarm.[3] Its 65 Series manual describes a CO alarm that is not intended to detect smoke or fire.[4] By contrast, the 25 Series manual identifies two independent sensors in one listed CO/propane unit.[5]
A combination unit can reduce the number of faceplates without making the hazards interchangeable. On the 25 Series, CO and propane have different indicators and sound behavior, and the unit gives the propane condition priority if both occur together.[5] The manual for a different combination alarm may make different choices.
Build the alarm map before reading any chirps
Start outside the RV with the unit unoccupied and no active alarm. Photograph the front and every accessible label. If the rear label cannot be read without removing a hardwired unit, stop unless its manual gives an owner procedure and you can isolate power safely. A service shop can identify it during the next inspection.
Make one row per physical device:
| Record this | Why it matters |
|---|---|
| Location | Tells you which device sounded and whether an opening, curtain, cabinet, or stored item could block it. |
| Manufacturer and full model | Matches the only signal chart and service rule you should use. |
| Hazard coverage | Prevents a propane-only unit from being counted as CO protection, or the reverse. |
| RV listing or stated application | Helps avoid replacing a purpose-built RV alarm with an unsuitable household unit. |
| Power source and voltage | Separates a replaceable battery, sealed battery, and coach-powered 12-volt device. |
| Manufacture, installation, and replace-by dates | Shows which date starts the service-life clock. |
| Alarm, trouble, low-power, and end-of-life patterns | Keeps a maintenance chirp from being guessed at during the night. |
| Manual URL and saved copy | Preserves the instructions even if a product page later moves. |
| Connected functions | Flags a relay, solenoid, interconnect, or generator-shutdown function that a replacement must support. |
Save the map in the tow vehicle or on a phone that will be available outside. A printed copy near the primary exit is useful only if it can be grabbed without delaying evacuation.
End of life is a sensor deadline, not a battery problem
An alarm can still light up and sound during a button test after its sensor has reached the maker's retirement point. Those checks answer different questions: the test follows the model's stated test function, while the service-life rule limits how long the maker says the sensor can be relied upon.
The sample manuals make the model dependency clear. The 30 Series propane alarm calls for replacement within five years of installation.[3] The 65 Series CO alarm also uses a five-year installation-based life and identifies its own light-and-beep end-of-life pattern.[4] The current 25 Series combination manual recommends replacement after five years of service and says to use the production date as the outside limit when the installation date is unknown.[5]
Do not turn those examples into a blanket "all RV alarms last five years" rule. Another make or model may define a different interval, start date, or chirp pattern. NFPA's general CO guidance is to replace alarms according to the manufacturer's instructions.[2]
Replace or arrange replacement when the exact manual's deadline has arrived, its end-of-life indication occurs, a required test fails, a fault will not clear through permitted owner checks, damage or contamination is present, or the age cannot be established. An end-of-life hush feature, where provided, is time to install a replacement. It does not extend sensor life.
Match the replacement to the system, not just the wall opening
Before ordering, compare the old label, RV manual, alarm manual, and candidate replacement. Match the detected hazard or hazards, RV application, power voltage, polarity, fuse instructions, mounting range, temperature limits, connector, current draw, and every linked function. Faceplate size comes after those items.
A hardwired alarm can be part of more than an audible warning. Some variants can operate a relay, gas solenoid, interconnected alarm, or generator shutdown. The 65 Series manual, for example, describes model suffixes with relay and multistation functions.[4] Similar names do not guarantee similar wiring.
Do not splice unknown leads, defeat a relay, bypass a fuse, substitute a random connector, or leave a circuit de-energized while the RV is occupied. If the replacement changes wiring, supported functions, location, or fuse protection, have the RV maker, alarm maker, dealer, or a qualified RV technician specify the correct part and installation.
Use a three-date service card
For each device, write down:
- the manufacture date or code exactly as printed;
- the installation date, with its source, such as a dated receipt or service record; and
- the replace-by date calculated only from that model's instructions.
Add the next test date and the exact manual's test interval. CPSC recommends monthly alarm tests in its CO safety guidance.[1]
The three sampled RV detector manuals call for checks before travel, after storage, or weekly during use.[3][4][5] Use the most demanding applicable schedule rather than averaging them.
If the dates conflict, do not choose the newest one because it buys more time. Ask the manufacturer to decode the label and confirm which date controls. If the model cannot be identified or the service life cannot be proven, replacement with a verified compatible RV alarm is the conservative path.
The checkout result
The audit is complete only when every alarm has a known job, a matching manual, a readable signal chart, a verified power source, and a replacement deadline. A green light without those records proves very little. The map turns a row of similar plastic boxes into a safety system that an owner, guest, technician, or emergency responder can understand.
Sources
What's Your Reaction?