





Freezer Meals for RV Trips: A Safe Pack-to-Plate Plan
Pack make-ahead RV dinners safely with a practical plan for rapid cooling, cold transport, refrigerator thawing and reheating every portion to 165°F.

A freezer meal earns its space in an RV when it saves work at camp without creating a food-safety puzzle. The useful idea came from Camping for Foodies: cook a larger dinner at home, eat part of it, then freeze the rest for a future road trip.[1] Their article offers seven recipe ideas. This guide takes a different route and deals with what happens between the home stove and the campsite plate.
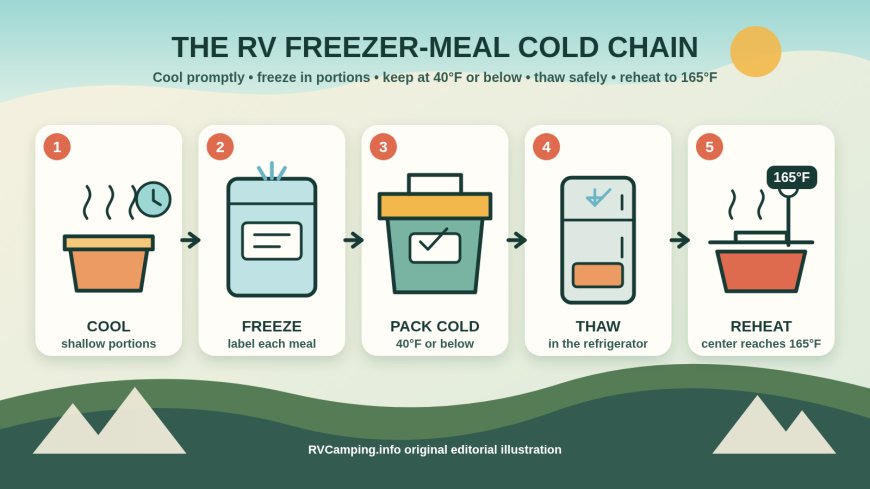
The short version is simple: cool cooked food promptly, freeze it in meal-size portions, keep it cold in transit, thaw it safely and reheat it to 165°F (74°C). The details matter, especially when an RV refrigerator is small, the cooler gets opened all afternoon or dinner plans slide by a few hours.
Pick dinners that fit the trip
Start with the campsite equipment, not a list of recipes. A thick stew that can reheat in one saucepan suits a camp stove. A casserole makes more sense when the RV oven is dependable. Individually packed portions are handy for travelers who eat at different times.
Good candidates tend to be moist and easy to stir or portion:
- soups, stews and chili-style meals;
- cooked beans or lentils in sauce;
- braised or shredded meat with sauce;
- pasta bakes and other casseroles;
- cooked grain bowls with toppings packed separately.
These are categories, not promises that every ingredient will freeze beautifully. Crisp vegetables soften, dairy sauces can separate and potatoes sometimes change texture. Test one home portion before filling half the freezer with an unfamiliar dish.
FoodSafety.gov lists quality windows that vary by food. Its chart gives soups and stews two to three months in the freezer, while cooked meat or poultry leftovers are listed at two to six months.[4] Those freezer times concern quality, not an automatic safety deadline. Food kept continuously at 0°F (-18°C) or below can remain safe indefinitely, though flavor and texture decline.[4]
Step 1: cool the food without waiting for room temperature
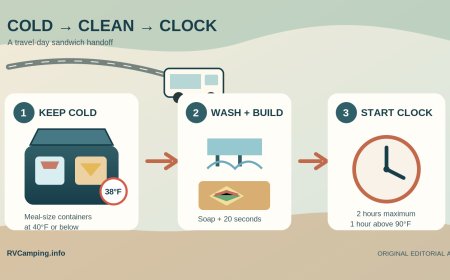
The risky habit is leaving a deep pot on the counter until it feels cool. USDA says cooked leftovers should be refrigerated within two hours, or within one hour when the surrounding temperature is above 90°F (32°C).[2] That clock includes the time spent serving and cleaning up.
Divide the dinner into shallow containers so heat can escape faster. USDA specifically recommends smaller, shallow containers rather than cooling a large pot as one mass.[2] You do not need to wait for steam to disappear before moving the portions into cold storage.
A practical home sequence looks like this:
- Finish cooking and serve the meal.
- Portion the make-ahead share into shallow containers.
- Refrigerate promptly within the time limit.
- Freeze the chilled portions once they are no longer holding a large amount of heat.
The fourth step is a workflow choice, not a new government temperature rule. It keeps a large hot batch from warming nearby frozen food and makes it easier to stack portions neatly.
Step 2: package one dinner, not one giant block
Meal-size packages solve several RV problems at once. They cool and thaw more evenly, fit around a crowded freezer compartment and let you remove only what dinner requires. A huge frozen bag may look efficient at home but can become a stubborn brick in a compact refrigerator.
Use freezer-safe, leak-resistant packaging. Press excess air from bags without squeezing food into the seal. If a bag holds a saucy meal, place it in a rigid bin during the drive so one puncture does not become a cooler-wide cleanup.
Label each package before it freezes. Include:
- meal name;
- freeze date;
- number of servings;
- allergens or special-diet notes;
- the final instruction: reheat to 165°F (74°C).
Freeze bags flat only until solid, then store them upright like files. For rigid containers, leave appropriate headspace for expansion. Keep the package size compatible with the pan or microwave-safe dish you will use in the RV.
Step 3: build a cold chain for the drive
A frozen dinner is food, not a substitute for ice. USDA's camping guidance recommends transporting chilled food and starting with food refrigerated or frozen before departure.[3] Pack it with frozen gel packs, block ice or another reliable cold source. The goal is to keep perishable food at 40°F (4°C) or below.[3]
Pre-cool the RV refrigerator before loading it and confirm the actual temperature with an appliance thermometer. A control dial only shows the setting; it does not tell you what happened during a hot fuel stop or a long door opening.
If you use a cooler:
- load food already cold or frozen;
- put the last dinner you expect to use at the bottom;
- fill empty space with cold sources;
- keep packages in watertight containers above meltwater;
- place the cooler in shade and open it as little as possible;
- use a separate drinks cooler if people will be reaching in often.
USDA advises packing food in reverse order so the first package placed in the cooler is the last one used.[3] It also recommends keeping raw meat or poultry separate, or at least below ready-to-eat food when one cooler must do both jobs.[3] Fully cooked freezer dinners should not sit under a package that can leak raw juices.
Treat the thermometer as the deciding vote. A meal that has softened but stayed at or below 40°F can be handled as refrigerated food. If you cannot confirm that it stayed cold, do not use smell or appearance as a safety test.
Step 4: choose the thawing method before camp
USDA recognizes three safe ways to thaw leftovers: in the refrigerator, in cold water or in a microwave.[2] For RV travel, refrigerator thawing is usually the least fussy option. Move tomorrow's dinner from freezer to refrigerator while it is still contained in a tray or bin that can catch leaks.
A cooler can function as a refrigerator only while it reliably maintains 40°F or below. Put a thermometer where you can read it and replenish the cold source as needed. "Overnight in the cooler" is not a safe method if the cooler warms with the afternoon sun.
Cold-water thawing needs a leak-proof package. Keep the water cold and plan to finish the process rather than leaving the bag unattended. Microwave thawing should flow straight into reheating; USDA directs cooks to continue heating microwave-thawed leftovers until they reach 165°F.[2]
Do not thaw dinner on the counter, dashboard or picnic table. If plans change, USDA says refrigerator-thawed leftovers can be used within three to four days or refrozen.[2]
There is also a useful no-thaw option. USDA says frozen leftovers can be reheated directly in a saucepan, oven or microwave, although the job takes longer.[2] That works best for smaller portions and foods that can be stirred. A deep, solid casserole may brown at the edges while its center stays cold, so use a lower, covered heating stage first and verify the center with a thermometer.
Step 5: reheat the coldest part to 165°F
A bubbling edge is not the measurement that counts. USDA says leftovers must reach 165°F as measured with a food thermometer.[2] Covering the food helps retain moisture and carry heat through the portion; soups, sauces and gravies should reach a rolling boil.[2]
RV appliances can heat unevenly, and camp stoves are vulnerable to wind. Stir when the food allows it, rotate covered dishes, and check more than one spot. Insert the thermometer into the center and any visibly dense or cold section without touching the pan.
For a microwave, spread food in an even layer, add a little liquid when appropriate, cover with a vent and pause to stir. Let it stand briefly, then check several places. For a saucepan, start gently with the lid on and stir from the bottom until the entire portion is steaming hot and measures 165°F. In an RV oven, use a covered, shallow pan rather than reheating a tall frozen block.
Serve only the amount the group is likely to eat. Return unused cold food to refrigeration promptly rather than leaving the whole batch on the picnic table. The USDA two-hour limit still applies after reheating, and it shrinks to one hour above 90°F.[2]
Match the package to the campsite
| Camp setup | Best package | Thaw plan | Reheat plan |
|---|---|---|---|
| Reliable RV refrigerator and microwave | Flat single-meal bags or shallow microwave-safe containers | Refrigerator | Covered microwave dish; stir and check several spots |
| Refrigerator and propane stove | Leak-resistant meal-size containers | Refrigerator | Covered saucepan or skillet with regular stirring |
| Ice cooler and camp stove | Double-contained flat bags | Cooler held at 40°F or below | Saucepan; add liquid if needed and stir |
| RV oven with limited refrigerator room | Shallow casserole portions | Refrigerator | Covered shallow pan; allow extra time |
| Uncertain cold storage | Skip perishable freezer meals | None | Carry shelf-stable dinner components instead |
That last row is worth taking seriously. A freezer dinner is convenient only when the trip has enough cooling capacity for it. If the RV refrigerator is unreliable and replacement ice is a long drive away, beans, canned fish, shelf-stable grains and packaged sauces are the calmer choice.
A five-minute departure check
Before pulling out, run through this list:
- Are all meals frozen solid or already at 40°F or below?
- Is an appliance thermometer visible in the refrigerator or food cooler?
- Are meals grouped by the day you plan to eat them?
- Are raw ingredients separated from cooked dinners?
- Is there enough ice or freezer capacity for the entire travel leg?
- Is the food thermometer packed where it can be reached at dinner time?
- Does each package say what it is, when it was frozen and how many it feeds?
- Is there one shelf-stable backup meal for a delay or equipment problem?
The payoff is not a perfect row of identical freezer bags. It is arriving after a long drive and knowing dinner has stayed cold, will fit the available pan and can be heated safely without improvising in a cramped galley.
Discovery source: 7 Freezer-Friendly Make-Ahead Dinners For RV Road Trips by Kim Hanna, Camping for Foodies
Source note: Camping for Foodies was used only to discover the make-ahead dinner topic. RVCamping.info did not reproduce its recipes. Cooling, transport, thawing and reheating guidance was independently developed from USDA FSIS and FoodSafety.gov primary-source material. Because the live pages blocked automated retrieval, the citation ledger points to dated Wayback Machine copies captured between April and September 2026.
Sources
[1] 7 Freezer-Friendly Make-Ahead Dinners For RV Road Trips (archived 2026-04-10)
[2] Leftovers and Food Safety | USDA FSIS (archived 2026-09-04)
[3] Food Safety While Hiking, Camping & Boating | USDA FSIS (archived 2026-09-04)
[4] Cold Food Storage Chart | FoodSafety.gov (archived 2026-08-23)
What's Your Reaction?