










Set RV tire pressure from the weight each wheel position carries
Weigh the RV as traveled, use the heavier wheel position on each axle, and match the exact tire to its maker’s load-inflation table before setting cold pressure.

Set RV tire pressure from the weight each wheel position carries
A tire sidewall, a chassis label, and a load-inflation table answer different questions. The sidewall states tire limits. The vehicle labels and manuals describe the completed RV's approved equipment and baseline instructions. The tire maker's table shows how much load a specific tire can carry at listed cold pressures. None of those numbers tells you what your RV weighs today.
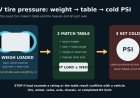
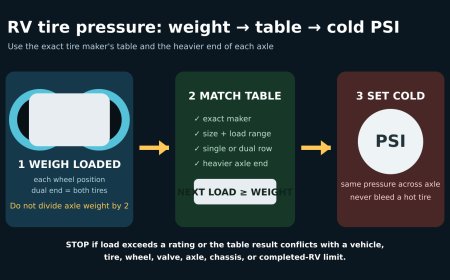
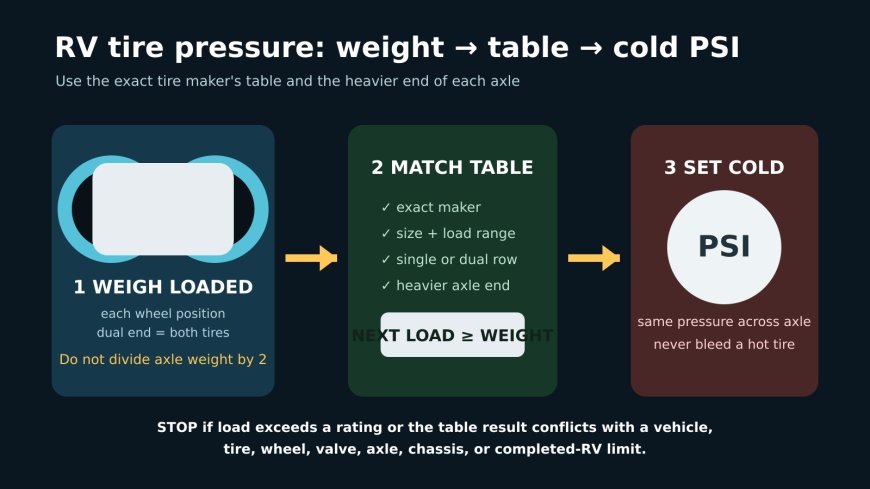
The useful chain is: load the RV as it travels, weigh it, identify the exact tires and wheels, consult the matching tire-maker table, then check the result against every applicable vehicle and component limit. Michelin and Goodyear both build their RV guidance around actual loaded weight rather than a guess based on empty weight.[1][2]
Do not lower pressure from the vehicle placard or manual on the strength of this article alone. The chassis maker, final-stage RV manufacturer, tire maker, and wheel maker may set boundaries that a generic worksheet cannot resolve. If their instructions conflict, or a replacement tire differs from the listed size, load range, service description, or application, stop and ask those manufacturers or a qualified commercial/RV tire professional.
Weigh the RV in travel condition
Load the RV the way it will go down the road: people, pets, fuel, fresh water at the amount you normally carry, propane, food, tools, hitch or tow equipment, and normal cargo. Put movable items in their travel locations. Record the fuel and water levels so the measurement remains meaningful.
Best case, obtain a separate weight at every wheel position, often called four-corner or individual wheel-position weighing. For a dual-wheel position, the reading is the combined load carried by both tires at that end of the axle, not the load on one tire. Michelin recommends individual wheel-position weights because an axle total can hide a heavy side.[1]
If a suitable scale gives only whole-axle weights, do not simply divide each axle by two and assume the sides match. Use the axle figures first to check gross axle and gross vehicle limits. Then seek wheel-position weighing or follow the exact vehicle and tire manufacturers' fallback instructions. An axle-only ticket cannot prove that neither side is overloaded.
Compare the measured total with GVWR, each axle with its GAWR, and any tire and wheel limits that apply. Pressure cannot cure an overloaded RV. If a wheel position, axle, tire, wheel, or vehicle rating is exceeded, unload or redistribute weight and weigh again before travel.[1][2][3]
Copy the tire identity before opening a table
For each axle, record:
- tire maker and product line;
- full size exactly as molded on the sidewall;
- load range or other service description;
- single or dual fitment;
- wheel size and the wheel's pressure/load limit;
- the vehicle tire-and-loading label, certification label, and relevant manual pages.
A table for the same nominal size but a different load range, construction, or application is not a safe substitute. Use the current table published by the maker of the installed tire. Michelin warns that printed information can be superseded and says to match the sidewall markings to the table; if no table matches, contact a Michelin dealer.[1]
Replacement tires make this identity check especially important. Ford's motorhome chassis manual directs owners to the tire label and warns about replacement tire and wheel compatibility.[3] A completed motorhome may also carry final-stage manufacturer labels and instructions. Keep both the chassis and coach records with the scale ticket.
Use the heavier end to set one pressure across the axle
Work axle by axle.
- Find the heavier wheel-position load on that axle.
- Select the exact tire's row and the correct single or dual column.
- Find the first listed load capacity that equals or exceeds that heavier end load.
- Read the corresponding cold inflation pressure.
- Apply the same approved cold pressure to every tire on that axle, unless the vehicle or tire manufacturer gives a different explicit instruction.
Michelin's RV tables list load by axle end. Its guide says to use the heavier end and keep pressure the same across an axle for vehicle control.[1] Do not set left and right pressures separately to match unequal corner weights. Redistribute cargo when practical, then reweigh.
For duals, use the table's dual value as defined by that maker. Do not read a single-tire number, divide a combined wheel-position weight by two, and assume you have recreated the dual table. Check both inner and outer tires. Their pressure and compatibility matter as a pair.[1][2]
Do not interpolate between columns unless the tire maker expressly permits it. Move to the next table pressure that supports the measured load. Do not exceed the tire, wheel, valve, axle, chassis, or completed-vehicle limit. A table lookup that demands more than a component permits is a stop sign, not permission to inflate higher.
A worksheet that keeps the units straight
| Axle | Left end, loaded | Right end, loaded | Heavier end used | Tire / load range | Single or dual row | Table pressure supporting load | Final approved cold pressure |
|---|---|---|---|---|---|---|---|
| Front | ____ lb | ____ lb | ____ lb | __________ | Single | ____ psi | ____ psi |
| Drive/rear | ____ lb | ____ lb | ____ lb | __________ | Dual / single | ____ psi | ____ psi |
| Tag/trailer axle | ____ lb | ____ lb | ____ lb | __________ | __________ | ____ psi | ____ psi |
The last column is deliberately separate. It is where you reconcile the table result with the tire label, manuals, minimums, margins or adjustments explicitly required by the manufacturers, and component maximums. Do not invent a universal “safety cushion.”
“Cold” describes the tire, not the weather
Load-inflation tables use cold inflation pressure. Michelin describes its published table pressures as cold pressure at ambient outside temperature and notes that even short driving heats tires and raises pressure.[1] Ford likewise directs pressure checks when tires are cold.[3]
Set pressure before driving, after the vehicle has sat long enough to meet the definition in the applicable manual, and out of direct heating when practical. Record ambient temperature. If a trip crosses a large temperature change, check again when the tires are cold at the new conditions.
Do not bleed a warm tire down to the cold target. A normal pressure rise while driving is not evidence of overinflation. If one tire behaves differently from its axle mates, loses pressure, runs visibly damaged, or triggers a warning, stop safely and have the tire, valve, wheel, and dual mate inspected as applicable. Never drive on a tire that cannot carry its actual load at an allowed pressure.
Keep the record tied to the load
A pressure calculation expires when the loading changes enough to matter. Reweigh after major cargo changes, new batteries or solar equipment, suspension or hitch changes, tire or wheel replacement, or a different water-carrying routine. Recheck after repairs that can change ride height or load distribution.
Keep one page with the dated scale ticket, loading notes, tire identity, table revision or URL, table row used, required cold pressures, and gauge used. The point is not to chase a softer ride. It is to prove that every tire can carry the heaviest measured load on its axle without violating the completed RV's instructions or any component limit.
Sources
What's Your Reaction?