
























Does your RV water heater need an anode rod? Check the model before you wrench
Identify the exact RV water heater before inspecting a sacrificial anode, because aluminum-tank and tankless models follow different maintenance paths.

Does your RV water heater need an anode rod? Check the model before you wrench
A replacement anode rod costs little. Installing one in the wrong water heater can cost plenty.
Some RV tank water heaters use a sacrificial rod that doubles as the drain plug. Others use an aluminum tank and specifically warn against an aftermarket anode. Tankless heaters are a different design again. The right first move is not reaching for a socket. It is identifying the heater by its data plate and finding the manual for that exact model.
This guide covers an owner inspection of an accessible drain/anode fitting. It does not cover burner, propane, 120-volt wiring, relief-valve, or tank repairs. If the fitting is seized, badly corroded, cross-threaded, leaking around damaged tank threads, or blocked by another component, stop and use a qualified RV technician.
Source note: this decision guide is based on the cited Suburban and Dometic component manuals, with Grand Design owner guidance used to cross-check the RV-level drain sequence. Your installed model's manual controls.
First split the job into three equipment paths
Open the exterior water-heater door and photograph the data plate without touching the gas train or wiring. Record the maker, complete model number, serial number, and tank capacity. Then match it to the component manual in the RV's owner packet or the manufacturer's library.
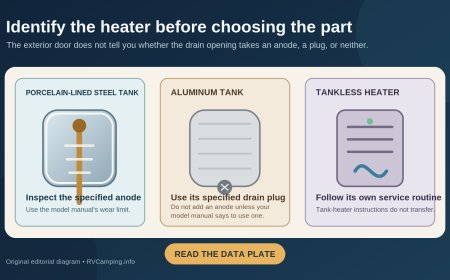
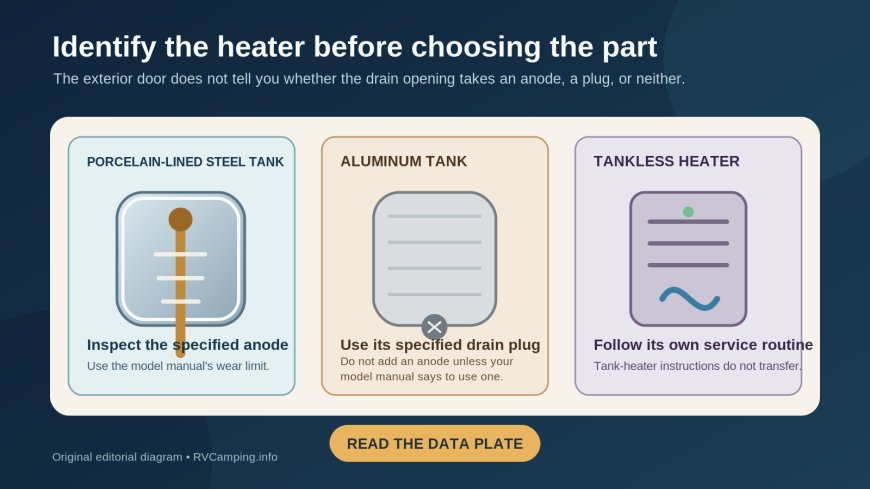
Use the model, not the shape of the access door, to choose one of these paths:
- A Suburban porcelain-lined steel tank: the current Suburban tank guide says these heaters use a replaceable magnesium or aluminum anode. The rod protects the tank by being consumed, and the manual says replacement is due when consumption or weight loss exceeds 75 percent.[1]
- A Dometic/Atwood aluminum tank covered by the cited manual: its ordinary drain plug is not an invitation to add a rod. Dometic warns that replacing that plug with an anode can damage the coupling through cathodic action.[2]
- A tankless heater or any unidentified unit: do not apply a tank-water-heater routine. Find its own maintenance and freeze-protection instructions. If the plate is missing or unreadable, a technician or RV manufacturer should identify it before parts are ordered.
That decision prevents the most expensive mistake in this job: treating "RV water heater" as one interchangeable design.
Make the heater cold, off, and depressurized
Hot water under pressure can turn a drain fitting into a scald hazard. Do this work with the RV parked, stable, and connected to no water source.
For a Suburban tank heater, the manufacturer directs owners to turn off electrical power, shut off the gas supply, turn off the water-system pressure pump, open both hot and cold faucets, and then remove the anode rod.[1] Grand Design's owner guidance adds a useful warning: even a small amount of pressure can make water spray when the drain plug is removed, so its sequence calls for relieving water pressure before removal.[3]
A practical shutdown card is:
- Turn the water heater's gas and electric operating controls off.
- Disconnect shore power or open the correct breaker as the RV and heater manuals direct. Do not trust a wall switch alone if the component manual requires another disconnect.
- Shut off propane at the source when the manual calls for it. If you smell gas at any point, leave the area and follow the RV's gas-emergency instructions.
- Disconnect city water and turn off the onboard pump.
- Allow the stored water to cool fully. Verify at a hot faucet rather than guessing from elapsed time.
- Open a hot faucet to remove pressure. Follow the exact manual if it also directs use of the pressure-temperature relief valve; never remove, cap, or modify that safety valve.
- Keep people clear of the drain path. Several gallons may leave quickly, carrying hot sediment if the tank was not truly cool.
Do not proceed because the burner has been off "for a while." Cold at the nearest hot faucet and zero water pressure are the useful checks.
Inspect the rod without inventing a universal interval
Use the socket size and access method in the heater manual. Suburban's current guide specifies a 1 1/16-inch socket for its covered tank models.[1] That number belongs to those models, not every heater. Keep the tool square to the hex, support yourself outside the water path, and avoid striking or leaning on the burner tube, gas valve, or wiring.
Once the tank is drained and the rod is out, look at the sacrificial material rather than surface color alone. Uneven craters, scaling, and a narrowed section are normal signs that the rod has been doing its job. What matters is how much material remains and whether the steel core is exposed.
Suburban gives a product-specific replacement rule: replace at more than 75 percent consumption or weight loss, and inspect regularly because water chemistry and use change the rate.[1] Its guide also recommends yearly replacement under normal use, while noting that actual frequency varies with water conditions.[1] Treat that as the cited manufacturer's rule for the covered heater, not a calendar rule for every RV.
Replace sooner if the exact manual requires it or the rod has passed its stated wear limit. Also stop and seek service if you find:
- tank-thread damage or heavy corrosion around the opening;
- a rod that will not clear the opening because it appears bent or broken;
- unexplained metal fragments rather than ordinary sediment;
- leakage that returns after correct installation;
- soot, scorching, damaged wiring, or a disturbed burner assembly nearby.
The rod does not repair a damaged tank. A new part cannot make questionable threads, a leaking weld, or combustion damage safe.
Reinstall the part specified for your model
Buy by heater manufacturer and model, not by a marketplace claim that a rod "fits most RVs." Suburban says to use its specified accessory part and warns against substituting add-on electric heating elements for the anode.[1] Dometic's cited aluminum-tank manual reaches the opposite design conclusion: use the drain plug, not an aftermarket anode device.[2]
For a Suburban replacement, clean only what the manual permits and apply a thread sealant approved for potable water to the rod's threads. Suburban states that correctly applied thread sealant does not interfere with anode protection.[1] Start the fitting by hand. If it will not engage cleanly, back it out; a long wrench is not a cure for crossed threads. Tightening method and torque, if specified, come from the exact manual or manufacturer, not from a generic video.
Before restoring heat:
- Return the water-heater bypass valves to the normal-use position for that RV.
- Close drains and faucets as the plumbing instructions require.
- Reconnect water or turn on the pump.
- Open a hot faucet until water flows steadily and air stops spitting.
- Inspect the drain/anode joint and nearby plumbing for leaks.
- Confirm the tank is full before restoring propane or electric heating.
Suburban explicitly warns that operating an empty tank can damage the tank or controls.[1] A successful thread installation is not the finish line; a full, purged, leak-free tank is.
Pair the inspection with sediment removal
The open drain gives access to sediment that collects below it. Suburban links sediment to slower heat transfer, overheating at the tank bottom, damage to the glass lining, and reduced efficiency.[1] Dometic also calls for periodic draining and flushing of its aluminum tanks, even though those tanks should not receive an anode rod.[2]
Use the flushing method approved for the exact heater. Do not jab the tank with a metal object, aim high pressure at components, or assume a wand is permitted merely because it fits the opening. Continue only while the drained water and work area can be controlled safely.
This is where the equipment paths meet: steel-tank owners inspect an anode while flushing, aluminum-tank owners reinstall the correct drain plug after flushing, and tankless owners follow a separate service routine.
A five-minute parts-counter check
Before buying anything, put these six items on one note:
- RV year, make, and model;
- water-heater manufacturer;
- complete heater model and serial number;
- tank, aluminum-tank, or tankless design;
- exact manual title and revision;
- the manual's specified anode, drain plug, sealant, inspection limit, and tool size.
If one line is blank, keep the old part in place until the heater is positively identified. The safe maintenance question is not "Which anode fits an RV?" It is "What does this exact water heater use, and what does its manual say to do when that part wears?"
Sources
- Suburban: Tank Water Heaters Operation & Maintenance Guide (manufacturer guide, part 206244, March 22, 2023; accessed October 9, 2026)
- Dometic: L.P. Gas Water Heater 6 & 10 Gallon XT Installation, Operation and Maintenance Manual (manufacturer manual, revision B, October 30, 2018; accessed October 9, 2026)
- Grand Design: Imagine Travel Trailer Owner's Manual update (RV maker instructions used for the pressure-release sequence; accessed October 9, 2026)
What's Your Reaction?