









RV slide-out pre-travel check: inspect, retract, verify
Inspect an RV slide-out inside and out, use its exact power and control procedure, stop for binding or skewing, and verify the room is locked for travel.

RV slide-out pre-travel check: inspect, retract, verify
By Romana
Category: Tips and Trends
A slide-out is ready for the road only when the room has retracted squarely, the seals and exterior trim look evenly seated, and every travel lock or transit bar required by the RV's documentation is secured. The switch procedure is not universal. Even manuals from the same component maker call for different ignition, power and end-of-travel actions.[1][2][3]
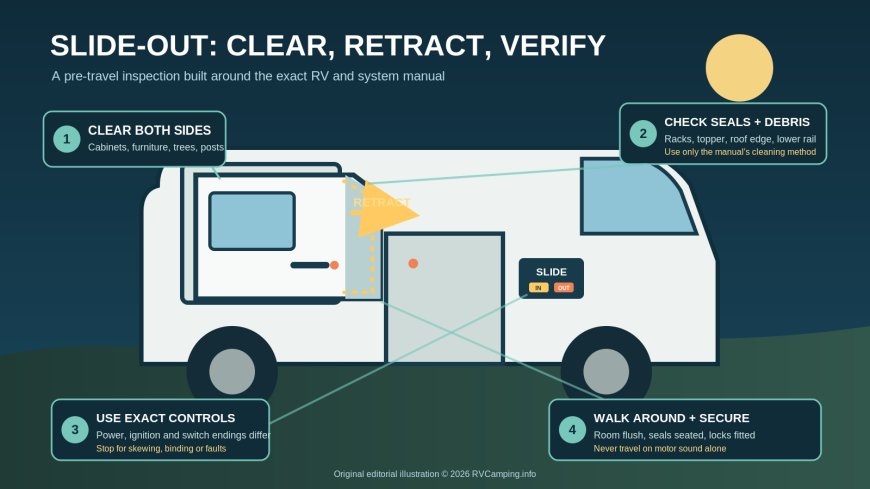
The short answer: Identify the installed slide system and read both its manual and the RV builder's instructions. Clear the room inside and out, remove debris, provide the specified power source, retract from a position where you can watch the room, and stop for skewing, binding, unusual noise or a fault indication. Afterward, walk around the RV and confirm the room is fully in before moving.

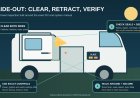
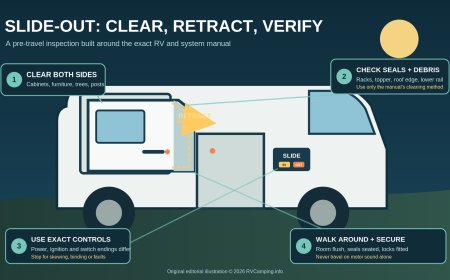
Retraction is a controlled inspection, not a button press followed by an assumption. Original illustration by RVCamping.info.
Start with the system, not a generic checklist
"Slide-out" describes the moving room, not one mechanism. An RV may use an in-wall system, an electric rack-and-pinion drive, a hydraulic drive, a cable drive or another design chosen by the coach builder. Controls and interlocks can also change with the RV installation.
The three Lippert manuals used here show why a borrowed sequence is risky:
- The cited In-Wall (often called Schwintek) manual says a motorized unit's ignition must be off. It tells the operator to keep holding the switch briefly at full retraction until the motors shut off, then release it.[1]
- The cited Power Gear electric manual calls for a fully charged, connected battery. Its procedure says to release the switch when the room has fully retracted and stopped.[2]
- The cited SlimRack manual instead requires the engine or generator to be running, or the RV to be on shore power. It also includes transmission and parking-brake conditions where applicable.[3]
Those are model-family instructions, not interchangeable tips. The RV manufacturer may add ignition interlocks, lock controls, leveling requirements, awning steps or a different control panel. Find the mechanism label and the RV's model-specific manual before departure. If the two manuals appear to conflict, stop and ask the RV manufacturer or an authorized service center which instructions govern that installation.
Make two clearance passes
The room needs a clear path on both sides of the wall. Lippert's In-Wall troubleshooting section names trees, posts and cars outside, plus luggage, furniture and open cabinets inside. It also warns about small objects trapped beneath the floor or along the room sides.[1] Power Gear likewise calls for checking the travel path inside and outside before retracting.[2]
Inside the RV
Walk the full inside perimeter rather than glancing from the switch.
- Close cabinet doors, drawers and appliance doors that could enter the room's path.
- Move chairs, pet bowls, shoes, bags, cords and rugs away from the floor edge.
- Look beneath the slide fascia and along the side gaps for small objects.
- Confirm loose furniture is in its travel position. Follow the RV builder's directions for any removable floor panels, bed platforms or dinette parts.
- Get every person and pet clear. Nobody should reach beside or beneath a moving room.
A cabinet door only has to open a few inches to become a hard stop. The motor cannot tell whether resistance comes from the designed end of travel or from a forgotten object.
Outside the RV
Check the roof and both side edges from the ground or another safe viewing position. Do not climb on a wet roof or place yourself beneath an unsupported room.
- Remove branches, cones, ice and packed debris that could be carried into a seal.
- Check the lower edge and exposed rack areas for stones, mud or road grit.
- Make sure a tree, pedestal, post, vehicle, open compartment door or campsite item is not in the closing path.
- Inspect a slide topper for pooled water, ice, a trapped branch or fabric that is no longer tracking normally.
- Look for a seal that is torn, folded oddly or pulled loose from its retainer.
For the cited In-Wall system, Lippert says small dirt clumps or metal shavings in the side rack can bind the spur gear; its manual specifies a dry brush or compressed air for removal before trying again.[1] That cleaning method belongs to that manual. Do not add grease or spray to an unknown rack. Lubrication rules differ, and the same In-Wall manual says grease is unnecessary and may hurt long-term reliability.[1]
Check power, locks and operating conditions
Do this before anyone presses IN.
First, use the exact manual's power requirement. "Plug into shore power" is not a universal cure for a weak house battery because many slide controllers and pumps still depend on the RV's 12-volt system. The Power Gear manual requires a fully charged battery connected to the electrical system.[2] The SlimRack manual calls for a running engine or generator, or shore power.[3] The In-Wall controller manual describes a 12-volt input and provides low-voltage fault codes, but that does not override the RV builder's operating directions.[1]
Next, deal with locks and transit bars in the order the manual gives. A bar installed for travel must not remain where it blocks room movement. After normal retraction, both the In-Wall and Power Gear manuals say to reinstall transit bars when equipped.[1][2] Power Gear also says some slide awnings require manual locking before travel.[2]
Do not improvise with a lumber brace, adjustable pole or aftermarket lock unless the RV or lock manufacturer approves the device and placement. Excess pressure can damage trim, walls or the room structure.
Finally, set the conditions required for that installation. Depending on the system, these may include leveling, stabilizers, transmission position, parking brake, ignition state, engine or generator operation, shore power, and an on/off key. This is where the manuals diverge most sharply. Read the panel labels, but treat them as controls rather than a substitute for the instructions.
Retract where you can see and hear the room
One person should operate the control while maintaining a useful view. If the switch location hides an edge of the room, use a spotter who stays well clear of the mechanism and agrees on a clear stop signal. Do not let a spotter stand in the path or put hands near a rack or seal.
Use the named control exactly as the manual describes. For example:
- On the cited In-Wall system, keep the IN side pressed through full retraction. When travel ceases, maintain pressure for the manual's brief motor-shutoff period, then release.[1]
- On the cited Power Gear electric system, hold IN until full retraction and movement stops, then release. The same procedure includes checking the awning and installing transit bars if fitted.[2]
- On the cited SlimRack system, satisfy its power and vehicle conditions, turn on the key or switch if equipped, hold IN, and release after the room is fully retracted and has stopped. Then turn the control off and install transit bars if equipped.[3]
Do not combine those endings. Holding a switch after the room stops is part of the cited In-Wall control logic; it should not be copied to a system whose manual says to release at the stop. Likewise, an ignition-off instruction for one installation does not cancel an engine-running requirement for another.
Watch both vertical edges as the room moves. A small visual difference caused by perspective is not a measurement, but a growing side-to-side mismatch is a reason to stop. Listen for a new scrape, repeated clunk, gear chatter or a motor that strains without room movement.
Stop conditions are part of the procedure
Release the control immediately if:
- a person or pet enters the area;
- an interior or exterior object contacts the room;
- one side moves while the other stalls or the room becomes visibly skewed;
- a seal, topper or trim piece starts to pull, bunch or tear;
- the room jerks, binds, reverses unexpectedly or stops short;
- the controller shows a fault code;
- voltage drops, lights dim sharply or the motor sound changes without normal movement;
- hydraulic fluid appears, a cable looks loose or damaged, or a component is visibly displaced.
Do not "bump" the switch repeatedly to force the room past resistance. Remove an obvious loose obstruction only after the system is stopped and everyone is clear. If the cause is not obvious, leave the control alone and use the manufacturer's fault procedure or call qualified service.
Manual override is also system-specific. Power Gear's manual override involves its brake lever, drive point and a 3/4-inch tool; after manual retraction it requires the brake to be re-engaged, transit bars installed and authorized service.[2] SlimRack uses a different motor-access and room-securing procedure, then says not to operate the room until service is complete.[3] Guessing at an override can release a brake, desynchronize motors or leave the room unsecured. Keep the exact manual available offline, but use the override only if you understand that manual and can perform it safely.
Prove the room is travel-ready
A motor sound is not proof. After retraction, take your finger off the control and make a deliberate verification pass.
From inside:
- Check both side edges and the top fascia for an even final position.
- Confirm nothing was crushed or drawn into the opening.
- Turn off or secure the slide control if the RV manual calls for it.
- Install every specified transit bar or travel lock, and verify each is engaged rather than merely nearby.
- Stow the control key where it cannot be activated accidentally.
From outside:
- Walk the full perimeter and view each slide from front and rear.
- Confirm the outer flange sits evenly against the wall and the room is not proud at one corner.
- Check that bulb seals contact the room around the visible perimeter without a branch, cloth or cable trapped beneath them.
- Confirm topper fabric is rolled normally and any manual awning lock is secured.
- Look underneath from a safe position for a hanging cable, displaced trim, fluid leak or object left in the mechanism.
Do not depart with a corner visibly out, a required lock unsecured, a room that drifts outward, or a fault you cleared without finding the cause. A room that had to be manually retracted needs the securing and service steps in its exact manual before travel.[2][3]
A compact pre-travel card
Before movement
- Exact RV and slide-system manuals identified
- Inside path clear, including cabinets and floor edges
- Outside path, roof edge, racks, seals and topper checked
- People and pets clear
- Required battery, shore-power, engine and ignition conditions confirmed
- Parking brake, transmission, leveling and key controls set as specified
During retraction
- Operator can watch and listen
- Both sides move together without binding
- Manual-specific switch action used
- Stop immediately for interference, skewing, abnormal noise or a fault
After retraction
- Room visually flush and even from inside and outside
- Seals seated; nothing trapped
- Topper rolled and locked if required
- Transit bars or travel locks fitted if equipped
- No leak, loose cable, damaged trim or fault remains
- Final walk-around completed before the RV moves
The useful habit is separating three decisions: Is the path clear? Did the room retract normally? Is it secured for travel? A yes to the first does not prove the other two.
Evidence note: The control actions, power conditions, transit-bar instructions, cleaning methods and override cautions in this article are attributed only to the named manuals. RVCamping.info's inspection passes and compact card are editorial tools, not substitute operating instructions.
No hands-on test, repair or inspection of a specific RV is claimed.
Sources
- Lippert In-Wall Slide-Out Owner's Manual (CCD-0001602) — Forest River component-manual archive; retrieved September 18, 2026.
- Lippert Power Gear Electric Motor Slide-Out Owner's Manual (CCD-0001615) — Forest River component-manual archive; retrieved September 18, 2026.
- Lippert SlimRack Slide-Out Owner's Manual (CCD-0001459) — Forest River component-manual archive; retrieved September 18, 2026.
What's Your Reaction?