










The sandwich cooler: a cold-chain plan for deli meat, cheese and cut produce
Pack deli meat, refrigerated cheese and cut produce at 40°F or below, log three cooler readings, assemble small lunch rounds and clock anything removed from cold holding.

The sandwich cooler: a cold-chain plan for deli meat, cheese and cut produce
By Romana
Category: Cooking
A sandwich cooler can look fine at lunch and still leave one unanswered question: did the food stay cold during the drive? Ice rattling at the bottom does not prove that sliced turkey, cheese and cut tomatoes spent the morning at a safe temperature. A thermometer and a written clock do.
The short answer: Chill every refrigerated ingredient before packing. Load closed, shallow containers of deli meat, cheese and cut produce into an insulated cooler, using enough frozen packs or ice to hold 40°F or below. Keep the cooler out of sun, open it briefly, and check its thermometer at departure, arrival and before lunch. If perishable sandwich food is not kept cold, use a two-hour limit, reduced to one hour when it is exposed to air above 90°F.[1][2][4]
Assemble only the sandwiches you will eat. Keep the reserve sealed and cold. If you cannot establish how long a warm container has been out of temperature control, discard it rather than returning it to the cooler.

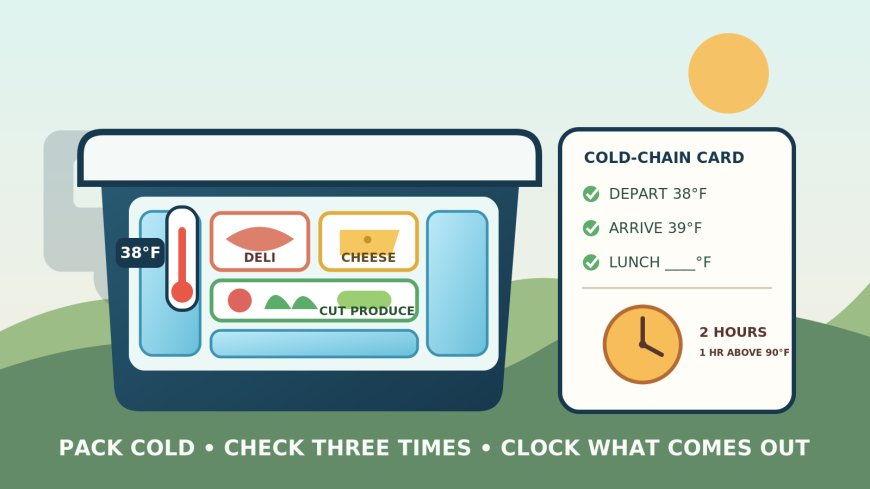
The cold-chain check has three readings: departure, arrival and lunch. Original illustration by RVCamping.info.
Give the cooler one job
Use the sandwich cooler for ready-to-eat lunch food, not drinks and not raw meat headed for the grill. FDA recommends separating beverages from perishable food when possible because repeated drink runs admit warm air.[2] A dedicated lunch cooler also removes the chance that raw-meat juices will leak onto food that will not be cooked.
Start with cold equipment. Chill the deli meat, cheese, washed produce and condiments in the refrigerator. If practical, pre-chill the empty cooler with sacrificial ice, then drain and dry it before loading. Pack the food directly from refrigeration just before departure. A warm cooler, a room-temperature block of cheese and two small gel packs begin the trip by spending cooling capacity that should have protected lunch.
Place a freestanding appliance thermometer where you can read it without unpacking every container. Do not bury it against a frozen pack, where it may report the cold source rather than the air around the food. USDA and FDA consumer guidance use a target of 40°F or below.[1][2]
FDA produce guidance and FoodSafety.gov apply that cold target to the refrigerated sandwich ingredients covered here.[3][4]
The thermometer is a checkpoint, not decoration. Record:
- DEPART: cooler _°F at _
- ARRIVE: cooler _°F at _
- LUNCH: cooler _°F at _
- OUT: sandwich ingredients removed at _ / discard by _
These labels are an RVCamping.info planning tool, not an agency form. They turn a vague memory of “still pretty cold” into a usable history.
Pack by zone, not by sandwich
Prebuilt sandwiches get soggy and invite the whole batch to warm whenever one person is hungry. Pack components in shallow, meal-size containers instead:
- Cold center: sealed deli meat and cheese sit between frozen packs near the middle of the cooler.
- Produce box: washed, dried and cut produce stays in its own leak-resistant container. Keep wet items such as sliced tomato apart from lettuce and bread.
- Assembly pouch: bread, napkins and clean utensils stay dry and outside the ice field. Refrigerate any condiment whose label requires it after opening.
- Day-two reserve: tomorrow’s meat and cheese remain unopened in a separate marked container so today’s lunch does not expose them to hands and warm air.
Build a nearly full cold core around the containers with frozen packs or ice. Close the lid immediately after loading. USDA camping guidance favors cold or frozen food plus a cold source and recommends packing in reverse order so the food needed last goes in first.[1] In an RV, secure the cooler so it cannot slide into direct sun at a windshield or tip during a turn.
Meltwater is not a bonus cold bath. Keep food sealed against it, drain only when you can replace lost ice, and never let sandwich ingredients float in water that has contacted hands, packaging or a cooler drain.
Prepare produce before the wheels turn
Wash whole produce under running water before cutting it. FDA says not to use soap, detergent or commercial produce wash; washing reduces bacteria but does not eliminate them.[3] Scrub firm items such as cucumbers or melons with a clean produce brush, then dry them with a clean cloth or paper towel before using a clean knife and board.
Do this where you have potable running water and a clean work surface. A campsite spigot with unknown status is a poor place to rescue unwashed lettuce just before lunch. Produce labeled “pre-washed,” “washed,” “triple washed” or “ready-to-eat” does not need another wash; keep it away from dirty hands and utensils after the package opens.[2][3]
Refrigerate pre-cut or packaged produce. FDA specifically directs consumers to choose pre-cut produce that is refrigerated or surrounded by ice and to refrigerate it after purchase.[3] FoodSafety.gov names cut fruit and vegetables alongside deli meat and cheese as perishable snacks that need cold holding or the applicable time limit.[4]
Do not assume every whole vegetable has the same refrigeration requirement as its sliced form. The simple sandwich rule is to put every cut component in the cold plan. That includes sliced tomato, cut melon, shredded lettuce and prepared fruit cups.
Check package age before it becomes cooler cargo
A cooler cannot reset an old package. Check use-by directions, signs of damage and the date the deli meat was opened or sliced before loading it. FoodSafety.gov’s cold-storage chart gives opened packages or deli-sliced luncheon meat a refrigerator window of three to five days at 40°F or below; unopened packages are listed at two weeks.[5] Manufacturer dates and instructions still control when they are more restrictive.
Labeling is especially useful on a multi-day RV trip:
- TURKEY: opened/sliced _ / use or discard by _
- CHEESE: opened _ / package direction _
- PRODUCE: washed and cut ____
Do not combine a fresh purchase with yesterday’s leftovers in one bag. Separate containers preserve each batch’s age and temperature history. They also make it possible to discard one questionable item without sacrificing the entire cooler.
Cheese needs a label-based decision rather than a blanket claim. Moisture, processing and packaging differ. If a cheese is sold refrigerated or says “keep refrigerated,” keep it at 40°F or below for this trip. When cheese shares a container with deli meat or cut produce, the more perishable ingredients set the handling rule for the whole container.
Build lunch with a clean, quick-open routine
Park in shade when possible. Move the cooler out of a closed hot cab, but keep it away from campground dirt, pets and the sewer-service area. Wash hands with soap and safe running water before assembly. If that is not available, follow the campground’s potable-water guidance and use an appropriate hand-cleaning backup; do not treat visibly dirty hands as ready for food prep.
Read and log the cooler temperature before removing food. Set out bread and clean utensils first. Then take out one meal-size meat container, one cheese container and the produce needed for the people eating now. Close the cooler while you build.
Use tongs or a clean fork rather than passing a common hand through every stack of meat and cheese. Give wet produce its own utensil. Never put a utensil that touched raw meat from a later cook into this ready-to-eat setup. FDA advises keeping raw animal foods securely wrapped and away from prepared food and produce.[2]
Make the number of sandwiches requested, close the containers and return verified-cold reserves promptly. Do not leave the whole cooler open as a self-serve buffet. If people will eat at different times, prepare lunch in rounds and start a separate OUT label for each round.
Run the clock when cold holding stops
The time limit applies when perishable food is no longer held at 40°F or below. Federal consumer guidance allows up to two hours, or one hour when exposure is above 90°F.[1][2][4] The shorter limit can apply in a hot vehicle even when the campground’s shaded weather reading is lower.
Count cumulative time. Twenty minutes on a rest-stop table plus 35 minutes during campsite setup equals 55 minutes. Putting the container back beside ice does not erase those minutes. It only resumes cold holding if the food has remained within the safe window and the cooler can actually restore and maintain 40°F or below.
An air reading is useful but not magic. If the thermometer reads 48°F at arrival and the last confirmed reading was five hours earlier, you do not know when the food crossed 40°F. A cold corner, one frozen juice box or cheese that feels firm cannot reconstruct that gap.
Discard deli meat, refrigerated cheese or cut produce when its applicable time expires. Also discard it when the start time is missing, raw juices leaked onto it, a dirty utensil contaminated it, or the package is swollen, damaged or subject to a recall. Do not taste food to settle the question.
Make a safer choice for a higher-risk traveler
Cold holding slows bacterial growth, but it does not make every ready-to-eat food equally suitable for every person. CDC lists pregnant people, adults 65 and older, newborns and people with weakened immune systems among groups at higher risk from Listeria.[6]
For someone in a higher-risk group, CDC advises choosing safer foods and lists deli meat and cold cuts reheated to 165°F or until steaming hot instead of eating them unheated.[6] CDC also distinguishes among cheeses, including pasteurized hard cheeses and several pasteurized packaged cheeses as safer choices, while advising against unheated queso fresco-type cheeses and cheese made with raw milk.[6]
That changes the picnic plan. Heating deli meat at home and then letting it drift warm for hours is not the answer. Reheat it immediately before serving with a legal, RV-safe appliance, verify 165°F with a food thermometer, and keep it separate from the unheated deli stack. If that setup is impractical, choose a lunch that fits CDC’s safer-food guidance rather than improvising at the table.
The lid-closing check
Before the RV moves, confirm six points:
- Meat, refrigerated cheese and cut produce went into the cooler already cold.
- Frozen packs surround the shallow, sealed food containers.
- The thermometer is visible and reads 40°F or below.
- Raw grill food and frequently opened drinks are elsewhere.
- Package ages and the three temperature checkpoints are written down.
- Clean hands, utensils and a discard-time label are ready for lunch.
A sandwich cooler works when it preserves a chain of evidence: cold food at departure, a cold reading on arrival, a short opening at lunch and a visible clock for anything removed. If one link is unknown, the practical answer is not to guess better. It is to discard the questionable food and open a shelf-stable backup.
Evidence note: Federal sources support the 40°F cold target, two-hour and one-hour limits, produce washing and refrigeration steps, storage time for deli-sliced luncheon meat, and higher-risk Listeria choices. RVCamping.info created the zone map, temperature card and three-checkpoint routine for trip planning; they are not federal forms. The article offers U.S. household food-handling information rather than medical advice or rules for a permitted food operation.
Sources
- Food Safety While Hiking, Camping & Boating | USDA FSIS (archived evidence saved locally)
- Handling Food Safely While Eating Outdoors | FDA
- Selecting and Serving Produce Safely | FDA
- Splash into Food Safety at the Pool this Summer | FoodSafety.gov (archived evidence saved locally)
- Cold Food Storage Chart | FoodSafety.gov
- Preventing Listeria Infection | CDC
What's Your Reaction?