






















Inspect RV roof seams before you reach for sealant
A material-first RV roof inspection guide for finding seam failures and confirming sealant compatibility with the membrane, substrate, old material, joint orientation, preparation, and cure conditions.

Inspect RV roof seams before you reach for sealant
By Romana Category: Tips and Trends

The safe order is identify, inspect, document, confirm, then repair. Before buying sealant, identify the roof membrane and every material the new bead must touch; find the RV maker’s sealant schedule or component manual; and obtain written compatibility for the exact product. “EPDM/TPO compatible” on a label may answer only one part of the joint.
Do not guess from roof color, texture, or a previous owner’s leftover tube. An RV roof can put a membrane, fiberglass or metal, plastic vent flange, painted trim, fasteners, butyl bedding, and old lap sealant in one repair area. Compatibility has to cover the full stack.
Set the inspection interval from your own manual
Intervals are not universal. Jayco’s 2026 towable manual calls for a six-month review of sealants, while Winnebago’s general maintenance guidance recommends two roof checks per year and lists lifted seams, soft areas, punctures, dried caulk, and loose seals among the conditions to find.[1][2] A component supplier may be stricter: Alpha’s membrane-care document ties roof inspection to cleaning three or four times per year.[3]
Use the shortest applicable interval in the documents for your exact RV and roof system. Add an extra inspection after a branch strike, hail, a new roof-mounted accessory, unexplained interior moisture, or a long trip over rough roads. Record the date, weather, photos, and locations checked; the log makes slow changes easier to see.
Confirm that the roof can be accessed safely
A factory ladder does not automatically make every roof, every edge, or every added component a standing surface. Jayco says certain equipped units have decking beneath the membrane and still directs owners to walk with caution; that statement belongs to the covered units, not to every RV.[1]
Check the RV manual for roof access, load, ladder, and fall-protection instructions. If the documentation does not say the roof is walkable, inspect from a stable platform beside the RV, use a camera pole, or hire a service facility. Never step on a wet roof. Keep clear of skylights, vents, solar panels, and unsupported areas even when the main deck is rated for service access.
Build a roof compatibility record
Before touching a seam, write down five things:
- 1. Roof covering: EPDM, TPO, PVC, fiberglass, aluminum, coated material, or another documented system.
- 2. Joint substrate: the flange, molding, cap, fastener, or rail beneath the visible bead. Note whether it is plastic, metal, fiberglass, painted, or another material.
- 3. Existing sealant: product name or chemistry if known. Look in the build sheet, owner packet, repair invoice, or manufacturer sealant callout—not at appearance alone.
- 4. Seam orientation: flat field, sloped transition, roof edge, or vertical face.
- 5. Application limits: surface preparation, primer, minimum temperature, cure window, rain exposure, and whether application over old material is allowed.
Start with the VIN-specific owner packet and the RV manufacturer’s current support channel. If the membrane maker is known, check its care and repair instructions too. Ask a precise question: “Is product X approved to bridge this roof membrane, this vent-flange plastic, and the existing sealant on my model?” Save the answer.
The need for model-specific confirmation is not theoretical. One membrane maker’s care sheet restricts what may contact its SuperFlex membrane.[3] By contrast, a different sealant manufacturer lists one self-leveling product for EPDM, TPO, and PVC and several non-membrane substrates.[5] Those are product-system claims, not permission to substitute one tube for another.
Map the roof instead of spot-checking one leak
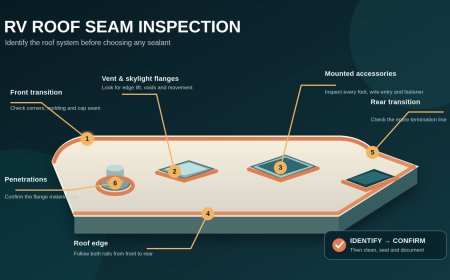
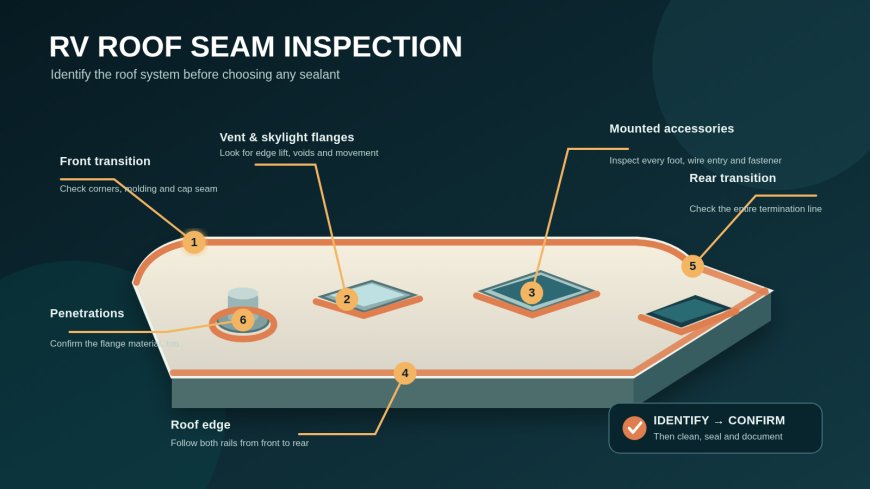
Begin at the front and follow a fixed route so nothing disappears behind an air conditioner or solar panel:
- front cap-to-roof transition and termination molding;
- both roof edges and gutter or awning rails;
- vents, skylights, antennas, plumbing stacks, fans, and air-conditioner interfaces;
- every solar, rack, satellite, cable-entry, or cellular mount;
- exposed fastener heads and wire clips;
- field seams, membrane patches, and prior repairs; and
- rear transition and corner joints.
Use diffuse daylight and view each bead from more than one angle. Take one wide photo to establish location, then a close image with a ruler beside—but not pressed into—the defect. Mark the photo and roof map; do not mark the membrane with a solvent-based pen.
Read what the seam is telling you
A good inspection distinguishes a surface blemish from a joint that needs diagnosis.
Schedule a compatibility-confirmed reseal when the documented system permits owner maintenance and you find a small void, edge lift, shrinkage gap, crack through the bead, exposed fastener, or a clean loss of adhesion with sound materials underneath.
Stop and escalate when you find a soft deck, swelling, staining inside the RV, a moving fixture, a split membrane, saturated material, widespread adhesive failure, corrosion, mold odor, or a seam that has repeatedly reopened. New sealant can hide the entry point without correcting wet decking, loose hardware, damaged bedding, or trapped moisture.
Winnebago includes soft spots and lifted seams in its roof-inspection warning signs, while Jayco warns that neglected resealing can lead to serious roof damage.[1][2] Treat active water entry as damage control: protect the RV only by a method the manufacturer accepts, reduce further exposure, and arrange diagnosis promptly.
Choose by joint, not by shelf label
A compatibility decision has four gates:
| Gate | Question to answer before purchase |
|---|---|
| Roof system | Does the RV or membrane maker approve this exact sealant for the identified covering? |
| Other substrates | Does the technical data cover the flange, rail, cap, paint, metal, or plastic it will contact? |
| Existing material | May it overlap the old sealant, or must that material be removed by a specified method? |
| Geometry and conditions | Is it made for this slope, temperature, movement, preparation, and cure window? |
“Self-leveling” describes flow behavior, not universal compatibility. Alpha’s repair procedure assigns its leveling material to horizontal work and its non-sag material to upright surfaces.[4] Dicor likewise labels the cited product for horizontal use and separately lists the membranes and substrates it claims.[5] The practical rule is broader than either catalog: first verify chemistry and substrates, then choose flow behavior for the joint’s orientation.
The initials do not settle the question either. EPDM and TPO are different membrane families, and even a manufacturer that lists both may limit approval to named formulations.[6] Verify the exact stock-keeping unit and current technical sheet; do not extend a compatibility statement from one product to a whole brand.
Prepare only as the approved procedure allows
Surface preparation is part of compatibility. The Alpha repair sheet says to remove only loose material by hand, avoid puncture-capable tools, clean with soap and water, and let the area dry; it also warns against solvents around existing caulk and roof plastics.[4] The cited Dicor directions similarly require a clean, dry surface, but name additional contaminants to remove.[5]
Those examples show why a generic “wipe it with solvent” recipe is unsafe. A cleaner that helps one sealant bond can attack a membrane, craze a plastic flange, soften old material, or leave residue. Use only the cleaner, primer, removal method, bead size, tooling method, and cure conditions specified for the confirmed roof system and exact sealant.
Do not carve aggressively at a rubber or plastic membrane. Do not seal over dirt, moisture, or a bead that is detached beneath the surface. Do not assume a fresh skin means the joint is rain-ready. Read the current technical data and weather forecast, and give the repair its full stated protection and cure period.
A no-guess repair decision
Use this sequence at every questionable seam:
- 1. Photograph and label the location before cleaning.
- 2. Check for deck movement, wet material, loose hardware, or a damaged fixture.
- 3. Identify the membrane and all adjoining substrates from records.
- 4. Identify the old sealant or treat it as unknown.
- 5. Ask the RV, roof-system, or sealant manufacturer to confirm the complete material combination.
- 6. Compare preparation, primer, temperature, and cure requirements with actual conditions.
- 7. If any answer remains unknown, stop and use a qualified RV roof technician.
- 8. After an approved repair, photograph the finished joint and recheck it on the schedule in your manual.
This is slower than matching colors at a parts counter and faster than correcting a failed overlay. The right sealant is not the most popular tube; it is the exact product the responsible manufacturer approves for the membrane, substrate, old material, orientation, and conditions in front of you.
Frequently asked questions
Can I identify an RV roof by looking at it?
Not reliably enough to select a sealant. Color, texture, and exposed backing can offer clues, but coatings, aging, repairs, and similar-looking membranes make visual identification uncertain. Confirm with the build sheet, owner packet, VIN-specific manufacturer support, or a qualified inspection.
Can new lap sealant go over old sealant?
Only when the roof-system and new-sealant instructions permit that combination and specify how to prepare it. Unknown, contaminated, loose, or chemically incompatible material is not a sound base. Some system instructions allow sound old material to remain; that permission cannot be generalized to another roof.[4]
Does self-leveling sealant belong on every roof seam?
No. It is intended to flow, so the joint must have the orientation the product allows. Vertical edges commonly require a non-sag formulation, but both the formulation and its compatibility still need confirmation for the roof and adjacent materials.[4][5]
Is “compatible with EPDM, TPO, and PVC” enough?
No. That statement can be useful for the membrane gate, but the same bead may touch old sealant, plastic, paint, fiberglass, metal, or wood. Verify every contact surface, preparation step, and application limit on the current product data sheet.[5]
Source credit: This original RVCamping.info guide synthesizes current RV-maker and roof-system instructions into a material-first inspection and decision workflow. Product documents are cited as examples of why compatibility must be confirmed, not as endorsements.
Sources
- 2026 Towable Owner's Manual | Jayco (retrieved September 16, 2026)
- RV Maintenance Without the Overwhelm | Winnebago (retrieved September 16, 2026)
- Cleaning and Maintaining Your Alpha Systems Roof Membrane | Alpha Systems (retrieved September 16, 2026)
- Recommended Repair Method for Alpha Systems Roofing Sealant | Alpha Systems (retrieved September 16, 2026)
- Self-Leveling Lap Sealants | Dicor Products (retrieved September 16, 2026)
- Roofing and Sealant FAQ | Dicor Products (retrieved September 16, 2026)
What's Your Reaction?