










Keep Mice Out of Your RV: A Between-Trip and Campsite Checklist
A practical RV rodent plan for storage and camp: remove attractants, seal only safe-to-close gaps, reject unreliable folklore, clean droppings safely, and know when wiring needs professional inspection.

Keep Mice Out of Your RV: A Between-Trip and Campsite Checklist
By Romana
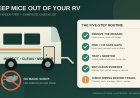
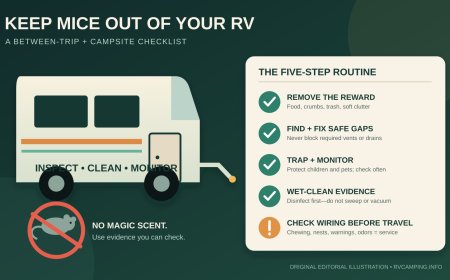
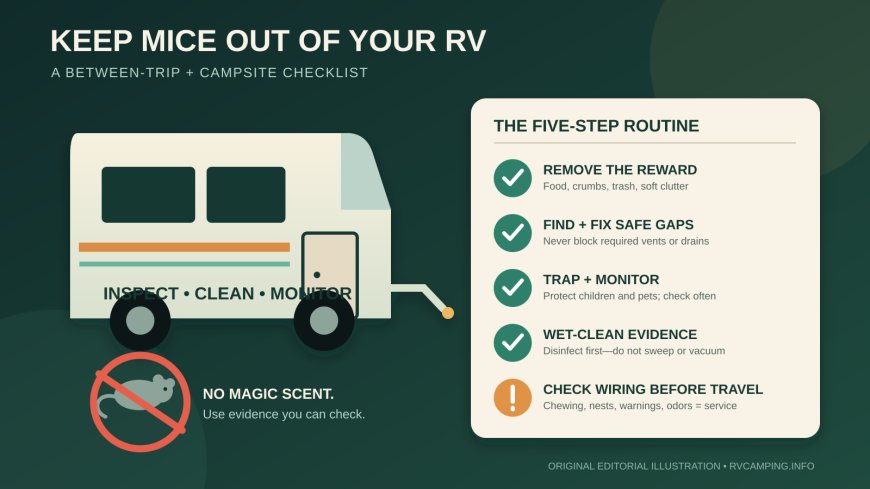
The reliable plan is not a pouch, scent, or plug-in. It is a repeatable routine: remove attractants, close safe-to-close gaps, monitor, trap active mice, clean contamination correctly, and inspect anything they may have chewed.
An RV can be quiet, sheltered, and stocked with exactly what a mouse needs. The risk does not end when the pantry is empty: paper towels, upholstery, insulation, and forgotten pet treats can become food or nesting material. A rig that sits undisturbed gives a small problem time to become a wiring, duct, or sanitation problem.
The useful dividing line is prevention versus response. Prevention makes the RV harder to enter and less rewarding to explore. Once you find fresh droppings, a nest, gnaw marks, or a trapped rodent, stop treating the situation as a prevention project. You now need removal, safe cleanup, renewed monitoring, and possibly a professional inspection.
Between trips: remove the reward before you close the door
Do a food-and-nesting sweep at the end of every trip, not weeks later.
- Remove food, not just open food. Take out snacks, dry goods, pet food, birdseed, drink mixes, and anything in paper or thin plastic packaging. Vacuuming ordinary crumbs is fine before there is rodent evidence; the CDC warning against vacuuming applies to rodent urine, droppings, and nests.[1]
- Empty trash and wipe cooking areas. Check the toaster tray, range surround, dinette, sofa seams, cab cup holders, and exterior kitchen.
- Reduce easy nesting material. Store paper goods, spare linens, and soft supplies in smooth, lidded bins. Remove unnecessary cardboard.
- Drain and dry ordinary water sources. Fix drips and leave sinks and counters dry. Follow the RV maker's winterization and appliance instructions rather than improvising changes to plumbing or safety equipment.
- Inspect the parking area. Move spilled seed, pet food, open garbage, leaf piles, and loose fabric away from the rig. A clean RV beside an open bag of birdseed is still parked at a feeding station.
University extension guidance puts exclusion ahead of fragrance: adult mice can use openings about 1/4 inch, and gaps commonly occur around plumbing, drainpipes, electrical lines, vents, roofs, doors, and other penetrations.[2][3]
Close entry routes—but do not close safety openings
Use a flashlight and inspect the RV from the ground up. Look around the underbelly, utility penetrations, wheel wells, steps, slide mechanisms, storage-bay corners, cable and plumbing runs, and gaps where unlike materials meet. Inside, check under sinks, behind removable access panels you are authorized to open, and around lines entering cabinets.
For a gap that is genuinely unintended, use a durable repair compatible with the surrounding material. NC State Extension recommends metal-based fillers or screens for many openings and notes that steel wool or copper mesh should be secured with caulk so rodents cannot push around it.[2] Utah State recommends heavy materials such as sheet metal or heavy-gauge hardware cloth for larger openings.[3]
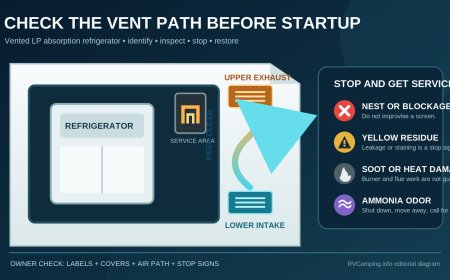
An RV is not a house, however. Never screen, stuff, tape, or caulk an opening merely because it looks mouse-sized. Refrigerator, furnace, water-heater, battery, generator, combustion-air, drain, and pressure-relief openings may be required for cooling, venting, drainage, or safe operation. Do not place loose mesh near belts, fans, hot exhaust, moving suspension, slide mechanisms, or electrical terminals. Confirm the purpose of an opening in the manuals for your exact RV and component; if you cannot identify it, ask the manufacturer, dealer, or qualified RV technician.
Check door sweeps, compartment seals, and damaged screens, but remember that closing a door on a loose cable or hose may create a different hazard. A correct repair preserves the equipment's intended clearance, airflow, drainage, and service access.
At camp: make the nightly routine boring
Campsite prevention should take minutes, not become a perimeter of chemicals.
- Keep the screen door and compartment doors closed when they are not in use.
- Put food away after meals, including pet bowls and treats. Use hard-sided, closed storage where practical.
- Clean grill grease, table scraps, and spills; follow campground rules for trash and wildlife-safe storage.
- Do not leave paper grocery bags, snack totes, or dog-food bags open in an exterior kitchen or under the RV.
- Before retracting a slide, packing a hose, or closing an exterior kitchen, look for droppings, shredded material, and gnawing.
- If you hear scratching or find fresh evidence, notify campground management and begin a measured response instead of moving loose bait or poison around the site.
If you use snap traps for active mice, place them only where children and pets cannot reach them, along travel edges where evidence is present, and check them frequently. Utah State Extension identifies snap traps as a standard control tool and recommends placement close to walls.[3] A protected trap is easier to account for than loose poison and lets you remove the carcass rather than discover an odor inside a wall later.
What not to count as prevention
Peppermint oil and scented pouches
A strong smell is not a sealed opening. NC State Extension specifically includes peppermint oil, mothballs, ammonia, and commercial mixtures in its discussion of repellents and does not consider them dependable for managing or preventing mice. It also warns that volatile oils disappear quickly and may interfere with baits and traps.[2]
That does not prove every scented product has zero short-term effect in every setting. It does mean you should not treat a pleasant-smelling cabinet as evidence that the RV is protected. Keep inspecting, sealing, cleaning, and monitoring.
Ultrasonic plug-ins
Commercial residential sonic pest devices have not been shown effective in scientific studies, according to University of Arizona Cooperative Extension, which does not advise them for common pest problems.[5] In an RV, walls, cabinets, upholstery, and storage bays create even more shadowed spaces. A glowing indicator light is not a population count and should not delay action on fresh evidence.
Dryer sheets, soap, flashing lights, and improvised odors
These ideas do not close a gap, remove a nest, or show whether activity continues. If you choose a nonhazardous scent for your own preference, keep it separate from the control plan. Do not make it the reason you skip inspection or leave food aboard.
Mothballs
Do not scatter mothballs in an RV, storage bay, engine compartment, or around a campsite to repel rodents. The National Pesticide Information Center says mothballs have little or no effect as repellents unless a product label specifically describes that use, and open use can expose people and animals to pesticide vapor.[6] In the small volume of an RV, that is an especially poor trade.
Be cautious with rodent poison
Rodenticide is not a casual “set it and forget it” storage accessory. EPA warns that rat and mouse poisons can harm people, children, and pets when misused. It says to follow the label, keep products away from food, place traps or baits where children and pets cannot reach them, and promptly dispose of carcasses to reduce poisoning risk to pets and wildlife.[4]
If trapping and exclusion are not resolving activity, use a licensed pest-management professional who understands occupied vehicles, pets, local wildlife, and campground rules. Never broadcast loose bait, invent a container, transfer bait from its supplied station, or put pesticide where the label does not allow. A bait station does not repair the entry route.
Found droppings or a nest? Change procedures
Do not dry-sweep or vacuum rodent urine, droppings, or nesting material. CDC says disturbing dry contamination can put virus-containing droplets into the air.[1]
For a typical, limited cleanup:
- Move the RV to or keep it in a well-ventilated place. For a closed RV living space, open doors and windows for 30 minutes and leave during ventilation; CDC gives a 20-minute airing step for a vehicle interior and engine compartment.[1]
- Wear rubber or plastic gloves.
- Soak urine, droppings, a dead rodent, and nesting material with a household product labeled disinfectant or with the CDC bleach solution. Respect the product label and surface compatibility.
- Leave it wet for five minutes, or for the contact time on the disinfectant label.[1]
- Wipe up with paper towels. Double-bag dead rodents and nesting material, then put the sealed waste in a lidded trash receptacle that receives regular collection.[1]
- Disinfect the hard surface again. Launder contaminated washable fabrics with hot water and detergent, then machine-dry on high or air-dry in the sun.[1]
- Wash gloved hands before removing gloves, then wash bare hands with soap and warm water.[1]
Do not mix cleaning chemicals. Bleach can corrode metals and damage fabrics or finishes, so use a compatible EPA-registered disinfectant where appropriate and follow its label. Do not spray liquid into electrical equipment, connectors, controls, or an energized compartment.
If contamination is heavy, widespread, inside HVAC ducts, or inaccessible behind walls or insulation, stop. CDC calls for extra precautions for heavy infestations and directs people to professionals when rodents have entered heating and cooling ventilation systems.[1]
When the wiring needs more than a glance
Rodent evidence changes the pre-trip inspection. Before energizing suspect equipment or towing, use good light and look—without reaching blindly—for shredded insulation, nests, gnaw marks, missing wire covering, exposed conductor, damaged connectors, debris in air intakes, and contamination near batteries or electrical equipment.
Arrange a qualified RV or automotive inspection when you find:
- visible chewing, exposed copper, broken insulation, or a damaged connector;
- a nest beside wiring, a battery, a fuse panel, an appliance, a generator, a fan, or a hot component;
- new warning lights, repeated blown fuses or tripped breakers, intermittent lights, a no-start, or an unexplained battery drain;
- a burning or urine-like odor from a vent or electrical area;
- rodent material in an air intake or filter housing; or
- evidence that disappears into a sealed underbelly, wall, roof cavity, or wiring loom.
CDC tells owners of rodent-affected vehicles to consult a qualified mechanic or automotive professional, inspect intakes and filters before starting a long-idle vehicle, and replace a contaminated air filter when nesting material is found in the intake system.[1] Outdoors RV's owner manual separately makes wiring and connector inspection part of hitching and says to inspect external braking-system wiring before moving the RV.[7] Your own chassis, RV, converter, inverter, solar, battery, generator, and appliance manuals control for your rig.
Do not probe, splice, energize, or cover chewed wiring as a diagnostic shortcut. Keep clear of orange high-voltage cables and battery-service areas on hybrid or electric tow vehicles. If wiring is exposed, safety-related equipment acts abnormally, or a nest is near heat or moving parts, leave the unit off and arrange service before travel.
The repeatable RV mouse checklist
Before storage: remove food and trash; clean crumbs and grease; bin soft goods; inspect 1/4-inch-scale gaps; repair only confirmed unintended openings; set accessible monitoring or protected traps if needed.
At camp: close doors and bays; store food and pet supplies; clean spills; manage trash; inspect slides, exterior kitchens, and utility areas before packing.
If evidence appears: stop vacuuming; photograph the location; ventilate; disinfect and wet-clean; trap and monitor; find the route; inspect nearby wiring, ducts, filters, hoses, and insulation.
Before the next drive: verify that no fresh evidence has appeared, all traps are accounted for, required vents are clear, electrical and braking systems pass the manufacturer-directed pre-trip check, and any suspect wiring has been professionally cleared.
A mouse-free RV is not guaranteed by one product. It is maintained by a short routine that produces visible evidence: no food reward, no open route, no fresh droppings, no unaccounted trap, and no unchecked damage.
Sources
- Centers for Disease Control and Prevention: How to Clean Up After Rodents — official cleanup, vehicle inspection, ventilation, HVAC, and heavy-infestation precautions; updated April 8, 2024; retrieved October 10, 2026.
- NC State Extension: Surveillance and Management of Common Structure-Invading Mice — exclusion materials, opening size, trapping, and limits of scent repellents; retrieved October 10, 2026.
- Utah State University Extension: The House Mouse—Not Your Storybook Christmas Mouse — exclusion, food storage, and snap-trap guidance; retrieved October 10, 2026.
- U.S. Environmental Protection Agency: Safely Use Rodent Bait Products — label, bait-station, child, pet, food-storage, and carcass precautions; updated September 29, 2026; retrieved October 10, 2026.
- University of Arizona Cooperative Extension: Sonic Pest Repellents — evidence review of residential sonic devices; publication AZ1639; retrieved October 10, 2026.
- National Pesticide Information Center: Can I Use Mothballs to Repel Insects or Animals? — pesticide-label, efficacy, and exposure guidance; updated September 8, 2025; retrieved October 10, 2026.
- Outdoors RV Manufacturing: Owner Manual — manufacturer pre-trip directions for wiring, connectors, braking-system wiring, and function checks; revised August 6, 2018; retrieved October 10, 2026.
What's Your Reaction?