








Before the RV rolls: check the refrigerator latch and door seal
A model-specific pre-departure check for RV refrigerator travel latches, door gaskets, loading, safe repair boundaries, and food decisions after a door opens in transit.

Before the RV rolls: check the refrigerator latch and door seal
By Romana
An RV refrigerator door can look closed in the driveway and still open on the first hard turn. A crowded door bin, a container projecting past a shelf, a tired latch, or a folded gasket can defeat what felt like a solid push. The result is more than a puddle and a cleanup: glass can fall into the aisle, raw-food juices can spread, and nobody may know how long perishable food has been warming.
The useful pre-departure test is not “give the handle a tug.” It is a short, model-specific check of the latch, the load, and the full gasket perimeter. Do it while the RV is parked, with enough time to unload the refrigerator or arrange service if it fails.
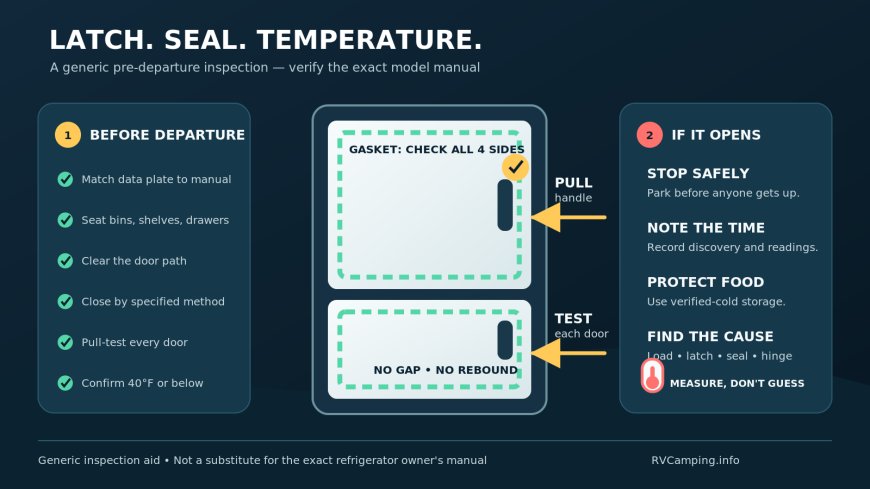
Departure rule: Identify the exact refrigerator model, follow that model’s door-lock instructions, remove anything that prevents full closure, confirm the latch actually holds, and check that the gasket contacts the cabinet all the way around. If the latch or seal fails, do not hide the problem with a makeshift restraint.

Start with the data plate, not a familiar-looking handle
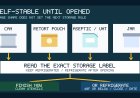
“RV refrigerator” is not one latch design. Even within one manufacturer’s line, a door may use an automatic travel latch, a self-latching handle, a separate storage lock, or a manual catch. A control-panel lock is not necessarily a door lock.
Photograph the refrigerator’s data plate and record the manufacturer, complete model number, serial number, and—if shown—the product or revision code. Then retrieve the owner’s manual from the manufacturer or its official support library. Match the model family on the manual cover to the plate. If the manual covers several variants, find the instruction and illustration for the hardware actually installed.
The differences are real. On the Dometic RM1350 family, certain versions have an automatic travel latch tied to the RV engine signal; while the engine is running, a manual release is followed by automatic relocking after five seconds.[1] The Norcold N8DC/N10DC manual instead says to push each door toward the refrigerator until a click is heard.[2] A Furrion 15-cubic-foot French-door model uses self-latching doors and directs the owner to make sure the latches and handles work and the doors are locked before departure.[3]
Those examples are a warning against generic advice, not a menu from which to choose. Use the instruction for the refrigerator in front of you. Keep the PDF offline on the phone or in the RV records so a poor signal at camp does not turn a model question into a guess.
Unload the latch before testing it
A latch is supposed to retain a properly closed door. It is not meant to crush an overfilled bin into place.
Before testing:
- Move tall bottles out of the door if they can tip into a shelf.
- Confirm every drawer and shelf is seated in its intended position.
- Turn containers so lids, handles, and bags do not project into the door path.
- Keep dense glass jars and other hard, heavy containers out of vulnerable door bins unless the model’s storage arrangement clearly accommodates them.
- Secure food so it cannot shift and strike the door from inside. Furrion specifically warns that heavy glass or metal containers may move and bounce during travel.[3]
- Wipe sticky residue from the latch contact surfaces and gasket using only the cleaning method allowed by the manual.
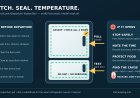
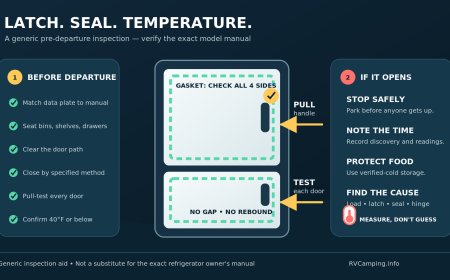
Now close the door by the prescribed method. Listen or feel for the specified engagement, then pull on the normal handle with the force used to open it—do not pry at the edge. Test every fresh-food door, freezer door, and drawer separately. On a multi-door unit, close them in the sequence the manual requires and check any center flap or mullion; a misplaced flap can prevent one door from seating even when the other looks flush.
A click is evidence only if the door then resists a normal opening pull. A door that rebounds, sits proud of its neighbor, releases without the normal handle action, or needs a hip-check has failed the test.
Walk the entire gasket, not just the handle side
The travel latch and magnetic gasket do different jobs. The latch retains the door; the gasket makes continuous contact that keeps warm, moist air out. One can pass while the other fails.
With the door closed, inspect the perimeter under good light:
- Look for a corner rolled out of its groove, a split, a hardened section, sticky debris, or a place where the gasket is pinched.
- Sight across paired doors for sag, uneven gaps, or one corner standing away from the cabinet.
- Check that bins, shelves, food packages, and the interior light switch are not holding the door off the frame.
- Use the seal test specified by the exact manual.
Norcold’s N8DC/N10DC manual gives a useful model-specific example: close the door on a piece of paper about the size of a dollar bill, pull gently, and look for slight drag on all four sides. If there is no slight drag, Norcold says the door is not sealing correctly and directs the owner to a dealer or authorized service center.[2] Do not automatically apply that test, a particular paper thickness, or a repair procedure to every brand. Check the manual first.
The Furrion manual also connects installation level with gasket sealing performance.[3] That does not mean leveling feet should be adjusted on any built-in RV refrigerator after watching a generic video. It means poor alignment deserves model-specific diagnosis: confirm the RV and appliance installation conditions required by the manual, then use the prescribed adjustment or service route.
Do not improvise a repair at the door
A strip of duct tape, a bungee cord, a wedge, a cabinet screw, or a universal child lock may appear to solve the immediate problem. None proves that the original latch has engaged or that the gasket is sealing.
Makeshift restraints can load a handle, hinge, trim panel, or gasket in a direction the appliance was not designed to carry. Tape can leave residue on sealing surfaces. A drilled fastener can strike hidden wiring, tubing, or structure. A wedge can create the very air gap the owner is trying to prevent. Most importantly, an improvised closure can conceal a failed part until the next stop.
Do not bend a latch tongue, move a striker, reverse a hinge, add holes, or substitute a “close enough” part unless the exact service information authorizes that procedure. The Furrion manual says not to disassemble and repair an unresolved problem yourself; it calls for an authorized technician and genuine parts.[3] Dometic’s automatic-latch instructions also show why bypassing hardware can be a mistake: on the covered models, the latch behavior depends on engine state and refrigerator state.[1]
If the door does not pass, remove the food to a verified-cold cooler or another working refrigerator. Travel only after the door is secured by the manufacturer-approved method for that model or the appliance has been made safe by qualified service. Do not let a temporary empty-door restraint become an undocumented permanent repair.
A two-minute refrigerator departure check
Add this block to the driver’s final walk-through:
- [ ] Data-plate model matches the saved manual.
- [ ] Interior load is below shelf edges and cannot strike the doors.
- [ ] Shelves, drawers, bins, center flap, and freezer baskets are fully seated.
- [ ] Gasket is clean, dry, unrolled, and contacting around the full perimeter.
- [ ] Each door closes using the manual’s method and gives the expected click, catch, or lock indication.
- [ ] Each latched door resists a normal pull without prying.
- [ ] No airing/storage position is mistakenly engaged for travel.
- [ ] Refrigerator thermometer reads 40°F or below before departure.
- [ ] A cooler, cold packs, and cleaning supplies are reachable without unloading the whole RV.
Run the check again after changing shelf positions, reversing a door, replacing a gasket or latch, or loading unusually heavy groceries. Make the person who closes the refrigerator the person who calls out “latched”; that closes the gap between “I thought you did it” and “I thought you did.”
If a refrigerator door opens in transit
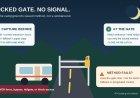
Do not ask a passenger to stand up and close it while the RV is moving. Pull over at the first safe, legal place, secure the vehicle, and then deal with the appliance.
1. Stop the warming and the spill
Note the time the open door was discovered. Close it if it can latch without forcing; otherwise move perishable food to a prepared cooler with enough ice or frozen packs to hold 40°F or below. Keep people away from broken glass. Use gloves for sharp debris, and keep raw-food leakage away from ready-to-eat food.
Do not repeatedly open the door while deciding what to do. FDA advises keeping refrigerator and freezer doors closed to preserve cold, and recommends a freestanding appliance thermometer because a control setting does not show the actual compartment temperature.[4]
2. Build a temperature history, not a reassuring story
Record the appliance thermometer reading before moving it. Check individual suspect packages with a clean food thermometer where practical. Note the departure reading, elapsed driving time, outside conditions, whether the cooling system was operating, and the earliest time the door could have opened. A cold-looking package or a running compressor does not reconstruct missing time.
FDA says food is safe if the refrigerator is still at or below 40°F, or if the food has been above 40°F for no more than two hours. If the time at or above 40°F is unknown, FDA says to throw the food out.[4] Apply that decision item by item: sealed mustard and a package of raw poultry do not have the same discard decision. Never taste food to judge safety.
If raw meat, poultry, seafood, or egg liquid leaked, discard any ready-to-eat food it contacted. Bag leaking products before moving them. Clean and sanitize affected refrigerator surfaces according to the appliance manual and the sanitizer label; do not flood controls, lights, fans, or gasket grooves.
3. Find the mechanical cause before rolling again
After the food is controlled, inspect the load, latch, striker, handle, hinges, gasket, bins, drawers, and any center flap. Photograph the as-found condition. Repeat the manual’s closure test with the refrigerator unloaded enough to see the mechanism.
If an obstructing package caused the opening and the latch now passes every prescribed check, reload conservatively and recheck. If the cause is a cracked part, loose hardware, poor alignment, damaged seal, intermittent automatic latch, or simply unknown, treat the latch as failed. Keep perishables in verified cold storage and obtain the correct part or service rather than trusting a roadside invention.
The check that matters is the one your model passes
A safe refrigerator departure check has three independent results: the load cannot push outward, the specified travel latch retains every door, and the gasket seals continuously. The thermometer is the fourth line of defense because it gives the food decision a measurement if the first three fail.
Save the exact manual, test the actual hardware, and leave improvisation out of the latch. If the door opens anyway, stop safely, preserve evidence and temperature history, protect uncontaminated food, and make the next departure only after the mechanical cause is understood.
Sources
What's Your Reaction?