

















RV campground water pressure: a regulator-and-gauge workflow that finds the real problem
Use a regulator and gauge to separate high pressure from low flow, recognize warning symptoms, and know when RV water troubleshooting should stop.

By Romana | Tips and Trends | October 10, 2026
A pressure regulator should be the first component between a campground water source and an RV, but the dial is not a universal “safe” selector. The correct ceiling comes from the instructions for your RV and every installed water-using appliance. Use the lowest applicable limit.
That detail matters. Winnebago tells owners in the cited guidance to regulate its systems to no more than 50 psi.[1] A Truma Combi manual gives a 40.6 psi maximum at the appliance inlet, while a Truma AquaGo manual lists a 65 psi maximum operating pressure.[3][4] Those figures are not interchangeable. They prove why “set every RV to 50/55/65 psi” is bad advice.
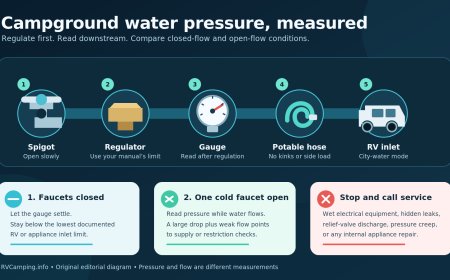
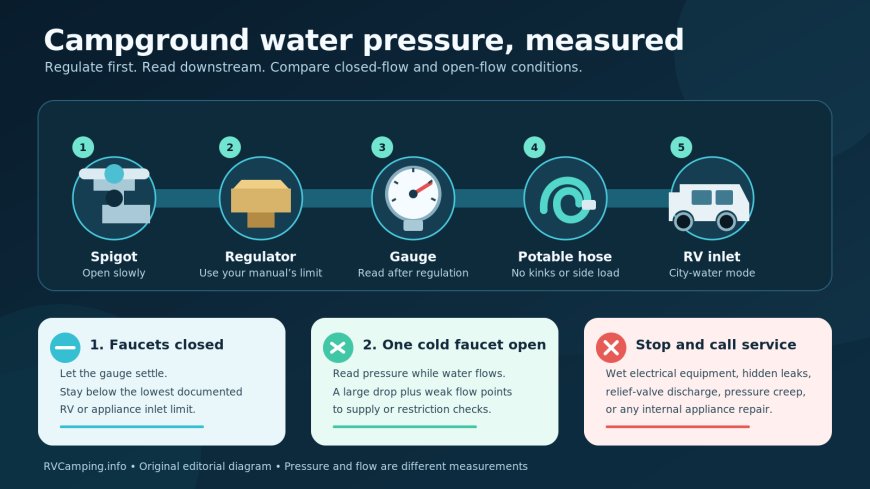
The useful campground routine is simple: identify the documented limit, put a suitable regulator upstream of the hose, read pressure on the regulated side, then compare a no-flow reading with a reading taken while water is moving. That separates excessive pressure from inadequate flow before anyone starts opening cabinets.
Before connecting: find the number that governs your rig
Start with the current owner’s manual for the RV’s exact model and year. Then check the manuals for the water heater or hydronic appliance, toilet, filter housing and any other component that states an inlet limit. If two instructions differ, do not average them. Treat the lower number as the working ceiling unless the RV or component manufacturer gives written model-specific direction.
Also identify what is already installed. Some RVs have a pressure-reducing city-water inlet. Pentair’s Shurflo city-water-entry manual, for example, covers distinct 50 psi and 65 psi nominal versions and gives those products a 125 psi maximum inlet rating.[2] Those are specifications for identified Shurflo products—not permission to expose every portable regulator, hose or RV to 125 psi.
A portable adjustable regulator with a gauge can make diagnosis easier, but verify its potable-water suitability, pressure range and flow arrow. A fixed regulator may protect the system yet provide no measurement. Valterra’s A01-1125 gauge/regulator product is factory set to 45 psi, which is a product setting rather than an all-RV recommendation.[5]
The hookup order
For a portable regulator and a downstream gauge, use this sequence unless the product or RV manual specifies another arrangement:
- Campground spigot — inspect the threads and briefly flush the outlet into a safe drain area if campground rules allow.
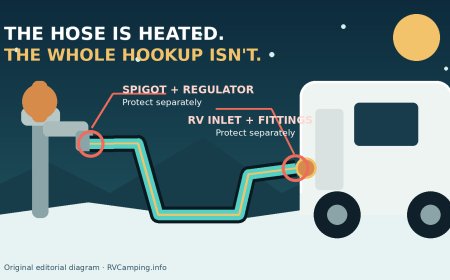
- Pressure regulator — place it at the source so the potable-water hose is not left carrying unregulated campground pressure.
- Gauge on the regulated side — skip the extra gauge when the regulator has an integral downstream gauge.
- Potable-water hose and optional filter — straighten kinks and support heavy components so they do not lever against the spigot or RV inlet.
- RV city-water connection — confirm the RV’s fill/diverter valves are in the city-water position shown in its manual. Turn the onboard demand pump off unless the RV manufacturer says otherwise.
Check that hose washers are present and sound. Thread garden-hose connections by hand, then stop when the seal is made. “Tighter” is not a pressure-control method. Pentair warns that sealant can lubricate threads and contribute to overtightening on its city-water-entry product; it also specifies hand tightening and a model-specific torque limit.[2] Follow the instructions for the hardware in front of you rather than borrowing that torque value for another fitting.
Open the campground valve slowly while watching the assembly. If a connection sprays, a housing swells, or the gauge instantly exceeds the documented limit, close the pedestal valve. Do not try to tighten a live, pressurized fitting.
Take two readings, not one
A single gauge number can hide the difference between pressure and available flow. Winnebago’s regulator comparison explicitly evaluated both because a device can control pressure yet restrict delivery.[1]
Reading 1: no-flow pressure. With the system filled, all fixtures closed and the water heater not actively heating, let the gauge settle. This is the downstream pressure with no intentional water use. It must remain at or below the lowest applicable limit in the RV and component manuals. If an adjustable regulator is permitted to be owner-adjusted, follow its own instructions and make small changes; do not assume every brand uses the same procedure. A gauge that does not return to zero when disconnected is suspect.
Reading 2: flowing pressure. Open one cold-water faucet fully and read the gauge again while water is moving. Then close it. A modest change is normal, but a large collapse paired with weak flow points toward a restriction or inadequate campground delivery rather than excessive static pressure. Repeat once with another cold fixture to distinguish one blocked aerator from a whole-system issue.
Record the site, time, regulator setting, no-flow reading, flowing reading and which fixture was open. Campground supply can change as other guests use water. A short log is more useful to a technician than “the shower felt weak.”
What the symptoms usually narrow down
The no-flow reading is above the manual limit. Shut the campground valve. Confirm the regulator’s direction and that the gauge is downstream. If the adjustable unit will not hold the selected pressure, remove it from service. Do not compensate by barely cracking the pedestal valve; that throttles flow but is not reliable pressure regulation.
No-flow pressure is acceptable, but pressure falls sharply with one faucet open. Look only at accessible external restrictions first: a kinked hose, clogged inlet screen, loaded filter cartridge, undersized or failing regulator, partly opened pedestal valve, or weak campground supply. Bypass a filter only if its instructions permit it and the water remains connected through potable-water-rated equipment. If neighboring pedestals are affected, report the supply issue to campground staff rather than adjusting the RV.
Pressure appears normal, but only one fixture is weak. The campground source and regulator are less likely to be the cause. With the water shut off and pressure relieved at a faucet, inspect that fixture’s owner-serviceable aerator or screen according to its manual. Stop if access requires disturbing wiring, gas components or sealed cabinetry.
Pressure pulses or the needle chatters. First rule out a loose hose, an intermittently opening campground source, a clogged screen and an unsupported regulator assembly. If the symptom continues inside the RV, or occurs on both city water and the onboard pump, it has crossed from a pedestal check into system diagnosis.
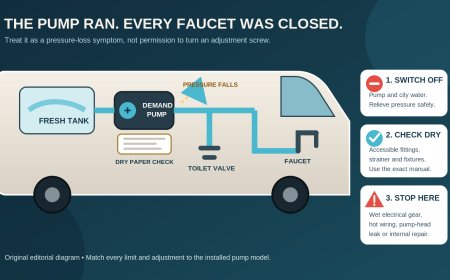
A new leak appears at a fitting or cabinet. Close the pedestal valve immediately, open a cold faucet to relieve pressure, and turn off the water heater. Dry the visible area and do not reconnect merely because the gauge later reads “safe.” Pressure may have exposed a damaged fitting, freeze crack, failed check valve or weakened seal that now requires repair.
Water drips from a heater relief outlet. Do not plug, cap or defeat the valve. High supply pressure is only one possibility; thermal expansion or debris at a valve seat can produce a similar symptom. The Truma AquaGo troubleshooting table lists excessive system pressure, lack of expansion capacity, and contamination at the valve seat as separate possibilities.[4] Its specified relief-valve replacement is technician work. The Truma Combi manual likewise says continued relief/drain discharge should be referred to Truma service and reserves reducer or relief-valve replacement for a qualified technician.[3]
Safe diagnostic boundaries
An owner-level campground check should stay on the exterior, depressurized side of accessible hose-thread parts: washers, screens, hose routing, regulator direction, a filter cartridge changed according to its instructions, and gauge observations. Close the pedestal and relieve pressure before removing anything. Never remove a regulator bonnet, defeat a check valve, alter a factory city-water inlet, or adjust an internal pump pressure switch unless the exact manufacturer procedure assigns that work to the owner.
Keep hot-water hazards separate from pressure troubleshooting. Switch the heater off before investigating a leak and allow it to cool. Do not lift a relief lever on a hot appliance simply to “see what happens.” Use only the inspection or flushing procedure in that heater’s manual.
Water near electricity is a hard stop. If a leak reaches a converter, inverter, breaker panel, receptacle, transfer switch, battery connection or exposed wiring, do not touch wet equipment or stand in water to operate a disconnect. Cut power only from a dry, safe location. CDC guidance says wet electrical gear should remain off until dry and inspected by a qualified electrician when there is doubt.[6]
Stop and call service when…
Disconnect city water, relieve system pressure, and arrange qualified RV or appliance service when:
- the regulator cannot keep no-flow pressure below the lowest documented limit;
- pressure creeps upward after adjustment, the gauge sticks, or the regulator body leaks;
- water continues from a relief/drain valve after the supply is shut off and the appliance is cool;
- a leak is hidden behind a wall, under a sealed floor, or beside energized equipment;
- the city-water check valve leaks backward, the inlet is cracked, or a fitting spins in the wall;
- diagnosis requires opening an appliance, altering gas or electrical connections, changing pump pressure, or replacing a safety valve;
- the RV was exposed to freezing, impact or flooding and damage may extend beyond one visible fitting; or
- the exact manuals cannot be identified and the pressure limit is therefore unknown.
Until the cause is resolved, leave the pedestal off. Use the fresh tank and pump only if inspection shows that system is dry, undamaged and permitted by the RV manual; otherwise use bottled water. A gauge is evidence, not permission to keep a leaking system pressurized.
A 60-second departure check
Before leaving the campsite or going to sleep, look at the regulator, hose, RV inlet and the ground beneath them. Feel for dampness at accessible connections, verify the hose is not pulling sideways on the inlet, and shut off campground water when the RV will be unattended if that is the practice directed by your RV maker. The goal is not to achieve somebody else’s favorite PSI. It is to deliver usable flow while staying below the most restrictive documented limit in your own system—and to stop before a pressure symptom becomes water damage.
Sources
- Winnebago, RV Water Pressure Regulator Round-Up (manufacturer guidance and a pressure-versus-flow field comparison; May 2016).
- Pentair Shurflo, City/Curbside Potable Water Entry Installation Instructions (Rev. T; model-specific pressure, installation and tightening limits).
- Truma, Combi Operating Instructions (40.6 psi inlet limit and relief/drain troubleshooting; manufacturer manual mirrored by Forest River).
- Truma, AquaGo LP Gas Instant Water Heater Operating Instructions (65 psi model limit, relief-valve symptoms and service boundaries; manufacturer manual mirrored by Forest River).
- Valterra, Gauge for Adjustable Water Regulator, A01-1125 (manufacturer product page; 0–160 psi gauge and 45 psi factory setting).
- Centers for Disease Control and Prevention, What to Do to Protect Yourself From Electrical Hazards (reviewed August 26, 2026; wet-equipment safety boundary).
What's Your Reaction?