






Home-canned food in an RV pantry: pack the process record, not just the jars
Verify the canning process, protect jars from travel damage and RV heat, inspect seals twice, and keep an easy backup meal for any doubtful jar.

Home-canned food in an RV pantry: pack the process record, not just the jars
By Romana | October 14, 2026
A row of home-canned beans, salsa or soup can look like ideal RV pantry food. The jars need no refrigeration while properly sealed, and dinner is already mostly made. The trouble is that a sound-looking lid cannot tell you whether the food was processed by a tested method.
That makes the packing decision different from checking a commercial can. Before a home-canned jar goes into the RV, you need to know what is in it, which tested recipe and process were used, when it was canned, and whether its seal and storage history have remained acceptable. If that chain is missing, the campsite is a poor place to investigate it.
The National Center for Home Food Preservation (NCHFP) says pressure canning is the recommended method for meat, poultry, seafood and vegetables. A boiling-water canner does not provide the same botulism control for those low-acid foods.[2] A tight lid does not repair an unsafe recipe, skipped acid, wrong canner, wrong pressure, short process, or missing altitude adjustment.
This guide is for selecting, transporting, storing and opening home-canned food during an RV trip. It is not a canning recipe and does not validate a jar after the fact.
Build a jar passport before it leaves home
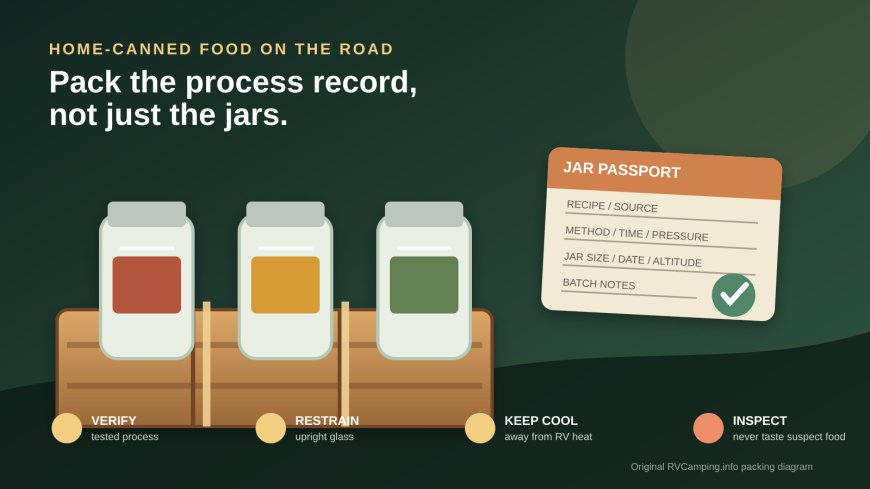
Write the details while the canning notes and recipe are still available. Each jar or batch record should include:
- the food and any meaningful recipe variation;
- the tested recipe source and edition or web address;
- processing method, time and pressure where applicable;
- jar size and pack style required by that recipe;
- canning date;
- altitude or the altitude adjustment used;
- who processed the batch;
- any seal failure, reprocessing or unusual event.
Do not call a family recipe "tested" because several generations ate it. Taste, tradition and a vacuum seal are not process validation. For low-acid foods and tomato products, NCHFP directs home canners to USDA-endorsed procedures and tested recommendations.[2]
If a gift jar has no recipe or process record, ask the giver before packing it. Useful answers are specific: the exact source, jar size, method, time, pressure and date. "I always do it this way" is not enough for a shelf-stable claim. When the process cannot be verified, do not take the jar as room-temperature trip food.
A handwritten label can stay simple. Put the food and date on the lid or jar, then keep the batch details in a notebook or phone file that works offline. A photo of the tested recipe and batch sheet is more useful at a remote campsite than a link that needs service.
Screen every jar at home
Use bright light and a clean counter. Keep the jar upright. For a common two-piece lid, the center should remain concave and should not flex up when pressed. NCHFP recommends removing ring bands after cooling and testing the seal; storing without the band also makes a lost seal easier to notice.[1]
Reject a jar from the trip if you find a loose or bulging lid, leakage, a crack or chip, dried food tracking from under the lid, unexplained bubbles, unnatural color, mold, corrosion that affects the lid, or a label you cannot match to a process record. Do not tighten a ring over a doubtful flat lid and call it sealed.
NCHFP warns not to taste food from an unsealed jar or a jar showing spoilage. It lists dried streaks, rising bubbles, unnatural color, spurting liquid, unusual odor and cotton-like mold among warning signs.[3] Some spoiled low-acid food may show little evidence, so a clean appearance is not a substitute for a verified process.
Leave rejected jars at home for disposal under current NCHFP directions. A leaking suspect jar does not belong in an RV trash can, shared campground dumpster or sink. Do not open it at the picnic table to "check."
Pack glass for braking, vibration and heat
A pantry cabinet is not a household shelf once the RV moves. Use a rigid bin with dividers or individual sleeves. Keep jars upright, separated from one another, and unable to strike the cabinet wall. Put heavier jars low in an approved storage position so they do not become projectiles or raise the RV's center of gravity unnecessarily.
Do not rely on screw bands as travel retainers for the lids. The packaging system should restrain the jar body. If bands are carried for resealing an opened jar, store clean, dry bands separately. A band screwed over a flat lid can conceal a failed vacuum and hold a loose lid in place.
Before departure, confirm the bin cannot slide, tip or block access to electrical panels, plumbing valves, emergency equipment or an exit. Check the RV's cargo limits and distribute the weight. Canning jars are surprisingly heavy in a full case.
Heat is the other travel hazard. NCHFP says to keep sealed jars somewhere clean, dry, dark and cool. For best quality, it gives a preferred range of 50 to 70°F. The storage space should remain at or below 95°F and away from heating pipes, cooking ranges, furnaces, uninsulated attics and direct sun.[1] An RV cabinet can cross that upper boundary when the rig is parked in sun without climate control.
Do not leave the jar bin in an unconditioned RV between trips just because the lids are sealed. Move it to appropriate storage. During travel, choose a cabinet away from the cooktop, furnace ducts, water heater, generator compartment and sun-heated exterior walls. If you cannot keep the location within the source guidance, bring different food.
Run a four-point arrival check
After a rough road, hard stop or hot travel day, inspect before placing the jars in the pantry:
1. Is every jar still upright and unbroken?
2. Is each lid still tight and concave, without flexing?
3. Is the outside dry, with no food streaks at the rim?
4. Did the storage area avoid excessive heat and moisture?
Quarantine any jar that fails. Keep it away from food-prep surfaces, children and pets. A cracked, leaking or unsealed suspect jar needs the official handling procedure, not ordinary glass recycling. NCHFP distinguishes sealed suspect containers from open or leaking ones because the latter may require detoxification and careful surface cleanup.[3] If you cannot carry out that procedure safely at camp, isolate the area, keep people away and contact a local health department or campground management for disposal help.
Do not pour suspect contents into a toilet, sink, fire ring, compost bin or vegetation. Do not feed them to wildlife or pets.
Inspect again before opening
The arrival check does not replace the meal check. Set the jar upright at eye level. Confirm the lid is still tight and concave. Look for a dried trail from the rim, rising bubbles, unnatural color, leakage or mold before touching the lid.[3]
Open the jar away from ready-to-eat food. Stop if liquid spurts, foam appears, the odor is unnatural, or mold is present. Do not taste a suspicious product. Botulism risk cannot be managed by taking a tiny sample.
A jar can pass the physical inspection and still have an unacceptable history. If the recipe or process was not verified before the trip, do not let hunger downgrade the standard. Set the jar aside and use the backup meal.
NCHFP includes a pre-serving boil recommendation for certain properly processed low-acid home-canned foods and a separate precaution for foods not canned to current recommendations.[2] Read that source and the exact tested recipe before the trip. Do not treat boiling at camp as a rescue step for a known underprocessed or mystery jar; NCHFP explicitly says its precaution is not a recommendation to consume significantly underprocessed food.[2]
Once opened, it is ordinary perishable food
Opening ends the shelf-stable part of the plan. Use a clean utensil and avoid touching the lid edge or jar rim with raw-food tools. Serve only what the group will eat, then move leftovers into a clean covered container that fits the refrigerator.
Do not count on the original flat lid to create a new shelf-stable vacuum. Refrigerate the opened food according to the tested recipe or current food-safety storage guidance. If the RV refrigerator cannot hold safe temperature, open a smaller jar or choose a meal with no leftovers. The jar size should match the people and cold-storage capacity, not the canner's maximum batch size.
Label the refrigerated remainder with the opening date. Keep it away from raw meat and from warm spots in an overloaded refrigerator. When a recipe directs further cooking after opening, follow it fully; warming a serving is not the same as completing a safety step.
Make the backup meal part of the safety plan
A shelf-stable commercial pouch, an intact commercial can, or another simple meal keeps a rejected jar from becoming an argument. Carry at least one option that needs little water and no risky improvisation.
The best home-canned RV pantry is not the one with the most jars. It is the one where every jar has a process record, a protected ride, a cool storage place and an easy discard decision. If any link in that chain is missing, leave the jar closed and eat the backup.
Source note: This RVCamping.info travel workflow is based on current National Center for Home Food Preservation guidance for tested processing, seal checks, storage and suspect-jar handling. It adds RV-specific packing and heat decisions but does not replace a tested canning recipe or local public-health instructions.
Sources
- Storing Home Canned Foods — National Center for Home Food Preservation; seal tests, ring-band storage, labeling, preferred storage temperature and heat/moisture limits.
- For Safety's Sake — National Center for Home Food Preservation; low-acid food processing, pressure-canning boundary, tested-recipe requirement and limits of pre-serving boiling advice.
- Identifying and Handling Spoiled Canned Food — National Center for Home Food Preservation; warning signs, no-taste rule and separate handling for sealed versus leaking or open suspect containers.
What's Your Reaction?