






How to evaluate an accessible RV campsite beyond the wheelchair symbol
A site-by-site method for checking an accessible RV campsite, including the route, surface, deployment room, hookups, living area, restrooms and confirmation questions.

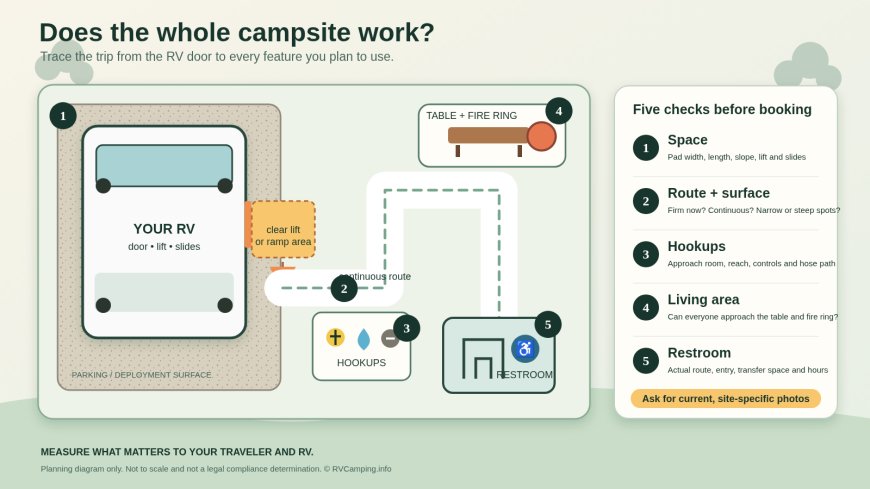
An accessible-site label is a starting point. Before you reserve, check whether the whole chain from the RV door to the hookups, table, restroom and campground services works for the people traveling with you.
The wheelchair symbol on a booking page cannot tell you whether your lift will clear a tree, pea gravel will bog down small casters, or the only usable restroom is across a steep loop road. Those details decide whether a site works.
The National Park Service itself tells visitors to look past a label. Its mobility-planning page suggests checking the terrain and surface, electrical hookups, whether restrooms are adjacent and accessible, and when campground registration is staffed.[1] Treat that list as the beginning of a useful conversation, not a guarantee about a particular campsite on a particular day.
This guide is practical trip-planning information, not legal advice or a compliance inspection. Rules differ by land ownership, facility type, construction date and whether work is new construction or an alteration. The federal outdoor standards discussed below apply to sites built or altered by federal agencies, or on federal land on their behalf. The Access Board says those outdoor provisions are not part of the Justice Department's 2010 ADA Standards and do not have legal effect for state, local or private entities covered by DOJ regulations.[2] Forest Service guidelines, meanwhile, govern facilities and features within the National Forest System.[4]
Start with your own non-negotiables
"Accessible" is not one body, one chair or one RV. Write down the conditions that must be true for your trip before comparing sites. A short list might include:
- enough room beside the passenger door for a lift or ramp;
- a firm route that a wheelchair, walker or cane can use after rain;
- hookups reachable without stepping over hoses or squeezing behind a pedestal;
- a restroom that fits the user's transfer method and has a route you can travel at night;
- a table, fire ring or other living-area feature that everyone can approach;
- access to the office, trash, water and dump station, if you expect to use them.
Add numbers where they matter: total RV length, slide depth, ramp deployment length, turning diameter and the maximum distance or grade the traveler can manage. These are personal fit measurements. They are not substitutes for an official standard.
Trace the route, not the icon
Imagine an unbroken line from the RV door to every place you plan to use. Check the parking surface, the edge of the pad, the route through the living area, the path to the restroom and the entrance. One bad transition can break the chain.
Federal outdoor guidance calls this connecting path an outdoor recreation access route, or ORAR. At covered camping facilities, these routes connect mobility-feature camping units with accessible elements and common-use areas. The Access Board specifies a firm, stable surface and a minimum clear width of 36 inches for an ORAR, subject to limited conditions for exceptions.[2] Forest Service guidance likewise calls for routes between campground units and the shared places campers use, including toilets, showers, water points, trash receptacles and parking.[4]
For trip planning, ask for the route in ordinary terms:
- Is the route paved, compacted aggregate, dirt, grass, loose gravel or boardwalk?
- Is it continuous, or are there curbs, steps, roots, drainage dips or soft shoulders?
- How narrow is the tightest point after posts, vegetation and parked vehicles are counted?
- Is the route beside or within the campground road?
- How steep is the longest section, and is there a side slope?
- What changes after rain, snow, freeze-thaw cycles or routine grading?
- Is the route lit, or should you plan for your own lighting?
Ask for dated photos or a short phone video from the actual site, not a representative accessible site. A wide-angle image from the center of the pad is less useful than views taken from the RV door toward the hookups, table and restroom.
Test the surface under realistic conditions
Material names can mislead. "Gravel" might mean tightly compacted crushed stone or several inches of loose river rock. "Natural surface" might stay hard in summer and turn soft after a storm.
Official federal guidance focuses on performance: outdoor recreation access routes must be firm and stable.[2][4] The Access Board explains that planners should consider whether a surface noticeably compresses or deforms during the seasons it is managed and under normally occurring weather and use.[2] That is a useful practical test for campers, too.
Ask the campground what the surface is like now. Specific questions get better answers: Does a caster leave a rut? Does a cane tip sink? Has fresh gravel been added? Are there puddles or washouts between the pad and the restroom? If conditions are uncertain, carry only the portable access equipment you already know how to use safely. Do not assume a thin mat can correct a deep, loose or sharply sloped surface.
Measure the RV space as a working area
A campsite can be long enough for an RV and still be unusable around the door. Confirm the length and width of the level parking area, then place your rig on that rectangle: entry door, lift or ramp, slide-outs, awning, tow vehicle and utility bay.
For federal outdoor facilities covered by the ABA provisions, an RV space with mobility features is at least 20 feet wide. The Access Board's explanation allocates room for an 8-foot RV, lift deployment and maneuvering on the passenger side, plus access to driver-side utilities.[2] That figure is a design requirement in its federal context, not a promise that every site advertised as accessible will measure 20 feet.
Ask whether the stated width is the actual clear, usable width. Timbers, bollards, trees, picnic tables and sloped shoulders can consume space. For a back-in site, confirm whether you can position the entry door where the firm area is widest. For a pull-through, ask whether leveling blocks will create a large first step or leave the lift on a cross slope.
Inspect hookups as a task, not a feature list
"Full hookups" tells you what is present. It says nothing about whether a traveler can reach or operate it.
Map the electrical pedestal, water connection and sewer inlet against your RV's utility bay. Check approach space, reach height, distance from the parking surface and anything that blocks a front or side approach. Ask about lid weight, stiff breakers, threaded caps and water valves. A companion may handle these tasks, but that should be a trip choice rather than a surprise at check-in.
The Forest Service pocket guide calls for accessible utilities to connect to an ORAR. It also specifies a 30-by-60-inch clear ground space at utility and dump-station hookups, positioned beside an accessible RV space, pull-up space or connecting route; barriers should not block that space.[4] Use those details as confirmation points on National Forest System land. Elsewhere, ask for measurements and photos rather than assuming the same rule applies.
Look at hose and cord paths after connection. Can they stay outside the travel route? Will a sewer hose cross the path to the picnic table? Is the water connection on a muddy strip? If the dump station is separate, ask about pull-up space, surface, slope and whether the controls and inlet can be reached from that space.
Evaluate the living area
The pad is only part of the campsite. Check the route and clear space around the picnic table, grill and fire ring. Ask whether the table has an extended end or another place where a wheelchair user can sit with the group. Find out whether the table is fixed, because staff may not be able to move it. If you do not plan to use the fire ring, confirm that it does not block the route between the RV and the hookups.
Federal camping standards require accessible elements within camping units with mobility features and address connected routes among them.[2] The Forest Service also requires firm, stable ground in camp living areas and routes between site furnishings and common-use facilities.[4] In real-world planning, the useful question is still: Can this traveler get to and use each feature without parking in the route or crossing unstable ground?
Verify the restroom from door to fixture
"Accessible restroom nearby" leaves several unanswered questions. Nearby may mean 100 feet on a level path or a quarter mile across a road and up a hill. Confirm which restroom serves the site, the route distance, surface, grade, lighting and operating hours. Ask whether it remains open for your travel dates.
Then ask about the room itself: Is the entrance step-free? How does the door open, and how heavy is it? Is there room to turn? Which side of the toilet has clear transfer space? Are grab bars installed? Can the user reach the latch, sink, soap and hand dryer? If a roll-in shower matters, ask about its entrance, seat, controls and any lip at the floor.
The ADA toilet-room guide explains which toilet rooms and fixtures must be accessible where they are provided; it does not set the number of toilet rooms a facility must have.[3] It also contains detailed requirements for doors, turning space, toilet clearances, grab bars, lavatories and accessories.[3] A reservation agent may not know those technical specifications, so ask for the facts that affect the traveler rather than asking only, "Is it ADA compliant?"
Portable toilets deserve the same scrutiny. Request the model or interior dimensions, entry threshold, door clearance, turning room, grab bars and route surface. If the campground has an accessible shower but no accessible toilet in the same building, confirm both routes separately.
Use a confirmation script
Call the campground after choosing a candidate site. Email is useful when you need a written record or photos. Keep the questions tied to one site number and one set of dates.
I'm considering site __ for an RV that is __ feet long. A traveler uses a __ and needs __ feet beside the passenger door for the lift/ramp. Could someone familiar with that exact site confirm the following?
- What are the clear length and width of the parking surface, and how level is it?
- What is the surface between the RV door, hookups, table and nearest usable restroom? Are there steps, curbs, loose gravel, roots, soft areas or steep sections?
- Where are the electrical, water and sewer connections relative to the driver's side, and is there clear level space in front of them?
- How far is the restroom by the actual route? Is that route step-free, and is the building open during our stay?
- Which side-transfer space, grab bars, turning room and shower features are available inside?
- Are the table and fire ring reachable without crossing loose or sloped ground?
- Have construction, weather or maintenance changed any of these conditions?
- Could you send current photos from the RV door area toward the hookups, living area and restroom route?
Record the employee's name, the date and what was confirmed. Recheck shortly before departure if wildfire recovery, storms, construction or seasonal closures could change the route or restroom. The NPS recommends contacting a park ahead of time when a traveler needs disability-related assistance or a reasonable modification, including reserving an accessible campsite.[1]
Make the final decision site by site
Do not reduce the answer to "accessible" or "not accessible." A site may work well for a manual wheelchair user traveling with help and fail for a larger power chair used independently. Another may have excellent restroom access but put the electrical pedestal beyond the traveler's reach.
Compare each candidate against the non-negotiables you wrote first. Keep a backup plan for a closed restroom, damaged route or site reassignment, and ask the campground how it handles an accessibility mismatch at arrival. The wheelchair symbol gets you to the right part of the reservation system. The measurements, route details and current confirmation tell you whether the campsite fits.
Sources
What's Your Reaction?