






RV trailer hitch, coupler, and safety-chain pretrip check
Inspect the complete bumper-pull connection before towing: ratings, receiver and ball hardware, coupler seating, safety-chain routing, jack clearance, and wiring slack.

Safety scope: This checklist is for bumper-pull RV trailers with a ball coupler. The trailer, coupler, hitch, ball mount, weight-distribution system, safety-chain, jack, and tow-vehicle manuals control. Ratings, latch designs, lubrication, chain routing, and test procedures differ. If the connection cannot be positively identified, rated, latched, retained, and inspected, do not tow until a qualified RV or hitch technician corrects it.
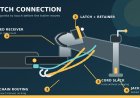
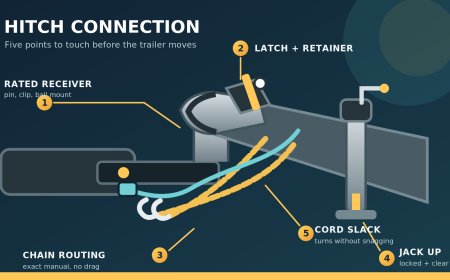
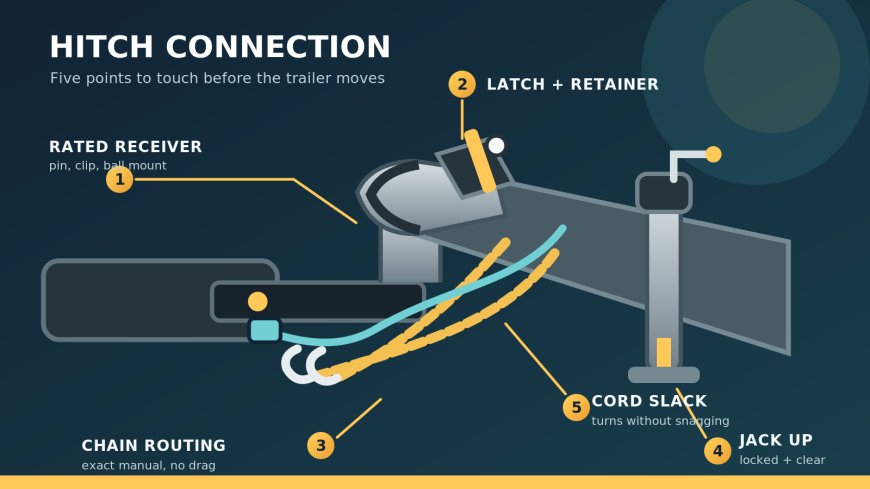
The hitch connection deserves more than a glance at the latch. A sound predeparture check follows the load path: tow-vehicle receiver, ball mount, hitch ball, coupler body and latch, safety chains and their anchors, tongue jack, then the cord that carries lighting and brake signals.
A useful check answers three questions. Is every load-carrying part rated for this trailer? Is the coupler fully seated and mechanically retained? Can the trailer turn and move through dips without a chain, jack, or cord dragging, binding, or pulling tight?
Read the labels before judging the hardware
Start with the trailer's loaded weight and tongue weight, not a catalog description. Compare those loads with the tow vehicle's limits and the marked ratings for the receiver, ball mount, hitch ball, coupler, pins, and weight-distribution equipment. The lowest applicable rating limits the system.
Keystone's 2026 owner manual says its selected hitch must be rated over the RV's GVWR and hitch weight.[1] Demco's 2-5/16-inch EZ Latch coupler manual similarly says not to exceed the lowest rating among the coupler, vehicle ball, and trailer.[2] Those statements apply within their own products and instructions, but the decision rule is broadly useful: one high-rated part does not upgrade a weaker part.
Clean each rating label or stamping enough to read it. Confirm:
- receiver class and maximum trailer and tongue-weight ratings, including any different weight-carrying and weight-distributing limits;
- ball-mount rating, shank size, pin, and retaining clip;
- hitch-ball diameter, shank, rating, and required installation torque;
- coupler ball size and capacity;
- safety-chain or cable rating and the rated attachment points;
- weight-distribution and sway-control ratings and setup, when fitted.
Stop if a rating is missing, illegible, below the expected load, or tied to hardware whose identity cannot be confirmed. Do not assume a familiar-looking ball is the correct diameter. Do not tow with a homemade extension, substituted pin, improvised fastener, or welded repair unless the applicable manufacturers or a qualified specialist have approved the exact arrangement.
Rated chains are not paperwork trivia. In NHTSA recall 25V377, certain 2025 Starcraft Autumn Ridge trailers had 7,600-pound chains on trailers with a 7,995-pound GVWR; the report says the underrated chains could fail during a separation and increase crash risk.[4] Check the RV's VIN for open recalls and resolve any applicable hitch or chain recall before travel.
Inspect the receiver and ball side
With the trailer chocked and no one between the tow vehicle and trailer, inspect the receiver tube, mounting area, ball mount, hitch ball, pins, clips, and visible fasteners.
Look for a bent tube or ball mount, cracked welds, elongated pin holes, missing hardware, looseness, severe rust scaling, fresh metal dust, impact marks, or movement where a fixed part should not move. Surface rust and structural metal loss are not the same thing; uncertainty belongs with a hitch shop, not on the highway.
Confirm that the ball-mount pin passes completely through the receiver and mount and that its clip or lock is fully engaged. Check the ball nut, fasteners, and weight-distribution parts by the exact manufacturer's inspection and torque schedule. Paint witness marks can reveal movement, but they do not replace a specified torque check.
The ball should have the finish, lubrication, and wear condition required by its coupler and hitch manuals. Grease is not universal. Keystone tells owners of its travel trailers to inspect the coupler before each trip and clean and lubricate the ball socket and clamp monthly with wheel-bearing grease.[1] Another coupler may specify a different product or interval.
Prove the coupler is seated and retained
A closed handle is not enough. Dirt, a wrong-size ball, a high tongue angle, or a worn clamp can leave the latch looking shut while the ball is not captured.
- Chock the trailer wheels and set the tow-vehicle parking brake.
- Inspect the coupler body, socket, latch, clamp, mounting bolts or welds, and retaining-pin holes. Look for cracks, bending, damaged welds, missing parts, heavy corrosion, or wear.
- Confirm the ball and coupler sizes match.
- Lower the coupler squarely until the ball is fully seated. Close the latch by its manual and install the specified pin, clip, or lock.
- Look underneath with a light when the design permits. Confirm the clamp or jaw is in the locked position described by the coupler manual.
- Perform the manufacturer's prescribed lift or tug check, if it calls for one, while the wheels remain chocked. Do not invent a lift test or crawl under a suspended tongue.
The design-specific instructions matter. CURT manual 25474 says its ball must be fully seated in the pocket and the supplied pin must pass completely through the coupler; if the pin will not pass through, it says, "DO NOT TOW."[3] Demco's EZ Latch manual says to make sure that coupler is properly latched onto the correct-size ball before towing.[2] Follow the manual for the actual coupler rather than borrowing either sequence for a different latch.
Do not tow if the coupler will not seat, the latch will not close normally, the retainer will not fit, the ball can escape during the specified check, or any coupler component is damaged or worn. Keystone directs owners to contact a dealer immediately when coupler parts appear damaged or worn.[1]
Attach safety chains by the exact instructions
Inspect both chains or cables end to end. Reject stretched, cut, kinked, heat-damaged, severely corroded, cracked, or deformed links and hooks. Check the trailer-side welds or attachment hardware and the tow-vehicle loops too. A sound chain on a cracked anchor is not a backup connection.
Attach only to the designated safety-chain loops or other anchor points named by the tow-vehicle and hitch manuals. Do not hook chains to the hitch ball, ball mount, receiver pin, bumper trim, or another chain unless the exact equipment instructions expressly provide that method. Close each hook's retainer when fitted, and orient hooks as the manufacturer specifies.
Crossing is an equipment instruction, not a free-floating slogan. The Keystone manual cited here directs owners to hook its travel-trailer chains to the hitch loops and cross them under the tongue.[1] Demco's cited coupler manual also directs users to crisscross its chains or cables under the tongue.[2] Follow that direction when it applies to the installed trailer and hitch. If your manuals specify another routing, use that routing and applicable state law rather than copying a generic diagram.
Set length after attachment. The chains need enough slack for the combination's full turning and articulation, yet must not drag or bind. Keystone requires enough length for turning while keeping its chains off the road.[1] Use only a shortening method approved by the chain and trailer makers. Knots, bolts through links, or repeated twisting can damage a chain or change how it loads.
Before pulling onto a road, have a spotter watch from a safe position while the rig creeps through left and right turns on level ground. Stop before anything goes tight. Repeat the clearance check for the actual weight-distribution hardware if it changes chain or tongue geometry.
Raise the jack and give the cord room to move
Retract the tongue jack to the travel position specified by its manufacturer. Remove or stow a removable foot, caster, or drop leg when required. Confirm the pin is fully engaged and the jack cannot settle. Check clearance below the jack and between its handle, motor head, tailgate, propane cover, weight-distribution bars, and tow vehicle.
Keystone says to inspect jack operation when preparing to travel and have a jack serviced or replaced if it remains difficult to operate or freezes.[1] A bent tube, slipping mechanism, missing travel pin, loose mounting bolts, cracked mount, or a jack that will not retract fully is a stop-towing defect.
Route the 7-way cord through the path specified by the tow vehicle and trailer makers. It needs enough slack for full turns and suspension travel, but not enough to touch the road, exhaust, sharp edges, chains, or moving hitch parts. Do not wrap it around a safety chain as a casual cure for excess length. Seat the plug, engage its cover or retainer, then test running lights, turn signals, brake lights, hazards, and trailer-brake operation. Keystone calls for checking the electrical connections and confirming that exterior lights work in synchronization with the tow vehicle.[1]
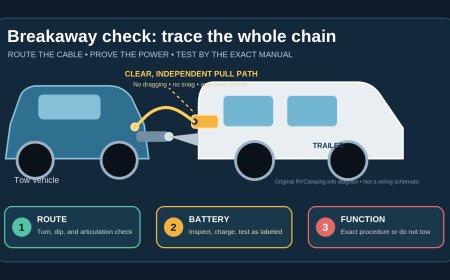
The breakaway cable is a separate safety system with its own routing, power, and test requirements. Include it in the full departure walk-around, but use the dedicated RV trailer breakaway-switch check rather than treating a clipped-on cable as proof that the system works.
Stop towing for these defects
Do not leave the campsite, storage lot, or driveway when you find:
- an unknown, unreadable, mismatched, or inadequate rating anywhere in the load path;
- a wrong-size ball, loose ball, bent mount, missing pin or clip, cracked weld, elongated hole, structural corrosion, or unexplained movement;
- a coupler that is not fully seated, will not latch normally, will not accept its specified retainer, or fails its manual's check;
- a worn, cracked, bent, or otherwise damaged coupler, clamp, socket, latch, or mounting point;
- a safety chain, hook, retainer, weld, or anchor that is damaged, underrated, detached, or routed where it will bind or drag;
- a jack that is bent, loose, frozen, slipping, not locked, or unable to reach its specified travel position;
- a 7-way plug or cord that is damaged, will pull tight, can drag, or does not support working lights and brakes;
- an applicable unresolved safety recall.
Chock the trailer, keep it parked, and arrange the correct part or qualified repair. Safety chains are the backup after the primary connection fails. They are not permission to tow with a questionable hitch.
The final 60-second connection check
After all setup adjustments are complete, start at the receiver and touch each item in order:
- Receiver, ball mount, hitch ball, pin, clip, and fasteners are identified, rated, secure, and free of stop-towing damage.
- Coupler is fully seated, latched, retained, and verified by its own manual.
- Both safety chains or cables are sound, attached to designated anchors, routed as the exact manuals direct, and clear through turns.
- Tongue jack and all stabilizers are fully in their specified travel positions with adequate clearance.
- The 7-way cord is locked in, has controlled slack, and cannot drag, snag, chafe, or pull tight.
- Lights and trailer brakes pass their prescribed checks.
- The breakaway system has been checked separately.
Then walk the connection once more without talking or multitasking. The point is not speed. It is catching the one pin, hook, latch, or cord that changed after the first look.
Sources
- Keystone RV Company: 2026 Owner's Manual (retrieved September 26, 2026)
- Demco: 2-5/16-inch EZ Latch Coupler manual, BC20013 (retrieved September 26, 2026)
- CURT: Trailer Coupler Installation Manual 25474 (retrieved September 26, 2026)
- NHTSA: Part 573 Safety Recall Report 25V377 (retrieved September 26, 2026)
What's Your Reaction?