








RV black-tank flush safety: the valve-by-valve checklist
Use an RV black-tank flush safely with a drain-first, water-off-before-valves sequence, separate waste-side hose, and model-specific anti-siphon limits.

By Romana
RV black-tank flush safety: the valve-by-valve checklist
A black-tank flush has one unforgiving failure mode: clean water keeps entering while wastewater cannot leave. A closed termination valve, the wrong valve handle, a blocked outlet or walking away can turn a routine rinse into an overfilled tank; Keystone specifically warns owners not to leave during the process and says overfilling can cause serious problems.[2]
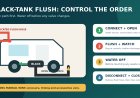
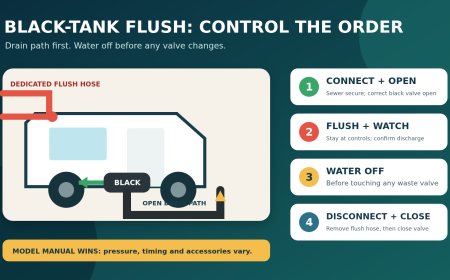
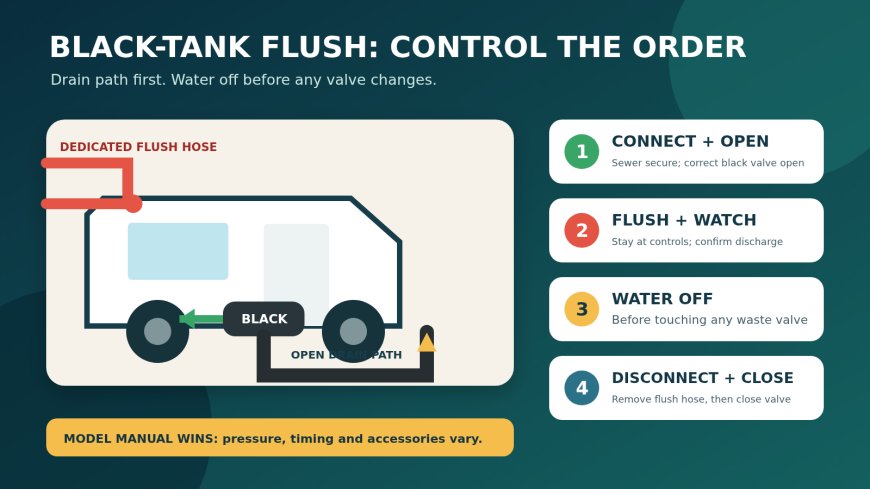
The safer routine is deliberately boring. Build the drain path first, prove it is open, connect a waste-only water hose last, stay at the controls, shut the water off before changing any valve, then remove the flush connection before closing out.
This guide narrows in on that sequence and the anti-siphon boundary. For dump-station rules and spill handling, use RVCamping.info's dump-station guide. For campsite potable-water setup, use the separate fresh-hose cross-connection guide.
First, identify what is actually installed
Find the label beside the flush inlet, then match it to the RV owner's manual and the component instructions. Record which black tank the inlet serves. Multi-bath rigs may have two black tanks, two flush inlets, remote cable pulls or electric valves that are easy to confuse.
Do not import one manual's numbers into another system. The No-Fuss Flush #336 instructions hosted by Tiffin, for example, call for a public water supply of at least 40 psi, full pressure without a regulator, and roughly two minutes or until clear. They also forbid adding check valves or regulators.[1] Those are No-Fuss Flush #336 instructions, not universal advice. If your inlet, panel or RV manual specifies a regulator, a lower pressure, a timed cycle or another sequence, follow that exact instruction instead.
The same boundary applies to plumbing parts. B&B Molders' Nautilus P4 installation sheet identifies an atmospheric vacuum breaker/check valve, requires correct flow direction and orientation, gives an 8-to-125 psi working range, and calls for qualified technical personnel for installation or service.[4] That sheet describes a P4 installation. It does not prove that another coach has the same device, pressure range or routing.
If the label and manual cannot be matched, stop. Ask the RV manufacturer or a qualified RV technician to identify the system by VIN and installed parts.
What the anti-siphon device does not promise
The flush inlet temporarily connects a water source to plumbing that ends at a black tank. EPA defines a cross-connection as an actual or potential path between potable and nonpotable plumbing; backflow is unintended reverse flow through that path.[3]
A factory vacuum breaker, check valve or combined device is one engineered layer. The cited component instructions still require the correct device, direction, orientation and installation.[1][4] It is not permission to:
- use the drinking-water hose for flushing;
- remove a campground hose-bibb vacuum breaker;
- leave the flush hose connected between uses;
- bypass a leaking device with an elbow;
- assume a hardware-store check valve is an approved substitute;
- assume the RV device satisfies every campground or local water-system rule.
EPA notes that cross-connection requirements vary by state and municipality.[3] The RV component also has installation limits. The No-Fuss Flush #336 instructions place its vacuum breaker/check valve at least six inches above the highest flood-level rim of a connected fixture and say the valve is directional.[1] B&B's P4 sheet has its own accessibility, distance, orientation and pressure requirements.[4] Treat either set as model-specific, not as a generic repair recipe.
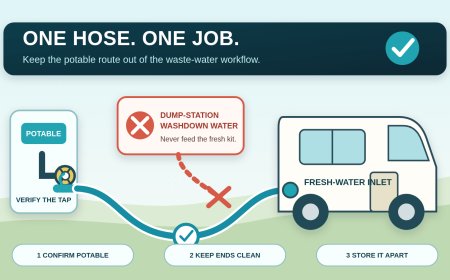
Keep one conspicuously marked hose for tank flushing and waste-side cleanup; the No-Fuss Flush #336 instructions expressly prohibit using its flush hose to fill a potable tank.[1] Store that hose with sewer gear and never return it to potable service. That handling rule adds separation even if every installed valve works.
The no-surprises preflight
Do these checks before attaching a water hose:
- Confirm the station or campsite permits tank flushing and has an approved receiving sewer connection.
- Chock or secure the RV as appropriate. Put on gloves and keep people and pets clear of the waste bay.
- Read the inlet label and identify the matching black-tank termination valve. Touch the handle and say its label aloud. Do not rely on handle color.
- Confirm every other waste valve is closed unless the exact manual says otherwise.
- Inspect the sewer hose, fittings and gaskets. Connect the RV end and secure the other end at the approved sewer inlet.
- Open the intended black valve and let the tank empty, which is the opening sequence specified for No-Fuss Flush #336.[1] Watch for flow, then for it to slow. A pulled handle is not proof that a remote cable or gate opened.
- Check that the flush inlet cap, threads and surrounding panel are intact. Stop for a cracked inlet, unexplained interior moisture or a known leaking vacuum breaker.
- Put the water shutoff within one step of your operating position. If that is impossible, use a second adult as the shutoff operator.
Keystone's owner guidance says the sewer hose should be connected to an approved dump station, the black termination valve should be open, and the RV should not be left unattended during these processes. It also warns that overfilling can cause serious problems.[2]
The valve-by-valve flush sequence
Use this sequence only where it agrees with the installed manuals and posted site rules.
- Drain path connected; water off. Confirm the sewer hose is secure at both ends.
- Correct black valve open; water off. Verify the tank has emptied and the outlet is not backing up.
- Flush hose connected; water off. Attach the dedicated waste-side hose to the approved water source and the correctly identified flush inlet. Do not connect to the city-water inlet or fresh-tank fill.
- Operator in place; water on. Open the water source as the exact component manual directs. Watch the sewer discharge and listen inside the wet bay for unusual spraying or leaking.
- Black valve stays open. Do not close it to "soak" or build rinse volume while pressurized unless the exact RV and component instructions explicitly prescribe that method. The No-Fuss Flush #336 warning is stricter: its dump valve must remain open whenever a water-supply hose is connected.[1]
- Operator stays present. Do not go inside, answer a long call or start another campsite chore. Tank monitors can misread; they are not an automatic shutoff.
- Water off first. Close the source immediately if discharge stops unexpectedly, the sewer inlet rises, the RV plumbing leaks, the tank bulges, or water appears at a toilet or vent.
- Pressure relieved and hose removed. Follow the component's disconnect order rather than assuming every system drains the same way.[1][4] The No-Fuss Flush #336 procedure says to disconnect at the faucet, let the system drain, then detach at the RV inlet, and never leave a supply hose connected when not in use.[1]
- Only now close the black valve. Confirm it seats fully. Keystone's general holding-tank guidance says termination valves should remain closed between dump operations.[2]
- Finish the tank state in the manual. Some instructions call for adding a small amount of water after dumping; use the method and amount specified for the installed system. Replace caps and wash hands.
That order creates a simple interlock in the operator's head: water cannot be on unless the sewer path is connected, proven and open; the black valve cannot close until the water is off and the flush hose is removed.
If you lose track of a valve
Do not guess. Turn the flush water off at its source. Leave the sewer setup undisturbed while you identify each handle from labels and the manual. If you cannot confirm that the black valve is open, keep the water off.
For electric waste valves, verify the indicated position against actual discharge. A lit "open" icon is not useful if nothing is moving because the gate, wiring or drain path failed. Stop the flush if flow changes sharply without a deliberate water adjustment.
A useful wet-bay card has four lines:
- sewer connected and accepted here;
- correct black valve open and flow proved;
- dedicated flush hose connected, operator present;
- water off and hose removed before valve closes.
Add the exact tank name, inlet name and valve label for the RV. A generic card should never overwrite model-specific instructions.
Stop conditions and recovery
Shut the water off immediately if you see a sewer backup, swelling tank, water at the roof vent or toilet, leakage inside a cabinet, or water spraying from the vacuum-breaker area. Do not defeat a vacuum breaker because it drips. B&B warns that wrong orientation, binding plumbing and improper service can cause damage or injury on its P4 system.[4]
If the tank may be overfull, keep people away from the toilet and waste plumbing. Do not open a fixture to "see how high it is." If the approved sewer path is intact and the correct termination valve is confirmed open, allow gravity drainage without adding more water. If the path is blocked, a valve will not open, or the tank or plumbing is leaking, stop and call the campground operator plus a qualified RV service provider.
If you suspect backflow into a potable supply, stop using that water and notify the water-system or campground operator. EPA's incident framework calls for eliminating the cross-connection, controlled flushing or cleaning, and testing affected drinking water after corrective work.[3] That is not a DIY instruction to taste, smell or casually sanitize the system. Follow the responsible water authority and RV manufacturer's contamination procedure.
The job is finished only when the water is off, the flush hose is disconnected, the black valve is closed, the sewer connection is removed or secured for continued camping, and the wet bay shows no leak. Five seconds spent reading that final state beats trusting where you think the handles were.
Sources
- No-Fuss Flush #336 Wasteholding Tank Flushing System user and installer instructions (Tiffin Motorhomes Knowledge Base)
- Complete Guide to RV Holding Tanks: Usage, Maintenance, and Tips for First-Time Campers (Keystone RV)
- Protecting Water Quality through Cross-Connection Control and Backflow Prevention (U.S. EPA, October 2021)
- Nautilus P4 Installation Instructions (B&B Molders)
What's Your Reaction?