







RV wheel chocks: the setup and departure order that prevents rollaway
Choose wheel chocks for the loaded RV, tire and ground, then keep a ground wedge in place through setup and hitching while treating tandem stabilizers separately.

By Romana
RV wheel chocks: the setup and departure order that prevents rollaway
Wheel chocks should be in the load path before the RV is disconnected from its tow vehicle or raised on leveling gear. They stay there until the rig is reconnected, the hitch is locked and checked, and the jacks are handled as the installed system requires. The complication is that a tandem-tire stabilizer may have to come out earlier. It is not the same tool as a ground-contact wedge.
That distinction prevents a common setup mistake: asking stabilizer jacks, hydraulic levelers or an expanding device between two tires to do the job of a correctly selected wheel chock.
The short answer: secure, level, stabilize
For most campsite routines, think in three separate jobs:
- Secure against rolling. Apply the motor vehicle's parking brake and transmission setting as its owner's manual directs. Place suitable ground-contact chocks before unhitching a trailer or operating a leveling system that calls for them.
- Level on approved ground. Use tire blocks, curved levelers or installed leveling jacks only within their instructions. A motorhome manual may prohibit lifting a braked axle; a trailer system may require every tire to stay on the ground.
- Stabilize after leveling. Deploy stabilizer jacks and, if compatible, tandem-tire stabilizers. These reduce movement inside the RV. They do not replace the first step.
Reverse is not automatically the departure order. A BAL X-Chock, for example, must be removed before the trailer's tongue jack or landing gear is operated and before the tow vehicle is connected.[5] A wedge chock should remain as the roll-control device while that tandem stabilizer comes out.
Select a chock for the RV, tire and campsite
A label that says "RV chock" is not enough. Record these details before buying or replacing a set:
- the RV's actual tire diameter and width;
- gross operating weight, using the loaded vehicle rather than an empty brochure figure;
- single-, tandem- or triple-axle layout and the space between adjacent tires;
- the steepest grade on which the manufacturer permits the RV or leveling system to be used;
- pavement, gravel, packed soil or another expected surface;
- temperature, oil, fuel and weather exposure covered by the product instructions;
- the number and placement of chocks required by the RV and leveling manuals.
Checkers Safety's commercial selection guide uses both gross operating weight and tire diameter. It also tells the end user to test the chock for the application because other variables remain, and its reference table is based on an 8% grade.[1] That last detail matters: a test basis is not permission to park any RV on an 8% campsite.
Treat every published capacity as conditional. Andersen's current Camper Leveler page, for example, lists trailers and RVs up to 30,000 pounds, tires up to 32 inches and a leveling range from 1/2 to 4 inches.[6] Those are boundaries for that product, not a rating for a different curved leveler, a loose wedge or the soil beneath it.
The chock should match the tire's curve, sit squarely in the tread path and have a base suited to the surface. Replace a chock with cracks, crushed ribs, rounded traction features, oil-softened rubber, bent metal or a damaged rope. Do not stack loose scraps under a chock to make it taller.
Reject ground that cannot hold the system
Chocks work through geometry and grip. Both can disappear on wet grass, loose pea gravel, mud, ice, a deep depression or an edge where only part of the base touches.
Before anyone leaves the driver's seat:
- Walk the tire and jack-pad areas. Look for ice, loose fill, holes, buried utilities, drop-offs and soft shoulders.
- Confirm that each chock can sit flat and contact the tire squarely. It should not bridge a rut or balance on one corner.
- Check the leveling manual's site limits. The Ground Control TT manual calls for solid, level ground, clear jack locations and load-distribution pads under jacks on extremely soft surfaces.[4]
- Move to a better site if the rig would exceed a product's travel, lift or slope limit. More plastic under a tire does not turn a rejected site into an approved one.
The Power Gear motorhome manual says to choose as flat a spot as possible and provide each foot a flat, solid contact surface. It also prohibits use on icy or slick surfaces where the feet may slide.[3] Chocking a tire does not cure a jack-pad problem, and a large jack pad does not cure a chock that is sinking.
Never work in the downhill path of a tire. Keep hands, feet, pets and bystanders out of the roll line. If the RV loads a chock so tightly that it will not release, do not pull it while the vehicle can move toward you. Re-secure the vehicle and unload the chock according to the vehicle and product manuals.
Arrival order for a travel trailer or fifth wheel
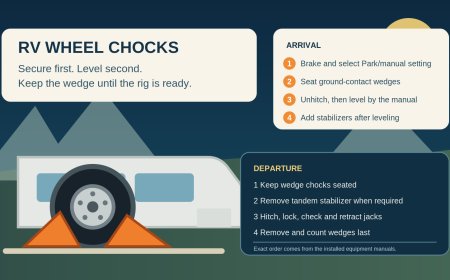
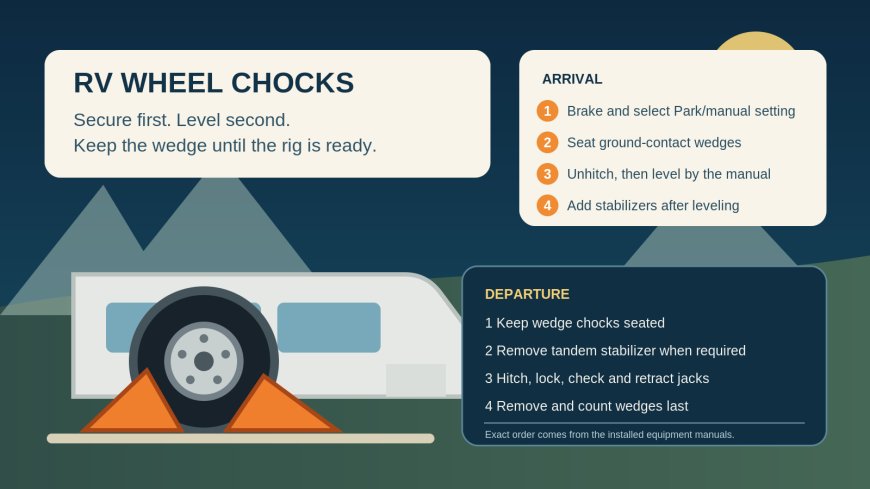
Use the exact trailer and leveling-system procedure. A defensible starting card looks like this:
- Position the trailer for final side-to-side level while it is still connected, unless the installed system directs otherwise.
- Stop the tow vehicle with the service brake. Apply its parking brake and select Park or the manual-transmission setting in its manual.
- Place the required ground-contact wedge chocks in the specified positions. Verify full tire contact before touching the coupler, kingpin, tongue jack or landing gear.
- Follow the hitch manufacturer's disconnect procedure and the trailer's instructions for breakaway cable, chains, wiring and coupler or fifth-wheel lock.
- Unhitch, move the tow vehicle away only when the trailer is independently secure, then run the installed leveling system.
- Deploy stabilizers after leveling. Add a compatible between-tire stabilizer only at the point its maker specifies.
Lippert's Ground Control TT sequence is one concrete example, not a universal template: park on level ground, chock all tires, then disconnect and use the tongue jack; Auto Level follows after the tow vehicle is clear.[4] A manual-level trailer, another brand of auto-level system or a fifth wheel may specify a different jack sequence.
Do not remove ground wedges merely because the trailer is level. Stabilizer jacks generally control bounce and sway; their name is not permission to use them as a parking brake.
Arrival order for a motorhome
A motorhome combines a parking-brake system, a driven chassis and coach leveling equipment, so its sequence comes from both the chassis and leveler manuals:
- Hold the service brake and make the transmission selection specified for parking and leveling.
- Fully apply the parking brake. Confirm any leveler-panel parking-brake indicator behaves normally.
- Place chocks at the wheels and in the directions named by the leveling manual. Do not assume "all four corners" or "one rear tire" without checking.
- Start, stop or leave the engine running as the installed system requires, then level while everyone stays clear.
- Confirm jack contact and wheel contact exactly as the manual specifies before opening slides.
The cited Power Gear system requires the coach to be in Neutral or Park and the parking brake engaged before Auto Level. It warns that lifting the rear wheels beyond ground contact defeats both transmission Park and the parking brake, and it says levelers are not vehicle brakes.[3] That warning is system-specific in wording but useful in principle: never count on a jack to arrest a rolling coach.
Tandem-wheel products: know which job they do
Three products often get called "chocks," although they have different limits:
- Ground wedge: sits on the campsite surface against a tire and resists rolling. This is the primary device discussed in an RV's chocking instruction.
- Curved leveler with mating stop: raises a tire while its matched chock holds the selected position. Keep the pair together and obey its tire-diameter, weight, lift and axle-spacing limits. Andersen tells users to drive onto its leveler and then place the supplied Tuff Chock behind it.[6]
- Between-tire stabilizer: expands between adjacent tires on a tandem axle to reduce tire shift and trailer motion. It requires suitable spacing and sound tires. It is not automatically a parking chock.
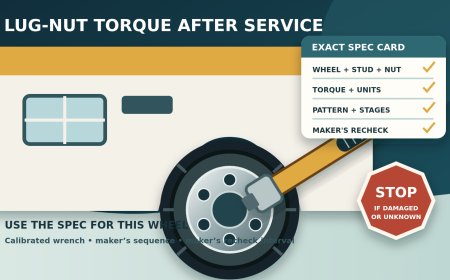
BAL's warning label is unusually clear: do not use its X-Chock as a trailer parking brake; level first; remove it before operating the tongue jack or landing gear and before connecting the tow vehicle.[5] That rules out using an X-Chock as the only restraint during hitching or unhitching.
Do not improvise across categories. A between-tire stabilizer does not belong on a single axle. A curved leveler trimmed for tandem spacing is acceptable only when that product's manufacturer provides the trimming method. A wedge that fits beneath one tire may be too small, too weak or poorly shaped for another RV.
Departure: remove the right device at the right time
Build the departure card from the RV, hitch, leveling system and chock manuals. The safe logic is to preserve an independent roll restraint until the towing or driving configuration is ready.
For a trailer with a between-tire stabilizer:
- Close slides, stow exterior equipment and clear people from the hitch and jack zones.
- Confirm ordinary ground wedge chocks are still seated.
- Remove the tandem stabilizer at the point its instructions require. For the cited BAL product, this is before operating the trailer jacks and before connecting the tow vehicle.[5]
- Run the installed system's hitch-return or jack procedure. Do not copy the Ground Control TT button sequence unless that is the installed system.
- Connect and lock the coupler or fifth wheel. Attach breakaway cable, safety chains where fitted, electrical cable and weight-distribution or sway-control equipment in their prescribed order.
- Perform the hitch maker's visual, physical or pull check, apply the tow vehicle parking brake, and fully retract and visually verify every jack.
- Remove the ground wedges last, immediately before the final walkaround and movement.
For a motorhome, keep the parking brake applied and chocks in place while slides and jacks retract, unless its manual specifies another arrangement. Walk outside to confirm every jack is fully up. Remove and count the chocks only when the driver is ready to leave; then complete the brake and warning-light checks before moving.
A bright "CHOCKS OUT?" tag clipped to the steering wheel helps, but counting works better than memory. Paint or number matched pairs, and give each one a fixed storage position. An empty slot then tells you what the walkaround missed.
Why OSHA is not the campsite sequence
OSHA wheel-chocking rules are often quoted online as if they set a universal RV procedure. The cited OSHA interpretation addresses commercial motor vehicles and loading-facility hazards, and it cautions that its answer may not apply outside the scenario discussed.[2] It is useful background on why uncontrolled vehicle movement is serious. It does not override an RV, chassis, hitch, leveler or chock manufacturer's instructions at a campsite.
The field rule is narrower: use a rated ground-contact restraint on ground that can hold it, keep that restraint active through the unstable parts of setup and hitching, and treat leveling and stabilization as separate jobs.
Sources
- Checkers Wheel Chocks Overview Brochure — manufacturer selection factors and test-basis limitations.
- Clarification of OSHA authority over wheel chocking at loading facilities — regulatory scope note; direct page retrieval was blocked, so the preserved search excerpt is recorded in the source corpus.
- Power Gear PowerLevel Automatic Hydraulic Leveling Owner's Manual — motorhome parking-brake, wheel-contact and surface limits.
- Ground Control TT Leveling System Owner's Manual — travel-trailer unhitching, chocking, ground and reconnect sequence.
- BAL X-Chock Warning Label — parking-brake prohibition and removal boundaries.
- Andersen Camper Leveler — product capacity, tire-size, lift and paired-chock instructions.
What's Your Reaction?