









Will tire chains fit your RV? Check the chassis before you buy
Match tire chains or cables to the RV’s exact chassis, drivetrain, axle and tire size, then verify manual limits and dry-fit clearance before winter travel.

Will tire chains fit your RV? Check the chassis before you buy
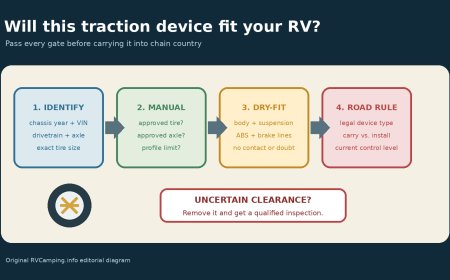
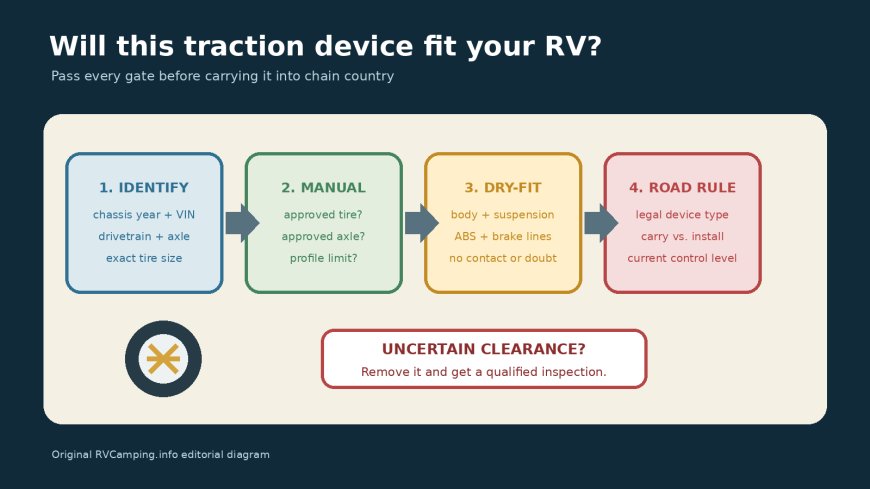
A package marked for your tire size is only half a fit check. The other half is the van underneath the camper build: drivetrain, approved axle, wheel and tire combination, and the space around brake hoses, ABS wiring, suspension parts and the body.
That distinction matters most at a chain-control checkpoint. A sign may require you to carry or install a legal traction device, while your chassis manual may allow only a narrow device on one axle, or no device at all for your wheel and tire combination. The road rule and the mechanical limit both apply. One does not cancel the other.
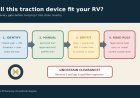
Start with the vehicle, not a shopping page
Before looking at chains or cables, record these details from the RV itself:
- Chassis year and model. The coach year can differ from the incomplete-vehicle or chassis year. Use the VIN and chassis label, not the year in a sales listing.
- Drivetrain and rear-wheel layout. Note front-wheel drive, rear-wheel drive or all-wheel drive, plus single or dual rear wheels.
- The full tire size on every axle. Read the sidewall and compare it with the certification/tire label. Include the service description and load range where shown. Do not assume front and rear sizes match.
- Wheel type and any conversion changes. Aftermarket wheels, offsets, larger tires, spacers, suspension changes and added wheel-well liners can alter clearance.
- The exact manual edition. Search the chassis owner's manual for “snow chains,” “traction devices,” and the tire size. A generic manual for the brand is not enough.
Treat an unlisted tire size as unresolved, not as permission. The seller's fit chart proves that a device can wrap around a nominal tire. It does not prove that the device can rotate inside your particular wheel well.
Three current chassis manuals give three different answers
These examples show why “chains for a camper van” is not a useful specification.
2026 Ford Transit: configuration changes the answer
The 2026 Transit manual lists two tire sizes in its snow-chain table. For 205/75R16C, it permits chains for rear-wheel-drive dual-rear-wheel and all-wheel-drive variants, but not the rear-wheel-drive single-rear-wheel column. For 235/65R16C, it permits the rear-wheel-drive single-rear-wheel and all-wheel-drive variants, but not the dual-rear-wheel column. The table notes say to fit only the outer tires on dual-rear-wheel vans and only the rear tires on all-wheel-drive vans.[1]
Ford limits the device to SAE Class S chains or cables measuring 10 mm (0.4 inch) or less, prohibits self-tensioning chains, and caps speed at 30 mph (50 km/h). It also tells owners to remove wheel trims, maintain pressure, avoid fully loading the vehicle and expect possible alloy-wheel damage.[1]
So “2026 Transit” still is not enough. You need the drivetrain, rear-wheel arrangement and exact sidewall size before selecting a device.
2026 Ram ProMaster: front axle, two named sizes
The 2026 ProMaster manual identifies the van as front-wheel drive in its traction-device table and lists LT225/75R16E and 225/75R16C on the front axle. It recommends a no-cam light-truck highway tire chain from Quality Chain Corp. or an equivalent product. The manual says no other tire size is recommended for chain or traction-device use.[2]
Ram also warns that clearance is restricted between the device, tire and suspension components. It calls for a tight installation, a retightening check after about 0.5 mile (0.8 km), no more than 30 mph, and an immediate stop if noise suggests a broken device. Long driving on dry pavement is out.[2]
The table is the compatibility gate. “Front-wheel drive” by itself does not authorize a chain on an unlisted ProMaster tire.
2026 Mercedes-Benz Sprinter: rear only, but confirm the combination
The 2026 Sprinter manual prohibits chains on the front wheels because they can drag against the body or chassis. It directs owners to install them in pairs on the rear wheels; on dual-rear-wheel vehicles, they go on the outer wheels. This rear-axle instruction also applies to all-wheel-drive Sprinters.[3]
Mercedes-Benz does not turn that into blanket approval for every Sprinter tire. The manual says chains are permissible only for certain wheel/tire combinations and recommends devices approved for the vehicle or of the same quality standard. It warns that an unsuitable chain can come loose and damage chassis parts or brake hoses. After about 0.6 mile (1 km), the chains must be retightened to preserve clearance to adjacent components. Maximum speed is 30 mph.[3]
For a Sprinter, write down the exact size, then confirm that wheel/tire combination through the manual's specified qualified workshop or Mercedes-Benz information channel. If the combination cannot be confirmed, do not improvise with a device that merely appears to fit the tire.
A carry rule is not a fit approval
California illustrates the difference clearly. Caltrans says all vehicles, including four-wheel-drive and all-wheel-drive vehicles, must carry chains when entering a chain-control area. Its guidance uses “chains” broadly for qualifying tire traction devices, including link chains, cable chains, textile snow chains and other alternatives that meet California requirements. It also says front-wheel-drive vehicles chain the front drive axle and that officials can impose additional drive-wheel requirements when conditions warrant.[4]
Those are road-access rules. They do not certify a product for the wheel well. Caltrans can accept a type of device under state law while a chassis manual limits the axle, tire size or device profile. A legal textile device may still be unapproved for a particular vehicle. Conversely, a cable approved by the chassis maker still has to satisfy the jurisdiction's current control level.
Plan for both questions:
- Legal: What must be carried or mounted on this road, in these conditions, for this vehicle class and towing status?
- Mechanical: What does the exact chassis manual permit on this axle, tire and wheel combination?
If the answers conflict, change the equipment or the trip. Do not treat a checkpoint as the place to test wheel-well clearance.
Dry-fit before the weather turns
A safe dry fit is a stationary inspection on level ground. It is not a road test on bare pavement.
- Read the chassis manual and the device instructions completely. Confirm the approved axle, tire size, maximum profile, mounting orientation and any ban on self-tensioning hardware.
- Park on firm, level ground away from traffic. Set the parking brake, switch off the engine and keep the key under your control. Chock a wheel if the device instructions call for it.
- Verify the size molded into each tire, then compare it with the size printed on the device package. Check both sides; RV conversions sometimes end up with a replacement tire that differs from the label or its axle mate.
- Lay out the pair and inspect every cable, link, connector and tensioner. A kink, bent fastener or damaged cross member is a reason to stop.
- Install the device exactly as its maker directs, without crawling under a vehicle that is supported only by a jack. Keep all connectors facing the prescribed direction and remove slack as instructed.
- Use a bright light to inspect behind the tire. Check the inner sidewall area, brake hose, ABS sensor wire and brackets, suspension, steering parts on a steer axle, fender liner, mud flap, wheel-well body and any camper-conversion plumbing or wiring nearby.
- If you cannot see and verify clearance through the full visible path, remove the device. Ask a qualified shop to inspect the installed fit with the suspension and steering safely positioned. Do not reach into a wheel well while someone moves the vehicle.
- Pack the clean, dry pair with gloves, a kneeling pad, light, reflective vest and the instructions. Record which axle and which side of the dual assembly the manual specifies.
A hand's-width guess is not a measurement. The tight spot may sit behind the tire where it is hard to see, and suspension movement reduces static clearance. On front axles, steering angle changes the path again.
Stop when the clearance answer is uncertain
Remove the device and stop the fit check if it touches, nearly touches or could snag any of the following:
- a brake hose, hard line or caliper component;
- an ABS sensor wire, clip or connector;
- a strut, spring, control arm or steering part;
- the body, wheel-well liner, mud flap or conversion hardware;
- the inner tire of a dual-wheel pair when the manual calls for an outer-only fit.
Also stop if the tire size is absent from a manual table that limits approval to named sizes, if the axle instruction is unclear, or if the chain needs an unapproved tensioner to stay centered. Noise, rubbing or banging during actual use means pull over safely and inspect. Both Ford and Ram set 30 mph ceilings, and Mercedes-Benz does the same, but a device maker may specify a lower limit.[1][2][3]
The practical buying order is simple: identify the chassis, verify the tire, read the axle and clearance rules, then choose a legal device that satisfies all of them. Buying by RV badge or tire size alone skips the part that protects the brake system and bodywork.
Sources
What's Your Reaction?