








Pack the Cooler Like a Route Plan: An RV Travel-Day System
Use an RV-specific cooler workflow for pre-chilling, raw-food separation, thermometer checks, controlled openings, meltwater handling and evidence-based discard calls.

By Romana
A cooler can be cold at breakfast and poorly organized by the second fuel stop. The usual failure is not one dramatic mistake. Warm groceries go into a warm box, lunch is buried under dinner, somebody opens the lid for every drink, and raw-meat packaging ends up sharing meltwater with sandwich fixings.
The short answer:* Chill the food and the empty cooler before loading. Hold perishable food at 40°F (4°C) or colder, verified with an appliance thermometer. Put raw meat in a leakproof lower compartment and ready-to-eat food above it. Pack by the order you will open the cooler, keep drinks elsewhere when possible, and decide what to keep by measured temperature plus known time, never by smell or a hopeful touch.[1][2][3]
This guide treats the cooler as part of the day's route plan. The original value is the workflow: a home loading sequence, an in-transit opening plan, a safe meltwater routine and a decision card for the moment a reading is too warm.

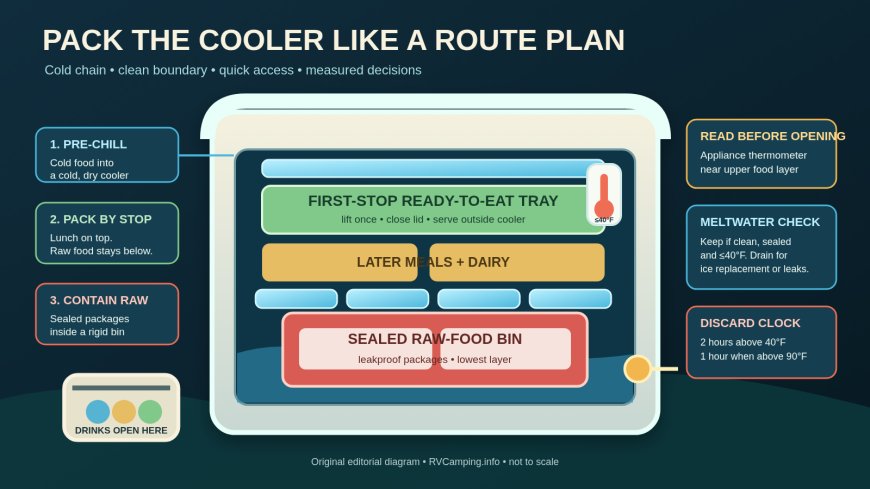
Load by access order while preserving the safety boundary: ready-to-eat food stays above a sealed raw-food bin. Original diagram by RVCamping.info.
The night-before pre-chill
The cold chain starts in the kitchen, not in the RV parking space. USDA says food should enter a cooler cold or frozen, and it notes that block ice lasts longer than cubes.[1] CDC also recommends frozen water containers or gel packs as cold sources for keeping food at 40°F or below.[3]
Use two separate jobs under the heading "pre-chill":
- Refrigerate perishable food overnight. Freeze items that can safely and usefully travel frozen, such as a meal intended for a later day or sealed water bottles with enough room for expansion.
- Cool the empty insulated box. Put frozen packs or sacrificial ice inside several hours before loading, then remove loose water and dry the interior before clean food containers go in.
The second step is an RVCamping.info efficiency recommendation, not a separate federal food-safety rule. It prevents already-chilled groceries from spending the first part of the drive cooling sun-warmed walls and air. Do not use the cooler as a place to chill a room-temperature pot of leftovers. FoodSafety.gov calls for prompt refrigeration of perishables and shallow containers for quick cooling.[2]
Set aside more cold source than the neat food stack appears to require. A half-empty cooler leaves warm air space, while a fully packed one has less room for air exchange. Fill gaps with frozen packs, block ice or sealed frozen water bottles rather than adding warm cans at departure.
Make a loading map before opening the lid
RV travel days create predictable access points: breakfast at home, roadside lunch, one snack stop, then dinner at camp. Write the day's sequence on a piece of tape. The cooler should answer that sequence without a full inventory every time.
USDA recommends reverse-use packing, with later food going in first.[1] In an RV, that rule needs a second boundary: raw animal food still belongs below food that can be eaten without more cooking. If the order-of-use plan conflicts with raw-below-ready separation, separation wins.
A one-cooler stack can work like this, from bottom to top:
- a frozen pack or contained block of ice;
- a rigid, lidded raw-food bin holding individually sealed meat, poultry or seafood packages;
- another cold layer that also creates a physical break;
- sealed dinner ingredients and dairy;
- a lift-out lunch tray with sandwiches, cut fruit and other ready-to-eat food;
- the appliance thermometer where it can be read with a quick lid opening;
- one more cold source near the top.
Do not rely on a supermarket overwrap as the only barrier around raw chicken or meat. FoodSafety.gov calls for raw foods to be held in containers or sealed, leakproof bags, while USDA camping guidance advises separate containment to stop raw juices reaching other food.[1][2] A rigid bin adds puncture protection when the cooler is wedged beside leveling blocks and folding chairs.
The cleaner option is a dedicated raw-food cooler. The most useful two-cooler setup, though, is often a food cooler plus a beverage cooler. USDA specifically recommends splitting drinks and snacks from perishables because the drink lid is opened frequently.[1] If raw food still rides with ready food, retain the sealed lower bin.
Give every opening a job
The lid should not become a pantry door. Before leaving, move shelf-stable snacks, napkins and unopened beverages that do not require chilling into a separate tote. Put the first meal in one lift-out tray. Tell passengers which cooler holds drinks.
At a stop:
- Park the cooler out of direct sun. If practical, leave it secured inside the conditioned RV rather than moving it onto hot pavement.
- Decide what is coming out before releasing the latch.
- Read the appliance thermometer immediately.
- Lift the stop tray, close the lid, then distribute lunch.
- Return any perishable item within its safe time window, and do not put used utensils or opened raw packaging into the ready-to-eat tray.
USDA advises keeping the cooler closed, shaded and insulated from sun.[1] The agency's two-cooler recommendation is an opening strategy as much as a packing strategy: frequent drink searches no longer dump heat into the food supply.[1]
For a long travel leg, put the food cooler where an adult can reach the display without unloading the cargo bay. Secure it so a sudden stop cannot tip it, block an exit or turn it into a heavy projectile. Never sacrifice safe vehicle loading merely to gain quick snack access.
Use the right thermometer for the question
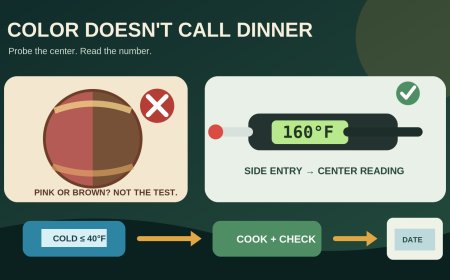
An appliance thermometer lives in the cooler and reports the storage environment. The target is 40°F (4°C) or below.[2][3] A thin instant-read food thermometer answers a different question: how warm a specific perishable food has become, or whether meat reached its safe temperature later during cooking.
Place the appliance thermometer near the upper food layer rather than pressed directly against ice, where it may report the cold source instead of the space protecting lunch. If the display reads over 40°F, close the lid, move the cooler into a cooler location, add a cold source if available, and check the temperature of the most vulnerable foods with a clean probe. One warm air reading right after an opening does not reconstruct the whole day; the food temperature and a written time record make the decision more defensible.
Keep a simple log on the tape label:
| Checkpoint | Record |
|---|---|
| Departure | Cooler reading and time |
| Meal or fuel stop | Reading before removing food |
| Ice purchase | Time, reading and amount added |
| Arrival | Reading before unloading |
| Any reading above 40°F | Food temperature, time discovered and corrective action |
Do not bury the thermometer under the raw bin. Do not treat frost on a bottle, cold meltwater or "it still feels cool" as a measurement. FoodSafety.gov and CDC both use 40°F as the cold-holding threshold and call for appliance thermometers to verify cold storage.[2][3]
Meltwater: contain first, drain for a reason
Meltwater creates two separate questions: Is the food still cold enough, and can water reach the food? A drain plug answers neither by itself.
USDA tells campers to use watertight food containers so melting ice water cannot contact food.[1] That means sandwiches, cut fruit, cheese and other ready-to-eat items need more than folded paper or a loose zipper bag. Put them in sealed containers or in the lift-out tray with a sound lid. Keep raw packages inside their own leakproof bin.
There is no universal safety need to pull the plug as soon as ice begins to melt. Use this RV operating rule:
- Leave clean meltwater in place when containers are watertight, the cooler remains at 40°F or below, and you are not replacing ice.
- Drain enough water when it interferes with adding fresh ice, threatens to enter a container, raises the load beyond what you can move safely, or must be removed for cleaning.
- Keep the lid closed while draining if the design permits, and recheck the thermometer afterward.
- Capture the discharge and dispose of it only where campground or local rules allow. Do not release food-contaminated water onto a campsite, road shoulder or storm drain.
If a raw package leaks, stop treating the water as clean. Keep bare hands and ready-to-eat food out of it. Discard any bread, produce or other ready food that was directly exposed or whose container is not demonstrably sealed. Move intact sealed containers to a clean bin, wash their exteriors before opening, and clean and sanitize the cooler before it returns to food service. USDA warns that raw juices can spread bacteria to other foods and recommends double containment during transport.[1]
Never use cooler meltwater as drinking water, handwashing water or ice for beverages. A sealed frozen water bottle can become drinking water because its contents stayed contained; loose cooler water has contacted packaging, hands and the cooler interior.
Make discard calls from temperature and time
The appliance thermometer is a warning system, not a time machine. A safe decision uses three facts: the highest known food temperature, how long the food was above 40°F, and whether the outdoor or vehicle temperature exceeded 90°F.
FoodSafety.gov says perishables should not remain unrefrigerated longer than two hours. When exposure is above 90°F (32°C), the limit falls to one hour.[2] Those limits include the lunch stop, serving time and any later stretch in a warming cooler. They do not restart when food goes back under the lid.
Use this travel-day decision card:
| What you know | Decision |
|---|---|
| Food is 40°F or below | Keep it cold and continue monitoring. |
| Food is above 40°F, but the total warm time is known and remains under 2 hours | Restore cooling at once; use the food soon or keep it at 40°F or below. |
| Food was exposed above 90°F and known warm time remains under 1 hour | Restore cooling immediately and shorten the meal stop. |
| Warm time exceeded 2 hours, or 1 hour above 90°F | Discard the perishable food. |
| Temperature history is unknown after loss of the cold source | Discard perishables rather than guessing. |
| Raw juice reached a ready-to-eat food | Discard the contaminated ready-to-eat food. |
Do not taste food to judge whether it survived. CDC explicitly warns against tasting questionable food and advises throwing it away when safety is uncertain.[3] Smell can identify some spoilage, but a normal smell does not prove that time-temperature abuse was harmless.
The conservative choice matters most for raw and cooked meat, poultry, seafood, eggs, milk, soft cheese, leftovers, deli food, and cut fruits or vegetables. Shelf-stable crackers and unopened canned food do not need a cooler, which is one more reason to keep them out of the cold compartment.
A five-minute departure check
Run this list after the cooler is in the RV but before pulling away:
- Perishable food entered at 40°F or below; frozen items are still frozen.
- The cooler itself was pre-chilled and starts with enough cold source for the leg.
- The appliance thermometer is visible near the upper food layer.
- Raw food is leakproof, inside a rigid lower bin, with ready-to-eat food above it.
- Lunch lifts out without moving the raw bin.
- Drinks and shelf-stable snacks have another home.
- The drain plug is closed, the cooler is upright and the load is secured.
- Ice resupply points are identified for a long or hot route.
- Tape and a marker are available for time-temperature notes.
- The group knows the discard limits and will not "test" doubtful food by tasting it.
A well-packed travel-day cooler is quiet equipment. Nobody excavates for mustard at a fuel island. Raw chicken cannot drip into lunch. A thermometer, not the last person's hand, settles the temperature question. When something goes wrong, the written reading and clock support a decision before camp setup begins.
Source note: RVCamping.info developed this RV-specific loading, opening, meltwater and decision workflow from USDA FSIS, FoodSafety.gov and CDC primary guidance. No feed article, recipe or third-party packing guide was used.
Sources
What's Your Reaction?