












Safe RV leveling and stabilizing: the right setup order
A practical setup sequence for towables and motorhomes that separates leveling from stabilization, puts tire support and chocking in the right order, and defines when to reject a sloped site.

Source note: This RVCamping.info guide is based on Winnebago, BAL, Lippert/Power Gear and Dometic instructions. It cannot replace the manuals for your exact RV, leveling system, stabilizers, chassis and refrigerator.
An RV can be level and still move when someone walks across the floor. It can also feel steady while sitting at an angle. Those are different problems:
- Leveling corrects the RV's angle from side to side and front to back.
- Stabilizing reduces bounce and rocking after the RV is level and secured.
A leveling jack may be designed to carry enough load to raise part of an RV. A stabilizer usually is not. BAL's Powered C stabilizer, for example, permits fine leveling in its instructions but warns against lifting excessive weight or raising tires from the ground.[2] The label and manual on the installed equipment settle the question, not the shape of the jack.
The safe order in one minute
For a conventional travel trailer without automatic leveling:
- Stop where the tire and jack-pad locations are firm and the RV can be made level without an improvised tower of blocks.
- Keep the trailer hitched while you check side-to-side level.
- If one side is low, pull or back the low-side tires onto purpose-made leveling blocks. Do not jack the body up with the stabilizers.
- Set the tow vehicle's parking brake. Chock the trailer wheels against movement, following the RV and chock manufacturers' placement instructions. Confirm that the chocks are seated before disconnecting.
- Unhitch only after the tires are supported and chocked.
- Use the tongue jack to level the trailer front to back.
- Put pads under the stabilizers where needed, then extend the stabilizers only as their manual directs.
Winnebago's travel-trailer setup guide follows the same basic division of labor: tires and blocks establish side-to-side level; chocks go in before detaching; the tongue jack sets front-to-back level; stabilizers come afterward and are not used to lift the trailer.[1]
A motorhome or an RV with automatic hydraulic or electric leveling needs its own sequence. One Lippert/Power Gear motorhome system requires the engine running, transmission in Park, parking brake set and rear wheels chocked before operation. It also requires a final check that no tire has left the ground.[3] Do not copy that sequence onto a different system. Air-suspension dump steps, engine requirements, jack pairs and tire-contact rules vary.
Start with the manuals and the hardware
Before the first campsite setup, identify every support device under the RV. Record the manufacturer, model and controller name. The useful documents are:
- the RV owner's manual;
- the chassis manual for a motorhome;
- the leveling or landing-gear manual;
- the stabilizer manual;
- the refrigerator manual.
Look for words such as leveling system, landing gear, tongue jack and stabilizing jack. Do not assume a powered switch means the device is a leveler. A small scissor or C-frame unit mounted near a trailer corner is often there to stop movement, while a hydraulic motorhome system may level and stabilize with the same set of jacks. Lippert describes the PowerLevel motorhome system as performing both jobs, first reaching a level plane and then stabilizing with all jacks in contact.[3]
The distinction changes what the equipment may safely carry. The BAL Powered C manual says to level the trailer fore and aft with the tongue jack or landing gear before operating its stabilizers. It also says those stabilizers must not lift tires or serve as tire-changing jacks.[2] If your stabilizer manual says "contact only," stop when the foot is planted and the slack is removed. Do not keep cranking to straighten a crooked bubble level.
Choose the site before reaching for blocks
Make the first correction with the steering wheel. Move within the assigned pad if campground rules and clearances allow. A few feet can change the tire position, drainage and jack landing points.
Inspect every place that will carry load:
- the complete footprint under each tire;
- the ground beneath each leveling block;
- every tongue-jack, landing-gear or leveling-jack landing point;
- clearance from curbs, holes, roots, utilities and campsite hardware;
- overhead and side clearance for slides and awnings.
The PowerLevel manual calls for a flat, solid contact surface under each leveling foot and warns against using its levelers on icy or slick surfaces.[3] Lippert's Titan fifth-wheel manual says jack locations should be free of debris, obstructions and depressions, with load-distribution pads on gravel, dirt or other surfaces where sinking is a concern.[4]
A pad under a jack spreads load; it does not turn soft ground into a sound foundation. Watch each foot during extension. If a pad tilts, sinks, slides or crushes its base, retract the system and reposition the RV or rebuild the support according to the component manual. Keep people, pets and loose equipment clear while anything is moving.[3][4]
Level a towable without defeating the chocks
Side-to-side leveling normally comes first because the tires control it. Measure at a repeatable location on the floor or frame specified by the RV maker, not on a countertop that may not have been installed level.
Keep the towable connected to the tow vehicle while positioning tire blocks. Place purpose-made blocks where the low-side tires will sit, then drive onto them slowly with a spotter if available. Support the full tread width, all tires in the affected tandem or triple set as the block maker directs, and stay within the product's stacking and load instructions.
Once the tire height is right:
- Put the tow vehicle in Park and set its parking brake.
- Chock the trailer before releasing the coupler or fifth-wheel hitch. Lippert's Titan manual says to chock all tires; Winnebago's example has chocks on the side without leveling blocks.[1][4]
- Use the placement required by your RV and chock instructions. On a slope, the chock must oppose the likely direction of movement; many setups require restraint in both directions. Do not perch a chock on an unstable stack or leave it unable to contact the tread.
- Let the combination settle gently against the chocks if the applicable manuals call for that step, then recheck them.
- Disconnect wiring, chains, breakaway cable and hitch components in the RV maker's order.
- Raise the trailer clear of the hitch with the tongue jack or landing gear, move the tow vehicle away, then set front-to-back level.
The exact chock arrangement differs with axle count, blocks and product design. "Chock first, unhitch second" is the non-negotiable part supported by the trailer and leveling-system instructions.[1][2][4]
Level a motorhome by its controller, not by habit
For a motorhome, center the coach on the pad, select Park, set the parking brake and chock the wheels exactly as the chassis and leveling-system manuals require. Check below for people and obstacles. Put a manufacturer-approved pad under each jack if the surface needs load distribution.
Then run the documented automatic or manual sequence. Do not walk inside while an automatic cycle is measuring and moving the coach; the PowerLevel manual says interior movement can affect the result.[3] When the cycle finishes, go outside and confirm that every jack foot is properly supported and every tire that the manual requires to remain grounded is still in contact.
Tire contact is system-specific, not a campsite debate. The PowerLevel motorhome manual says never lift the wheels off the ground and explains that raising the rear wheels defeats the braking effect of Park and the parking brake.[3] Lippert's 2026 Titan fifth-wheel manual is different: it says the system is not intended to lift all tires, yet permits a low-side tire to rise in some leveling conditions and specifies extra safety devices if the gap exceeds one inch.[4] That Titan exception belongs only to the equipment and conditions covered by that manual. It is not permission to lift a motorhome tire or to improvise under another trailer.
Never crawl under an RV supported only by its leveling system. Neither leveling nor stabilizing gear is a substitute for service-lifting equipment. The PowerLevel manual expressly forbids using its system for tire changes or work under the vehicle.[3]
When to refuse the slope
There is no responsible universal "safe campsite angle." The limit depends on the RV, system geometry, available stroke, tire-contact requirements, blocks, surface and appliance instructions. Unless your exact manual supplies a number, do not invent one from a phone app or a rule shared online.
Relocate or ask for another site when any of these occurs:
- The leveling system reports an excess-angle, excess-slope, out-of-stroke or unable-to-level condition. Lippert's Titan controller stops automatic operation when the RV reaches its allowed maximum angle; the manual does not publish a universal degree value for campers to substitute.[4]
- Following the documented cycle would lift a tire that your manual says must stay on the ground. This is an explicit stop condition for the PowerLevel motorhome system.[3]
- A tire cannot sit fully on its approved block arrangement, or a jack foot cannot land flat on solid support.
- Blocks, pads or chocks shift, sink or deform as load comes onto them.
- The RV would need stabilizers to carry the leveling load.
- The entry step, hitch area, rear overhang, utilities or slides would be unsafe even if the bubble reached center.
Do not clear a controller error by repeatedly extending jacks and hoping for a different result. Read the exact error procedure. If it calls for relocation, retract, secure the RV and move. If the cause is unclear, leave the system retracted and contact the RV or component maker.
Stabilize only after leveling and chocking
Once the tires, tongue jack, landing gear or leveling system have established a secure level position, add stabilization.
Place each stabilizer pad on firm support. Extend the stabilizer until it reaches the pad, then apply only the force the manual permits. Move around inside and make small, balanced corrections if the instructions allow. Stop if a door opening changes shape, a slide binds, the frame twists or a tire begins to unload. BAL warns that overloading its Powered C stabilizer can damage the frame and door jamb.[2]
More pressure is not always more stable. Excess force can transfer load away from the suspension or leveling points and into parts of the frame that were not meant to level the RV. If movement remains, check that the chocks are seated and that every required stabilizer has firm contact. Use only accessories approved for the particular RV and stabilizer system.
The refrigerator rule depends on the refrigerator
"The fridge must be level" is not one rule for every RV refrigerator. Find the data plate and operating manual for the installed model.
Dometic's operating manual for the DM and DMA absorption-refrigerator families requires level operation during a stop lasting several hours. It warns that several hours in a noticeably out-of-level position can cause loss of cooling, while travel does not require the same level condition.[5] That is manufacturer- and model-family guidance. It does not create a degree limit for a different Dometic model, a Norcold absorption refrigerator or a 12-volt compressor refrigerator.
If the site cannot satisfy the installed refrigerator's manual, turn that refrigerator off as directed and relocate. Do not use the refrigerator as a slope meter, and do not assume that food staying cold proves the RV is parked within its operating limit.
Break camp in the order that preserves restraint
Before retracting support equipment, bring in anything whose movement or weight changes the setup as the RV manual directs. Clear people and gear from the perimeter.
For a towable, retract the stabilizers first. Reconnect and positively latch the hitch, attach the required safety components, and transfer the tongue or pin load back to the tow vehicle before removing wheel chocks. Winnebago's hookup sequence removes the chocks only after the hitch, safety chains, breakaway cable and wiring are connected; the front jack is fully retracted afterward.[1]
For a motorhome, retract the leveling jacks through the controller's normal sequence. Confirm visually that every jack is fully stowed and that the "jacks down" warning has cleared before removing chocks and moving. The PowerLevel instructions call for both the controller indication and a visual check.[3]
One final walk-around should account for every block, pad and chock. It should also catch the expensive mistakes: a jack still down, a cord still connected or a compartment left open.
A campsite setup card worth keeping
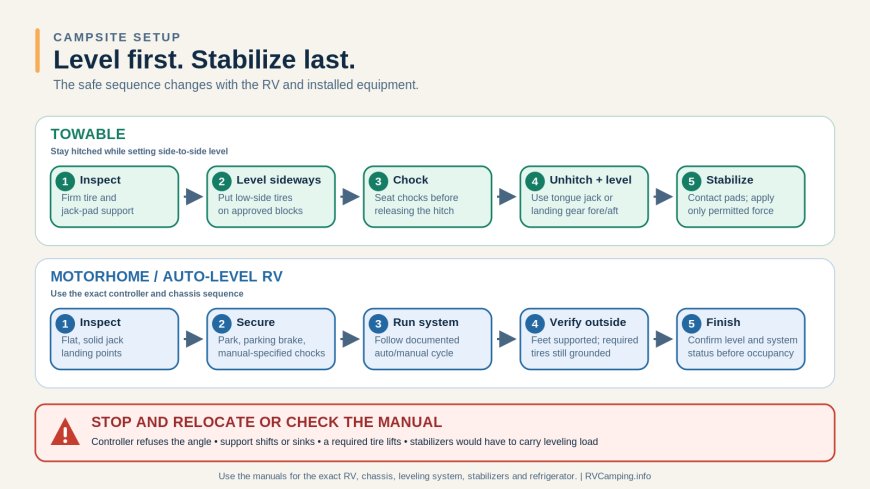
Towable: inspect site → level side to side with tires on blocks → parking brake → chock trailer → verify restraint → unhitch → level front to back with tongue jack or landing gear → stabilize.
Motorhome: inspect site → Park and parking brake → chock as the exact manual directs → place jack pads if approved and needed → run the documented leveling cycle → verify jack support and required tire contact.
Stop and relocate: controller refuses the angle; required tires would leave the ground; support cannot stay flat and firm; blocks or pads shift; or the setup needs stabilizers to do a leveler's job.
Sources
[1] Travel Trailer Setup & Takedown Guide with Checklists | Winnebago
[2] Powered C Type Stabilizing Jack Model 21100005 Operating Instructions | BAL
[3] PowerLevel Operation Manual 3010001202 | Lippert Power Gear
[4] Titan Leveling Systems for 5th Wheel Owners Manual CCD-0007709 | Lippert
What's Your Reaction?