









RV tire safety before a trip: age, load, pressure and inspection
A practical RV tire pre-trip check covering tire age, loaded weight, cold pressure, visible damage and the difference between placard pressure and the sidewall maximum.

Source note: This independent RVCamping.info guide draws on tire-industry, manufacturer and RV safety guidance. It is not a substitute for the labels and manuals for your exact RV, chassis, tires and wheels.
A tire can have deep tread and still be a bad candidate for the next highway run. RV tires spend long periods parked, carry substantial loads and may be hard to see in dual-wheel positions. A useful pre-trip check therefore asks four separate questions: Is each tire suitable and within its service-life guidance? Is the RV loaded within every relevant rating? Is each tire at the correct cold pressure? Is there visible damage or a pattern that requires a professional inspection?
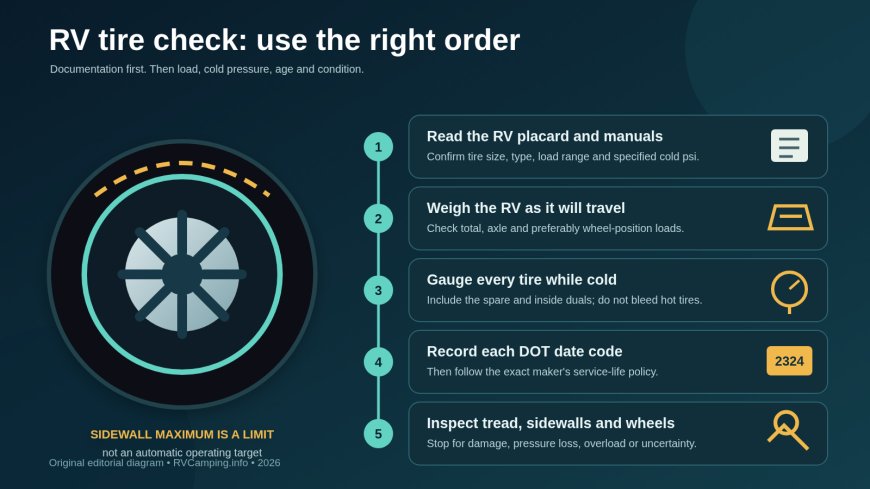
The short version: start with the RV's placard and owner documentation, not the largest pressure printed on the tire. Check pressure cold with a gauge. Weigh the RV in travel-ready condition. Record each tire's date code, but do not turn one company's age policy into a universal deadline. If damage, unexplained pressure loss, a significant impact or uncertain fitment enters the picture, stop troubleshooting by guesswork and use a qualified RV tire professional.
Sidewall maximum and placard pressure answer different questions
The tire sidewall and the vehicle placard are both important, but they do different jobs.
The sidewall identifies the tire and states limits such as maximum load and the corresponding maximum cold inflation. That marking describes a boundary for that tire. It is not automatically the operating pressure for the RV. USTMA says the sidewall maximum should not be used by itself to set pressure for a particular vehicle, while Goodyear directs owners of vehicles on approved original-equipment tires to use the vehicle manufacturer's recommendation.[1][2]
The RV tire placard or certification label supplies the vehicle maker's tire size, load information and recommended cold pressures for the original configuration. Depending on the RV, labels may be near the driver's position, inside a storage area or near a trailer hitch. The owner's manual may add chassis, axle or towing instructions.[1]
That leads to a conservative pressure rule:
- Confirm that the installed tire size, type and load range match the RV's documentation.
- For an unmodified original fitment, begin with the cold pressure on the RV placard or in the exact owner documentation.
- Never exceed the tire's sidewall limit or the wheel/rim limit.
- If tire size, load range, wheels, chassis or suspension have changed, do not improvise a number. Give the RV and tire professional the exact labels, tire markings and loaded weights. Ask them to reconcile the RV maker's documentation with the current load-and-inflation table for that precise tire.
Sometimes a trailer maker's specified pressure and the sidewall maximum are the same number. Follow it because it is the documented specification for that fitment, not because every RV tire should be filled to its sidewall maximum.
Pressure cannot correct an overloaded RV
Inflation pressure helps a tire carry load, but adding air does not raise the RV's Gross Vehicle Weight Rating (GVWR), an axle's Gross Axle Weight Rating (GAWR), or a wheel's capacity. USTMA notes that the weakest-rated component governs an axle and that a higher-capacity tire does not increase the ratings of the wheels, axle, brakes or suspension.[1]
Weigh the RV as it will travel: people, fuel, water, propane, food, gear, tongue or pin load, and carried or towed equipment included. Compare the measured total and axle weights with GVWR and every GAWR. A total or axle reading can still hide a heavy wheel position because RV loads are not always balanced side to side. USTMA calls individual wheel-position weights the most useful measurement, and RVSEF offers a wheel-position weighing program built around that problem.[1][3]
If individual wheel-position weighing is available, use it. If only axle scales are available, the reading is still useful for finding total or axle overload, but it cannot prove that each side is within its tire capacity. Do not divide an axle reading in half and assume both sides carry equal weight. Until better measurements are available, retain the OEM placard pressure and do not use an estimated split to reduce it.
When a measured position exceeds a tire, axle or vehicle rating, remove or redistribute load and weigh again. Higher pressure is not a repair for an overloaded component. Any pressure adjustment based on measured load should come from the current table for the exact tire designation and should respect the RV maker's minimum, the tire maximum and the wheel maximum.[1]
Check pressure cold, including the awkward tires
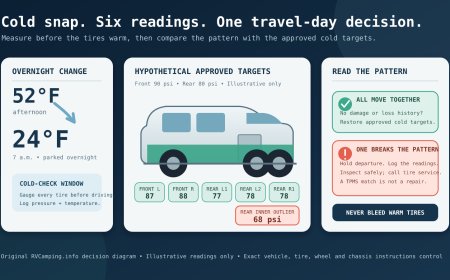
"Cold" describes tire condition, not a favorite morning temperature. Under USTMA's definition, the RV has sat for at least three hours or traveled under a mile at moderate speed. It recommends checking every RV tire, including the spare and inside duals, before each trip and each travel morning with an accurate gauge. A tire pressure monitoring system does not replace this check.[1]
Use a gauge with enough range for the specified pressure. Record the baseline so a repeated loss is obvious. If an inside dual cannot be reached, have the valve arrangement corrected before travel rather than leaving that tire unmeasured.[1]
Do not bleed air from a warm tire merely because its pressure rose on the road. Heat normally raises pressure. Compare and adjust to the specified value when the tire is cold. If a warm reading is already at or below the specified cold pressure, or a tire repeatedly needs air, treat that as a warning and arrange professional inspection.[1]
TPMS is useful for changes underway, but its display can encourage false confidence. It cannot confirm tread condition, sidewall damage, wheel damage, load distribution or the age of the spare. Keep the manual gauge and visual inspection in the routine.
Read tire age without inventing a retirement birthday
Find the full DOT Tire Identification Number (TIN). On tires made since 2000, its final four digits give the manufacturing week and year. A code ending in 2324, for example, means the tire was made in week 23 of 2024. The full code may appear on only one side, so an inside-facing sidewall can require help to read safely.[1]
Write the code down for every road tire and spare. The date is an inspection and documentation input, not a complete fitness test.
There is no responsible universal sentence such as "all RV tires must be replaced at six years." USTMA does not recognize one calendar-age floor or ceiling for the tires covered by its passenger and light-truck guidance because use, storage, load, pressure, heat, impacts and maintenance vary. It tells owners to follow the specific vehicle and tire manufacturer's policy and not to treat any stated age as a guaranteed minimum life.[1]
Manufacturer policies can be more specific. Michelin's RV/motorhome bulletin, for example, calls for specialist inspection at least annually once those tires have been in use for five years and replacement at ten years from manufacture as a precaution.[4] Those numbers are Michelin's policy for the tires covered by that bulletin, not a generic schedule for every brand, ST trailer tire or commercial-size motorhome tire.
For your RV, identify the exact manufacturer and tire line, retrieve the current service-life bulletin, then compare it with the RV and chassis manuals. Use the most conservative applicable requirement. Replace sooner when condition, damage, wear, loading history or a professional inspection calls for it. If the history is unknown, especially on a used RV, ask for a demounted internal inspection; damage from underinflation or a poor repair may not be visible outside.[1]
A no-tools-first visual inspection
Park on a firm, level place away from traffic, secure the RV as its manual directs, and keep your body out from under an unsupported vehicle. This is an observation checklist, not a tire-repair procedure.
Walk around every tire, then inspect the spare and both members of each dual set:
- Look across the tread for uneven wear, bald areas, separation, embedded objects and anything that exposes cord or fabric.
- Scan both accessible sidewalls for bulges, blisters, deep cuts, cracking, abrasion and impact marks. A bulge needs professional attention; do not dismiss it as normal sidewall shape.
- Check the valve and extension for visible damage and confirm that a sealing cap is present.
- Look between dual tires for trapped stones or debris, and verify that the pair is not contacting.
- Inspect the visible wheel for cracks, bending or heavy damage. Note leakage or other evidence around the hub for service evaluation.
- Measure tread with a proper gauge at several places rather than judging it from one shoulder. Use the tire, vehicle and jurisdiction requirements for the exact RV; legal minimums are not a promise that an aged or damaged tire is serviceable.
- Confirm that every installed tire's size, load range and service description agree with the documented fitment. Check the spare too.
USTMA advises regular checks for irregular wear, cracking, scrapes, bulges, cuts, snags and foreign objects, plus periodic inspection by a tire professional. Its RV guidance also calls for a professional inspection before each travel season and during routine maintenance.[1]
Conditions that should stop the departure
Do not start the trip simply because adding air makes the dashboard warning disappear. Pause and obtain professional help when you find:
- a bulge, tread or sidewall separation, exposed cord, a deep cut, severe cracking, or a flat tire;
- unexplained or recurring pressure loss;
- evidence that a tire ran substantially underinflated or carried an overload;
- a significant curb, pothole or road-hazard impact followed by damage, pressure change, vibration or uncertainty;
- a mismatch between installed tire markings and the RV label;
- a measured load above a tire, wheel, axle or vehicle rating;
- an inaccessible tire that cannot be inspected or gauged;
- an unknown used-tire history or a questionable prior repair.
A plug pushed in from outside is not a complete inspection. USTMA says a tire that has lost substantial pressure must be removed from the wheel for internal examination and that repairability depends on damage location, size, service and manufacturer policy.[1]
If a dual tire was significantly low or flat, have both tires in the pair inspected. Its mate may have carried more than its intended share even if it looks normal.[1]
Save one tire record for the RV
A simple tire sheet prevents the pre-trip check from becoming a memory test. Record:
- RV, chassis and axle identifiers;
- placard tire sizes and cold pressures;
- GVWR, each GAWR and relevant wheel ratings;
- installed tire brand, model, size, load range and TIN date code by position;
- travel-ready scale weights and the date/configuration weighed;
- the exact load-and-inflation table revision used, if a professional sets pressure from measured loads;
- gauge readings, observed defects and professional service findings.
Photograph the placards and tire sidewalls, but keep the written values too. Replace the sheet when tires, wheels, valves, suspension, loading or towing configuration changes.
The pre-trip order that prevents bad shortcuts
Use the same order every time: documentation, load, cold pressure, condition, then professional review of anything uncertain. That order matters. The sidewall maximum cannot substitute for the placard. A placard pressure cannot make an overloaded axle acceptable. Good tread cannot erase age, impact history or internal damage. A TPMS cannot inspect a spare.
If the numbers disagree, the correct next step is not to choose the largest psi. Stop, preserve the labels and scale ticket, and ask the RV maker, tire maker or a qualified RV tire specialist to reconcile the exact equipment.
Sources
[1] Care and Service of Passenger and Light Truck Tires
[2] Tire Inflation Recommendations for Auto and Light Truck Tires
What's Your Reaction?