
























How to Connect an RV Sewer Hookup Without Leaks
A campsite sewer-connection check for intact caps and seals, downhill hose support, secure fittings, safe valve sequencing and clean disconnection.

How to Connect an RV Sewer Hookup Without Leaks
A full-hookup campsite does not make the sewer connection automatic. Before a valve opens, the hose needs an intact gasket at each end, a supported downhill run, and a secure connection at the campground riser. This arrival and departure check is designed to catch the small faults that turn into spills: a missing O-ring, a cracked bayonet lug, a loose adapter, or a low spot full of wastewater.
This is a campsite hookup procedure, not a dump-station guide and not a cold-weather hose guide. Your RV and waste-system manuals take priority because valve arrangements, macerator systems, and combination tanks differ.
Start with closed valves and clean hands in mind
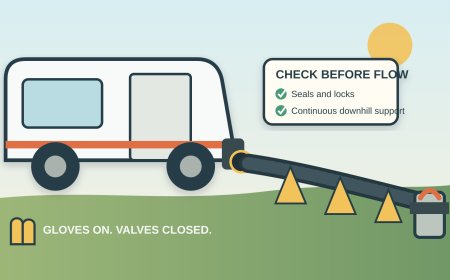
Put on waterproof disposable or reusable utility gloves before handling the RV waste outlet, hose, fittings, or sewer riser. Cover cuts first, and avoid touching your face. The CDC advises waterproof gloves for contact with sewage and handwashing with soap and water immediately after handling it; hand sanitizer is useful when a sink is not nearby, but it does not replace the soap-and-water wash at the end of the job.[2]
Keep sewer gear separate from drinking-water equipment. A dedicated bin or compartment for the hose, elbow, adapters, caps, and gloves keeps a used sewer fitting from rolling against a potable-water hose. Do not use the fresh-water hose to rinse sewer equipment.
Before removing either cap, confirm that the black and gray termination valves are fully closed. Do not trust handle position alone if a cable-operated valve feels loose. If the RV outlet cap is bulging, dripping, or under pressure, stop. A leaking gate valve may have trapped liquid behind the cap, and removing it can release that liquid at your feet.
Inspect the cap, outlet, hose, and riser
Work from the RV toward the campground connection while everything is still dry.
At the RV outlet, check the cap seal, bayonet lugs, and the round sealing surface. A flattened, split, twisted, or missing gasket cannot make a reliable seal. Look for dried residue around the outlet, which can reveal an earlier seep. The cap should turn and lock without being forced.
Unroll the sewer hose far enough to inspect every section. Flex it gently and look between the corrugations for pinholes, abrasion, brittle spots, crushed coils, or a repair that has started to separate. Check both end fittings for cracks and verify that their locking hooks move into place. Replace a suspect hose or seal before connecting. Tape wrapped around a wet corrugated hose is not a dependable campsite repair.
Now inspect the campground riser without putting bare hands on it. It should be stable, open, and free of obvious cracks or damage. If the cap is missing, the pipe shifts in the soil, sewage is already present, or the opening will not accept your adapter securely, contact campground staff rather than improvising. Virginia's campground sanitation rule illustrates the purpose of a proper connection: the hose is to be watertight, its lower end secured with a suitable gasket, and the joints arranged to prevent sewage or odor leaks.[1]
A damaged riser is campground infrastructure. Do not wedge a loose pipe upright with rocks, force incompatible threads, or leave an unsealed hose end resting in the opening.
Set the hose geometry before attaching it
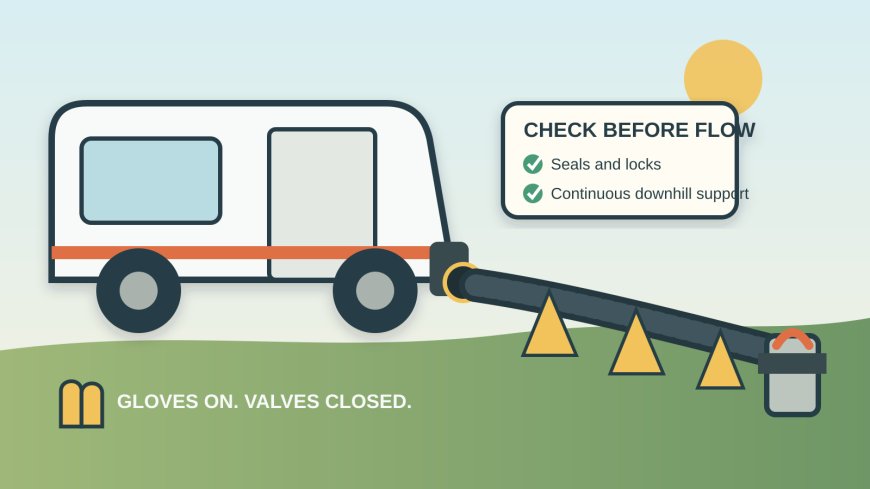
Lay out the shortest practical route with enough slack for small RV movement, but without an extra coil on the ground. Use a purpose-built hose support or stable trough to create a continuous fall from the RV outlet to the sewer inlet.
Think in terms of two geometry failures:
- A belly is a low sag that holds wastewater after the tanks drain.
- A hump is a rise that gravity-fed flow must climb.
Either one leaves liquid in the hose and adds weight to the fittings. Stretching the hose tight is not the answer. A taut hose can pull on the RV outlet or campground adapter when someone bumps the support or the rig settles. Support the hose along its length, especially near couplers, rather than asking the two end fittings to carry it.
Gravity systems need a clear descending path, so recheck the run from the side and correct every rise or sag. For a macerator or other pumped system, use that system's routing limits instead of assuming gravity-hose rules apply.
Make a sealed connection at both ends
With both RV valves still closed, attach the campground end first. A threaded elbow should engage smoothly and seat its gasket without cross-threading. A tapered press-fit adapter should sit firmly enough that normal hose movement will not pull it out. Campground rules may require an airtight or gas-tight fitting, so check posted site instructions.
Next, loosen the RV outlet cap carefully while standing to one side. Pause if liquid appears. Once the outlet is clear, align the hose bayonet fitting with all outlet lugs, push it fully into place, and twist until every hook is locked. A fitting caught on only one or two lugs may look connected while leaving a gap on the far side.
Run a gloved hand near, not underneath, each joint to confirm that it is seated. Check that the hose has not rotated the campground adapter loose. Verify the support again after both ends are attached; connecting the fittings often shifts the slope.
Do not open a waste valve just to see whether a questionable joint holds. If the adapter rocks, the gasket is missing, or the hose fitting will not lock, correct the mechanical problem first.
Use a controlled leak check, then follow your manual
There is no single valve sequence for every RV waste system. A conventional gravity setup, a macerator, a combination tank, and a coach with multiple gray tanks may use different procedures.
For one Thetford Sani-Con system, the manufacturer instructs the operator to run gray water briefly to confirm operation before opening the black valve. The same instructions then call for closing the gray valve, emptying the black tank, and emptying gray afterward.[5] That brief gray-water check is a model-specific test, not permission to invent the same sequence for every RV.
If your own manual authorizes a low-volume gray-water test, watch the RV fitting, couplers, hose body, and campground adapter while it runs. Stop immediately if you see a drip, a fitting shift, or the hose swell behind a kink. Close the valve before touching or reseating anything.
When the system manual calls for normal tank dumping, black-before-gray is common because the later gray-water discharge helps rinse the evacuation hose. Thetford's Turbo 700 manual gives that exact sequence and says to keep the nozzle securely attached, supervise operation, close the black valve, then empty gray; it also directs the operator to drain the hose before storage.[4] Follow that order only when it matches the instructions for the equipment installed on your RV.
During a longer full-hookup stay, do not assume both valves should remain open. Gulf Stream tells owners never to leave the black-tank valve open during use because a gravity tank needs enough liquid to carry solids out.[3] Your manual may have different guidance for gray tanks. Keep the hose supported and inspect the joints daily, after heavy rain, and whenever the RV has been leveled again or moved.
Disconnect without carrying the mess to the next site
At departure, close every tank valve and confirm that flow has stopped. Drain the hose toward the sewer inlet by lifting it in sections from the RV end, without whipping or sharply bending it. The goal is to move trapped liquid downhill while the campground end is still secured.
Disconnect the RV end first only after the hose is drained and all valves are closed. Keep the open hose end elevated and fit its cap if the system provides one. Then remove the campground adapter, avoiding contact between its used end and the outside of your storage bin. Replace the campground riser cap unless site staff instruct otherwise.
Inspect as you pack. A gasket that stayed on the riser, a new scrape in the hose, or moisture inside a capped fitting is easier to address now than at the next campsite. Thetford's storage procedure calls for emptying the hose, disconnecting the nozzle, reinstalling caps, and returning the hose to its compartment.[4]
Wash reusable equipment according to its manufacturer's directions and store it away from potable-water parts. Peel gloves off without touching their contaminated exterior, dispose of single-use gloves, and wash your hands thoroughly with soap and water.[2]
The final walk-around is short: every waste valve closed, outlet cap locked, hose and adapters contained, sewer riser capped, and no wet spots or residue left at the site. If there was a spill, keep people and pets away and notify campground staff so the area can be cleaned properly.
Sources
- 12VAC5-450-90. Sewage disposal Retrieved October 5, 2026.
- Protecting Workers Handling Human Waste Retrieved October 5, 2026.
- Gulf Stream Coach Travel Trailer Owner’s Manual Retrieved October 5, 2026.
- Thetford Sani-Con Turbo 700 Owner’s Manual Retrieved October 5, 2026.
- Thetford Sani-Con System Owner’s Manual Retrieved October 5, 2026.
What's Your Reaction?