





RV Kitchen Water Budget: Drink First, Wash Smart
Plan potable water for RV cooking, sanitize safe containers, wash dishes with two quarts, and follow each campground's grey-water rules.

By Romana
An RV kitchen water plan should make one promise: washing a skillet will never use tomorrow's drinking water. Start with a protected potable reserve for people and meals, then give dishwashing its own small allowance. Keep every drop of wash water in a basin until you know where that campground permits it to go.
For a simple planning floor, the CDC says to store at least one gallon per person per day for three days. That emergency figure covers drinking, cooking, toothbrushing and other uses, and the CDC advises carrying more for hot weather, pregnancy, illness and pets.[1] An active camping trip can demand more. Treat the formula as a floor to build on, not a promise that everyone will thrive on exactly one gallon.
Split the supply into three jobs
A single tank gauge hides the decisions that matter. Plan water in three buckets, even if all of it rides in the same RV:
- Protected potable water: the people-by-days floor, reserved for drinking, cooking and toothbrushing.
- Trip-specific additions: water required by the menu, pets, hot conditions, medical needs and a delay margin.
- Cleaning water: a measured allowance for handwashing and dishes.
The protected amount is intentionally conservative. The CDC's one-gallon figure includes more than drinking and cooking, but walling that entire amount off from routine dishwashing prevents a stack of greasy plates from eating into the next day's supply.[1]
Use this worksheet before filling the tank:
| Line | Planning method | Example: two adults, three days |
|---|---|---|
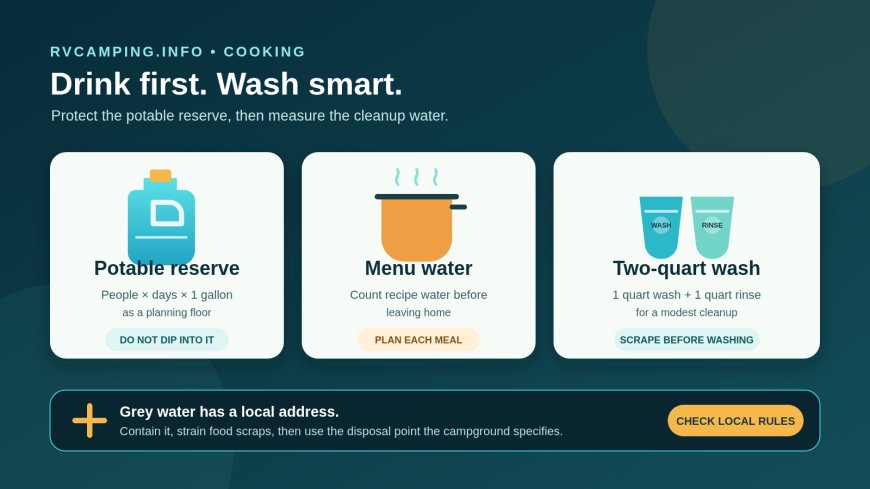
| Protected potable floor | people × days × 1 gallon | 6 gallons |
| One extra day | people × 1 gallon | 2 gallons |
| Three low-water cleanups | cleanups × 2 quarts | 1.5 gallons |
| Conservative load target | add the three lines | 9.5 gallons |
The 9.5-gallon result is an RVCamping.info planning example, not an agency requirement. It assumes two adults, three calendar days, one extra day of reserve and three full dish cleanups using one quart to wash plus one quart to rinse. It does not include pets, showering, toilet flushing or water used to put out a fire.
Change the assumptions to match the trip. A menu built around pasta, boiled potatoes and powdered drinks needs more cooking water than tortillas, canned beans and prewashed produce. Write the required water beside each meal, including water that stays in the food and water that will be discarded. If the pasta plan spends half a gallon merely to make dinner, that amount belongs in the food column before departure.
Do not count an uncertain campground spigot until you have confirmed that it is operating and potable. Seasonal shutdowns, primitive operating status and advisories can change what is available. Carry the protected supply in a form you can still reach if the pump fails or the fresh tank develops an off smell.
Use containers meant for drinking water
Commercially bottled water is the CDC's safest and most reliable emergency option. For refillable storage, CDC recommends FDA-approved food-grade water containers.[1] A suitable jug should close tightly, resist breakage and preferably have a narrow opening that lets you pour without putting a cup or hand inside.[1]
Never repurpose a container that held bleach, pesticide or another toxic chemical.[1] A clean-looking detergent jug is not a drinking-water jug. Label potable containers clearly and keep a separate, visibly different container for collected grey water so nobody can confuse the two in a dark storage bay.
A practical container setup has redundancy:
- one smaller jug in the galley for current use;
- one or more sealed reserve jugs stored low and secured against movement;
- a separate catch container for dishwater when the site has no sewer connection;
- caps installed whenever a container is not being filled or poured.
A small jug is easier to control than a large open pail. It also limits the amount contaminated if a dirty hand, cup or hose touches the opening. CDC advises using a clean scoop each time if water must be removed that way, and keeping hands away from both the water and the inside of the container.[1]
Sanitize a refillable jug before the trip
Cleaning removes dirt; sanitizing follows cleaning. CDC's container procedure is specific:
- Wash the container with soap, then rinse it completely.
- Mix 1 teaspoon of unscented household chlorine bleach containing 5% to 9% sodium hypochlorite with 1 quart (4 cups) of water.[1]
- Close and shake the container so the solution reaches every interior surface.
- Wait at least 30 seconds, pour out the solution and let the empty container air-dry.[1]
- Fill it with clean water and close the lid tightly.
This recipe is for sanitizing an empty storage container. It is not a substitute for an RV manufacturer's fresh-tank sanitation procedure, and it is not a general formula for making questionable source water drinkable. Tank capacities, plumbing layouts and appliance instructions differ. Follow the RV and water-heater manuals for that job.
Date water filled at home and rotate stored water at least every six months, as CDC recommends. Store it away from sunlight, gasoline, pesticides and other chemicals.[1] For a traveling RV, add two mechanical checks: secure each jug against braking forces and inspect the cap and seam for leaks before loading it into a cabinet.
Use safe water at the sink
A campground faucet is not automatically safe because it has a handle. Look for a potable-water label and check posted notices. During an advisory or supply interruption, follow the campground, utility or health department instructions.
EPA says properly disinfected water should be used for drinking, cooking, prepared drinks, brushing teeth and washing dishes during an emergency.[2] Its emergency treatment page also warns that boiling and germ-killing chemicals do not solve contamination by dissolved metals, salts and many other chemicals.[2] Water with a suspicious odor, color, chemical risk or official "do not use" notice needs local guidance; do not assume that boiling fixes it.
Keep the potable hose, filler nozzle and jug cap off the ground. Do not insert a campground spigot or shared hose into the container opening. If you transfer water through your own hose, use one reserved for potable water and protect its ends between uses.
A two-quart dishwashing method
This method budgets two quarts for one modest cleanup. It works best for two people and a one-pan meal. A larger group, raw-meat preparation or heavily burned cookware will need more water. The point is to set the allowance before opening the tap.
1. Check the disposal route first
Find the utility sink, grey-water drain or dump station before washing. If no facility is obvious, ask the host. Put a basin under the work so every drop remains contained. Do not start with the assumption that strained water may go on the ground.
2. Remove food while it is still food
Finish edible leftovers or move them into cold storage. Scrape the rest into the trash. Wipe grease and sauce from pans and plates with a used napkin, a small piece of paper towel or a flexible scraper. This dry step does most of the water-saving work.
Never pour cooking oil into the dish basin. Cool it, seal it and place it in the trash according to local instructions. A pan with a film of grease takes far less water to clean than a pan holding a spoonful of oil.
3. Measure, do not run
Put one quart of warm potable water and a small amount of dish detergent in the wash basin. Keep a second quart of potable rinse water in a bottle or clean basin. A continuous faucet can spend the whole allowance while one person looks for the sponge.
Wash the least greasy items first: cups, utensils, plates, then cookware. Use the same warm wash water throughout. A tight-fitting scraper and a small square of scrub pad are more useful here than a sink full of suds.
4. Rinse with control
Use a thin pour from the rinse bottle over the second basin, or dip and drain when the rinse water stays clean enough for the load. Keep washed items from falling back into the dirty basin. If the water source is under an advisory, use the safe-water method directed by local officials for dishwashing.[2]
Air-dry dishes on a clean rack. A dish towel can move contamination from one item to the next and becomes damp storage in a hurry. If the trip includes illness, vulnerable travelers, shared group cookware or raw-animal-food preparation, add the sanitizing step recommended by the relevant health authority or sanitizer label. Do not improvise a bleach concentration from memory.
5. Strain and contain
Pour both basins through a fine strainer into the grey-water container. Put captured food bits in the trash. Close the container and take it to the disposal point the campground specifies.
The two-quart target is a planning allowance, not a hygiene limit. Add water when dishes remain soapy or visibly dirty. Save water by scraping better, simplifying meals and washing promptly, not by skipping an adequate rinse.
Grey-water rules can change within the same park
There is no reliable national rule that lets an RVer scatter dishwater anywhere. The land manager and campground set the applicable disposal method, and the answer may depend on the campground's operating status.
Great Smoky Mountains National Park requires dishwater and bath water to go to utility sinks or dump stations, not onto the ground.[3] Glacier National Park gives the same direction in developed campgrounds: contain dishwashing wastewater and use utility sinks or RV dump stations.[4]
Glacier's primitive-status instructions are different. When potable water and dump facilities are unavailable, the park tells campers to filter food scraps into the trash and scatter the remaining dishwater at least 100 feet from campsites, lakes and streams.[4] That exception belongs to that stated place and condition. It is evidence of rule variability, not permission to copy the practice elsewhere.
Check four places before arrival: the reservation listing, the park or campground rules page, the confirmation email and notices posted on site. When they disagree, follow the current on-site instruction or ask staff. "Biodegradable" soap does not override a rule requiring a utility sink or dump station.
The departure check
Before leaving home, confirm that:
- the protected potable amount is loaded and reachable;
- menu water and the delay margin are included;
- food-grade jugs are clean, sanitized, dated and secured;
- potable and grey-water containers cannot be confused;
- the basin, scraper, small detergent bottle and strainer are packed;
- the campground's current water availability and grey-water route have been checked;
- no one plans to wash dishes at a drinking-water spigot.
A good RV water budget is visible. People can see what is safe to drink, what dinner will consume and what remains for cleanup. When the reserve is physically protected and the wash allowance is measured, the kitchen stops competing with tomorrow's water bottle.
Source credit: This original RVCamping.info guide was developed from CDC and EPA emergency-water guidance and current National Park Service campground rules. The budgeting worksheet and two-quart wash workflow are RVCamping.info planning tools; they are not agency standards.
Sources
What's Your Reaction?