








An RV slide-out will not retract: identify the mechanism before using an override
Secure the RV, identify the exact slide mechanism and controller, compare manufacturer-specific recovery paths, and use the service call sheet before attempting an override.

An RV slide-out will not retract: identify the mechanism before using an override
By Romana | October 19, 2026
A slide room that stops halfway in creates pressure to do something fast. That pressure is how the wrong socket ends up on the wrong shaft, or a generic video gets mistaken for the manual for the equipment in front of you.
There is no universal RV slide-out override. Lippert's In-Wall system uses two motors and a controller. Its electric through-frame system uses an electric ball-screw actuator and offers two mechanical crank points. Its hydraulic through-frame system uses a cylinder, pump and, on some installations, a manifold with room-specific valves.[1][2][3] The three manuals do not describe interchangeable recovery methods.
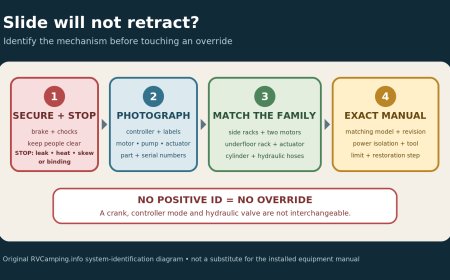
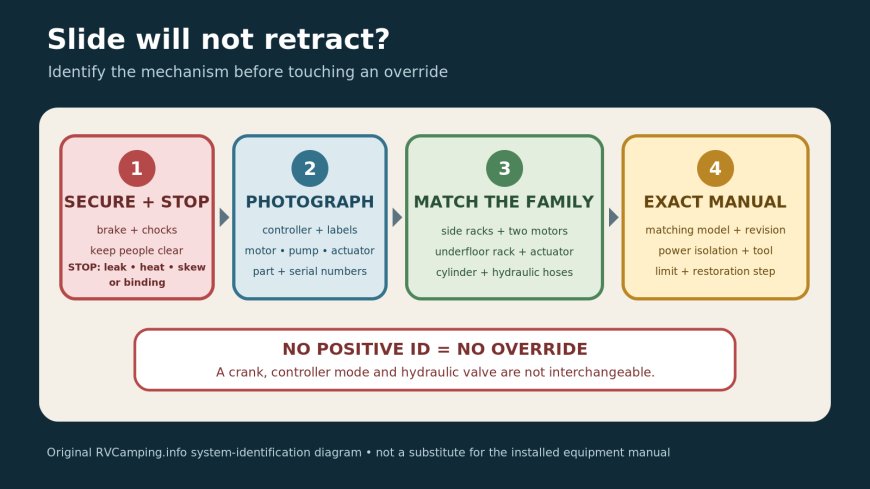
This article is a decision guide, not an override procedure for an unidentified slide. Secure the RV, identify the installed mechanism and controller, retrieve the matching revision, and stop if the manual or the condition of the equipment leaves doubt.
Stop before troubleshooting
Do not drive with the room partly extended. Set the parking brake, follow the RV maker's wheel-chocking instructions, and keep people and pets clear of the room and mechanism. Do not reach between the room and wall, stand in the room's travel path, or crawl under the RV to hunt for a motor. All three cited manuals direct users to clear people from the slide area; the hydraulic manual also warns about the pinch hazard at the slide rails.[1][2][3]
Call for qualified help instead of attempting an override when any of these conditions is present:
- the room, rack, rail, bracket or opening is bent, shifted or damaged by impact;
- one corner is substantially ahead of the other, the room is visibly crooked, or it has left its normal track;
- a hydraulic hose, cylinder, fitting, pump or reservoir is leaking;
- wiring is hot, insulation is damaged, smoke or a burning smell is present, or a breaker trips again;
- the mechanism grinds, snaps or binds, or a crack comes from the room structure;
- ice, a branch, furniture, flooring or another obstruction cannot be removed without entering a pinch zone;
- the required access point can be reached only by going under an unsupported RV;
- the system identity, controller version, applicable manual or stopping point is uncertain.
Do not loosen hydraulic fittings, remove structural fasteners, bypass an interlock, substitute a larger fuse or breaker, or force the room square. Do not place hands on a suspected pressurized leak. An override moves a mechanism; it does not repair collision damage, a failed bearing, a jammed room or a hydraulic fault.
First try the documented normal retract sequence
Photograph the room inside and outside before moving anything. Clear loose rugs, furniture and exterior obstacles from a safe position. Check the setup prerequisites in the RV and component manuals, including level or stabilization state, ignition position, battery condition and any transit-bar instructions.
The normal sequences already differ. For motorized RVs, the In-Wall manual requires ignition off. It directs the operator to keep the switch pressed at the closed position until motor shutdown, followed by fitting transit bars when equipped.[1] The current electric and hydraulic through-frame manuals say to hold IN only until the room stops, then release the switch and install transit bars if equipped.[2][3]
Watch both sides from a safe location during one documented attempt. Stop if one side lags, motion becomes uneven, the sound changes, the controls fault again, or the room meets resistance. Repeated switch cycling can turn a diagnosable problem into damaged gears, trim or structure.
Identify what is actually installed
The RV badge does not settle the question. One coach can have hydraulic leveling and an electric slide, or several rooms with different mechanisms. Identify each failed room separately.
Use labels and features you can see without entering a danger area:
| What you see | Possible family | What still needs confirmation |
|---|---|---|
| Horizontal gear racks on both vertical sides of the room; motors near the tops of the side columns; a two-motor controller with status LEDs | Lippert In-Wall, often called Schwintek | Controller revision, motor/controller compatibility and exact owner manual |
| Rack-and-pinion hardware below the room; one electric ball-screw actuator and a drive connection across the room | Lippert electric through-frame | Product label, actuator arrangement, inside or outside manual-access point and manual revision |
| Rack-and-pinion hardware below the room plus a hydraulic cylinder and hoses leading toward a pump/reservoir | Lippert hydraulic through-frame | Pump/manifold layout, which valve belongs to the failed room, and exact manual revision |
| Cables at the room corners or another layout that does not match the above | Another slide family | Manufacturer, model, controller and its own documentation |
Do not identify a system by one feature alone. A pump in a storage bay may operate leveling equipment but not the slide. A side-mounted rack may resemble another product generation. Photograph the controller face, motor or actuator label, pump and manifold labels, room-side hardware, and any part or serial numbers. The Lippert manuals themselves warn that reference images can differ from installed parts.[1][3]
Three official manuals, three different override paths
The differences below are identification clues and decision boundaries. They are not permission to combine steps.
In-Wall or Schwintek: controller-specific electronic override
Lippert's In-Wall owner manual limits its electronic manual override to named controller versions: C-1, C-2 and D-0.[1] The mode supplies 12-volt power directly to both motors, but the motors are not synchronized. Lippert says to watch the room and stop immediately if one side moves much slower or does not move.[1] Leaving override mode resets motor positions, so the motors need to be resynchronized afterward.[1]
That is not a generic “press the controller button” instruction. A different board, a dead side, a crooked room or an unidentified controller changes the decision. The same manual contains a separate motor-disengagement procedure, but using it means accessing the upper columns and then physically controlling and securing a free room. If that work is outside the owner's manual match, access or ability, it belongs with a technician.
Electric through-frame: mechanical crank, battery isolated
Lippert describes its electric through-frame system as a rack-and-pinion guide driven by an electric ball-screw actuator.[2] Its 2026 owner manual requires disconnecting the battery from the system before manual operation because backfeed through the motor can damage the system.[2]
That manual documents an outside-frame crank extension and an inside-frame hex-head extension. It says the actuator is “manual ready,” so the motor is not disengaged for those methods.[2] It also warns that manual operation can pass the normal limit and that continuing at full travel can strip gears.[2] The safe stopping point therefore matters as much as finding a part that accepts a socket.
Hydraulic through-frame: pump coupler plus the correct valve state
The hydraulic through-frame manual describes a rack-and-pinion system moved by a hydraulic cylinder.[3] Its override is not the electric through-frame crank. The manual identifies room valves at the pump manifold, uses a valve override where that manifold is present, and drives the power-unit coupler with an auxiliary drill.[3] It also requires returning the valve override to its normal position after room movement and warns that turning the set screw too far damages the valve.[3]
This is why copying a drill direction or valve count from another Lippert document is unsafe. Even the cited hydraulic manual branches when no manifold is present.[3] A multi-room hydraulic coach also creates a serious identification problem: opening the wrong valve can involve the wrong room or another hydraulic function. If the labels and plumbing do not make the match certain, stop and call Lippert, the RV maker or a qualified mobile RV technician.
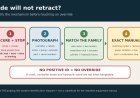
The override decision gate
Proceed only when every statement is true:
- I have identified the failed room's mechanism, product family and controller or pump arrangement.
- I have the current official manual that applies to those identifiers, not a screenshot, search snippet or video.
- The manual assigns this override to an owner and covers the symptom I see.
- The room and mechanism have no visible impact damage, severe misalignment, active leak, hot wiring or obstruction.
- I can reach the named access point without placing any part of my body under an unsupported RV or in the room's path.
- I can isolate electrical or stored energy exactly as the manual requires.
- I have the specified hand tool or permitted driver and know the documented direction, limit and restoration step.
- A second adult can keep the area clear and watch the opposite side without standing in a pinch zone.
- I know how the room will be secured for travel after retraction.
One no ends the owner attempt. Tell roadside assistance or the towing provider that a slide room is deployed or partly deployed before they dispatch. The rig may need a mobile technician before it can be moved or loaded.
System-ID and service call sheet
Save this sheet on the phone and keep a printed copy near the slide controls. Fill it out at home while the system works, not at checkout with rain coming in.
| Item | Record for this RV |
|---|---|
| RV make, model, model year | ______ |
| VIN | ______ |
| Failed room and position | ______ |
| Slide mechanism maker and product family | ______ |
| Controller, actuator, motor or pump part number | ______ |
| Serial number and label location | ______ |
| Electric, hydraulic, cable or other | ______ |
| Official manual title, document number and revision date | ______ |
| Manual URL saved offline | ______ |
| Normal retract page | ______ |
| Owner-permitted override page | ______ |
| Required power isolation | ______ |
| Required tools | ______ |
| Error lights, blink code or display text | ______ |
| Battery voltage at rest and during attempted operation, if safely measured | ______ |
| Which side moved first or lagged | ______ |
| New sound, odor, heat, leak or visible damage | ______ |
| Last successful full cycle and recent work | ______ |
| Room photos and label photos saved at | ______ |
| RV maker contact and case number | ______ |
| Slide maker contact and case number | ______ |
| Mobile technician or roadside provider | ______ |
During the call, describe what happened without diagnosing it: “The curbside bedroom room stopped about six inches from closed; the controller shows this blink pattern; the left side is behind the right; no further attempts were made.” Send label and room-position photos. Ask the technician to confirm the exact manual and whether the room must be mechanically secured after retraction.
Verify the travel condition
A room that looks closed from ten feet away may still be uneven or unsecured. Complete every restoration step in the matching manual. Confirm the controller has left override mode, disconnected components are restored only as directed, hydraulic valve overrides are back in their specified operating state, access covers are replaced, and fitted transit bars are installed.
Walk around the RV. Check that both sides are evenly seated, exterior seals have the expected contact, no cable or hose hangs down, and no fresh fluid or damaged wiring is visible. Verify the control indication as well as the physical room position. If the room creeps outward, sits crooked, will not lock or seal, required unusual force, or cannot be restored to normal operating configuration, do not travel.
The useful question is not “How do I crank in an RV slide?” It is “Which installed system am I looking at, and what does its exact manual allow me to do?” That extra identification step separates an owner-permitted recovery from an improvised repair.
Source note: This RVCamping.info workflow compares three official Lippert owner manuals to show why slide-out overrides are system- and controller-specific. Use the operating documents for the RV and its installed slide mechanism.
Sources
- In-Wall Slide-out Owner's Manual, CCD-0001602 — Lippert, revision April 19, 2023; normal operation, controller-specific electronic override, stop condition, fault codes and motor disengagement.
- Electric Through-Frame Slide-out Owner's Manual, CCD-0001613 — Lippert, revision April 13, 2026; system design, battery isolation, two mechanical override access points and overtravel warning.
- Hydraulic Through-Frame Slide-out Owner's Manual, CCD-0001616 — Lippert, revision March 11, 2026; cylinder/pump system, manifold branching, valve override, power-unit coupler and restoration step.
What's Your Reaction?