












After wheel service, when should you recheck RV lug-nut torque?
RV lug-nut recheck intervals conflict by chassis and axle. Compare exact Ford, Freightliner, Dexter and AL-KO manual schedules, then use the included service record card.

After wheel service, when should you recheck RV lug-nut torque?
The useful answer is not “after 50 miles.” It is: after the distance and under the conditions named in the manual for the chassis or axle actually under your RV. That may mean three early checks, a 50-to-100-mile window, a 100-mile check followed by another at 500 miles, or checks every 50 miles through a 200-mile seating period.
Those schedules are not interchangeable. Neither are the torque figures. A motorhome badge tells you who built the living space; a trailer brand tells you who assembled the coach. The wheel instructions may come from Ford, Freightliner, Dexter, AL-KO or another chassis, axle or wheel maker.
Start the clock whenever a wheel has been disturbed
Treat removal and reinstallation as a new service event. A tire replacement, flat repair, rotation, brake or bearing job, hub work, and any other task that required wheel removal can restart the manual’s recheck schedule.
The work order should identify what was touched. “Tire service” is too vague. Before leaving the counter, ask:
- Which wheels were removed?
- What chassis or axle manual supplied the final torque and tightening method?
- What wheel, stud and nut type did the technician identify?
- Were the specified threads or seating surfaces dry, clean or lubricated? Record the instruction, not an assumption.
- At what odometer or trip-meter readings are the rechecks due?
- Will the shop perform them, or does the owner need a qualified mobile or truck/RV service?
Do not wait until the end of a long travel day to sort this out. The first check in some towable manuals arrives after only 10 miles.
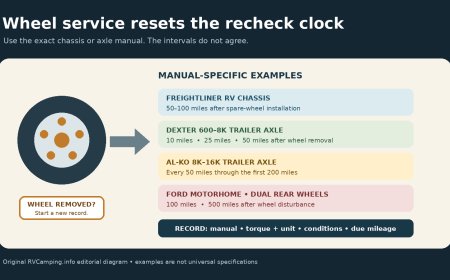
Four manuals, four different schedules
These examples are a comparison, not a substitute for the documents supplied with your RV.
| Chassis or axle manual | Trigger described in the manual | Recheck schedule |
|---|---|---|
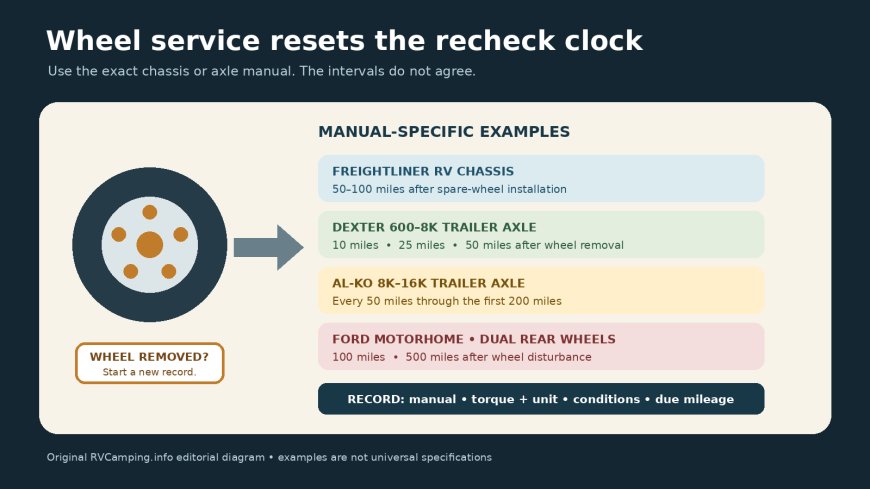
| Freightliner recreational-vehicle chassis | After installing a spare wheel in the manual’s flat-tire procedure | After 50–100 miles (80–161 km), using the correct specification and sequence from the chassis maintenance manual[1] |
| Dexter 600–8,000 lb. trailer axle | Before first road use and after every wheel removal | 10 miles, 25 miles and 50 miles; periodic checks afterward[2] |
| AL-KO 8K–16K trailer axle | New/first-trip seating period | Torque before departure, then every 50 miles for the first 200 miles[3] |
| 2024 Ford motorhome chassis with dual rear wheels | New vehicle operation and any wheel disturbance, including rotation, flat change or removal | 100 miles (160 km), then 500 miles (800 km)[4] |
The conditions matter as much as the mileage. Freightliner puts its 50-to-100-mile instruction inside the spare-wheel installation procedure. Dexter explicitly applies its sequence after each wheel removal. AL-KO repeats its 50-mile checks for 200 miles after a wheel has been reinstalled following brake service.[1][2][3]
Ford’s wording is different again. Its dual-rear-wheel instruction combines the new-vehicle schedule with the same 100- and 500-mile checks after a wheel disturbance.[4] An owner who follows a universal “50-mile rule” would miss Ford’s stated second checkpoint; one who waits 100 miles on a Dexter-equipped trailer would pass all three of Dexter’s early checkpoints.
What to do when two documents seem to disagree
First confirm that both documents apply to the same installed hardware. RV paperwork can include a generic coach manual, an axle booklet covering several capacities, a chassis manual, wheel-maker instructions and a service bulletin. Check the VIN, axle identification tag, wheel size and stud/nut system. Use the edition tied to that equipment.
Do not average the intervals or choose the number that is easiest on the route. Ask the chassis or axle maker, RV manufacturer or an authorized service facility to resolve the conflict in writing. Keep that answer with the maintenance record.
There is no safe generic RV torque value
Ford’s own motorhome table separates 19.5-inch and 22.5-inch wheels, then gives a specific instruction for two-piece flat wheel nuts: one drop of oil goes between the washer and nut, while the threads remain unoiled.[4] Dexter’s chart changes by wheel size, bolt circle, stud size and nut design. It also tells owners with wheels from other manufacturers to obtain the proper level from the vehicle maker and not exceed the axle-stud limit.[2]
That is why a campground neighbor’s number, an internet chart labeled “travel trailer,” or the maximum printed on a wrench is not a specification. Wet and dry instructions are not casually interchangeable. Nor should an owner substitute a breaker bar, impact gun or “one more pull” for the stated tool and method.
Record the value only after tracing it to the manual for the installed combination. Also record the unit. Foot-pounds and newton-meters are not the same number, and a transcription error can follow the RV for years.
A recheck is a procedure, not a roadside guess
The manual may require a sequence, multiple tightening stages, clean mating surfaces or a particular fastener condition. Dexter, for example, calls for the wheel fasteners to be tightened in stages and in its illustrated sequence. Ford warns that corrosion, dirt or foreign material between the wheel and its mounting surface can let the nuts loosen.[2][4]
Follow the applicable procedure exactly. If the specification or fastener condition is uncertain, stop and use a qualified facility. Freightliner notes that these assemblies are heavy and their lug-nut torque is high; its flat-tire section recommends calling a qualified service facility when possible.[1]
An owner should not turn a scheduled check into a wheel repair in a parking lot. Stop driving and arrange an inspection if you find a missing or damaged nut or stud, visible movement, elongated holes, a wheel that will not seat, fresh rust or metal around a stud hole, or a fastener that will not reach the specified result by the approved method. Do not keep tightening to make an abnormal condition disappear.
Plan the service route around the first checkpoint
Before wheel service, find a safe recheck location at the required distance. The right place is level, firm and out of traffic, with enough room for the RV and any slides or tow vehicle to remain closed and clear. A truck-tire or RV service shop along the route is better than a freeway shoulder.
For a towable with a 10-mile first check, that stop belongs in the service appointment plan. For a Freightliner chassis, plan within its 50-to-100-mile window. For the Ford example, record both 100 and 500 miles rather than relying on memory. If the trip will cross either threshold at night or in a remote area, move the wheel work or book the follow-up before departure.
Use the vehicle odometer where it accurately tracks the serviced motorhome. For a trailer, note the tow vehicle’s reading at the moment service ends, reset a trip meter, or use a dedicated trailer-distance record. Write down which method you chose so a later driver understands the numbers.
Wheel-service torque record card
Copy or print one card for every service event. If different axles or wheel systems have different instructions, use separate rows rather than squeezing them into one generic entry.
| Field | Record |
|---|---|
| RV year, make and model | ______________________________ |
| Chassis maker/model or axle maker/model | ______________________________ |
| VIN or axle ID/tag | ______________________________ |
| Wheel position(s) removed | LF / RF / LR inner / LR outer / RR inner / RR outer / trailer axle and side |
| Service performed | ______________________________ |
| Service facility and work-order number | ______________________________ |
| Manual title, edition/date and page | ______________________________ |
| Wheel size; stud and nut type | ______________________________ |
| Approved final torque and unit | __________ ft-lb / N·m |
| Thread/washer/mating-surface instruction | dry / specified lubricant and location / other: __________ |
| Required pattern or stages | ______________________________ |
| Starting odometer/date | ______________________________ |
| Recheck 1 due / completed / by whom | __________ / __________ / __________ |
| Recheck 2 due / completed / by whom | __________ / __________ / __________ |
| Recheck 3 due / completed / by whom | __________ / __________ / __________ |
| Later periodic requirement | ______________________________ |
| Movement or abnormal finding | none / stop and inspect: __________________ |
Take a photo of the completed card and the relevant manual page. Keep the paper copy with the work order. If a shop performs the recheck, ask it to record the result and technician rather than merely saying “lugs checked.”
If another driver takes over, review the open checkpoints during the handoff. A mileage due during that driver’s shift should be written on the route plan, not buried in a receipt. Close a row only after the specified check is completed; a visual walk-around does not replace a manual-required torque check.
The practical rule is short: identify the chassis or axle first, use its exact wheel instructions, and schedule every checkpoint before the RV rolls away from service. The mileage is evidence-specific. It is not folklore.
Sources
What's Your Reaction?